Refold Learning
this guide is copied from https://refold.la/roadmap/
Stage 0:Refold Philosophy
Welcome to the Refold Roadmap
Get Started
Immersion learning is very different from traditional methods. Before you embark on your language learning journey, you need to prepare. This section gives you a tour of the method, mindset, and tools that you’ll be using throughout the journey.
Method
Mindset
It’s important to have the right mindset going into the process. The following articles will help you unlearn broken methods of language learning and get into an immersion learning mindset.
Core Activities
Throughout your journey to fluency you’ll be relying on three core activities: active immersion, passive listening, and active study. Below, we’ve supplied an overview of each of these core activities.
Level Up
The goal of Stage 0 is to provide an overview of the Refold method. Once you’ve read through the articles you’re ready to move on to Stage 1.
0A: Language Acquisition
The linguist Stephen Krashen argues that there are two ways to develop language ability: acquisition and studying.
“Acquiring” a language means building an intuitive knowledge of the language. Acquisition is how we all learned our native language (NL). In our NL, most of us don’t know grammar rules: we just know what sounds right and what doesn’t. When speaking, we don’t have to think about grammar or vocabulary. We just think about the meaning we want to convey and the words flow naturally.
For example, if you’re fluent in English, you’d agree that the phrase “the big red dog ” sounds more natural than “the red big dog ”, but you probably aren’t aware of the complicated grammar rule that explains why.
” Studying ” a language, on the other hand, is the act of learning about the language. Learning a language solely through studying is known as the “skill-building” approach. Most language learning solutions focus on skill-building rather than acquisition. They teach you vocabulary and grammar as building blocks to construct sentences. Using this method, you can translate your thoughts from your NL into your target language.
No amount of skill-building will help you become fluent.
This may seem counter-intuitive. After all, this skill-building approach is how you learned every other subject in school. However, language is not like other subjects.
What sounds “right” or “wrong” in a language often doesn’t have any rhyme or reason. You may be able to translate a phrase, word-for-word, from English to Korean but it probably won’t make sense. Even if it does, it won’t sound natural. Language is highly specific in unpredictable ways. It is impossible to keep every grammar rule and language-specific phrasing in your head while trying to have a conversation.
Fortunately, your brain has a built-in mechanism for this exact problem. Every single one of us was born with the ability to naturally acquire language. Contrary to popular belief, this ability does not disappear when you become an adult. In fact, by pairing your mature analytical mind with your innate language acquisition ability, you can learn languages faster.
How Do Children Acquire Language?
Our brains are pattern recognition machines. This innate ability allows us to predict the future, appreciate music, and yes, learn languages.
Children learn language through exposure from their parents. Parents interact with their children, and narrate their experiences.
The ball rolled off the table. Are you hot? Here, let’s take off your sweater. Do you want the red one or the blue one?
Children acquire language because they understand the meaning behind the message. Over months and years of continuously hearing their parents speak to them, their brains decode the patterns, and they learn how to speak.
Replicating Acquisition
As adults, we don’t have a parent to talk to us 24/7, but we do have access to the whole of the internet. Using widely available media, we can emulate the language acquisition process that children experience.
In the next article, we explain each step of the process to acquire the TL of your choice.
- 1: Stephen Krashen uses the term “learning” to contrast with “acquisition”.Because the term learning is overloaded, we use the term “study” here.
- https://dictionary.cambridge.org/ja/grammar/british-grammar/adjectives-order
0A: Overview: The Refold Roadmap
Before diving into your language learning journey, let’s take a quick tour through what you’ll be working on in each stage.
There are 4 stages to achieving fluency:
- Build a foundation
- Develop comprehension
- Learn to speak
- Refine to mastery
Stage 1: Build a Foundation
The major advantage we have over child learners is that we can strategize, study, and use tools.
In Stage 1, you will use traditional language learning tools like flashcards, vocabulary lists, and grammar guides, BUT you will use them differently.
Instead of using these tools to learn how to speak, you will use them ONLY for understanding. You will only study one direction: from TL to NL. You will not attempt to speak or write (a.k.a. “output”).
Simultaneously, you will begin immersing in TL media (a.k.a. “input”).
The vocabulary and grammar you learn will immediately make your immersion more comprehensible. When your brain sees a word and understands it in immersion, you will start developing the instinct for how to use the word.
You can think of this process as building a little machine in your head that converts the foreign gibberish into pure meaning (a.k.a. “mentalese”). The combination of conscious study and immersion gives your brain all the tools it needs to build this machine.
Stage 2: Develop Comprehension
The key to developing comprehension quickly is to narrow your focus. Rather than randomly choosing TV shows or studying random vocabulary lists, you will choose immersion content that is the most comprehensible to you and only study vocabulary within that content.
In Stage 2, you will focus your conscious study on your immersion. By focusing your study on exactly what you need to understand your immersion, you create a feedback loop between the two, accelerating your language acquisition.
You will start with more comprehensible media, then build up in difficulty until you can understand native level content aimed at an adult audience. By starting with easier media, you can build a solid foundation of understanding and enjoy the media you’re immersing with.
Once you’ve attained a decent level of comprehension, you will narrow your focus and master a small subset of the language. Once you have near-perfect comprehension of this small subset, you will be ready to speak.
Stage 3: Learn to Speak
If you’ve ever tried to learn a second language, you know that speaking a language learned through ” study ” is exhausting while speaking your NL is nearly effortless.
One of the coolest parts of acquisition is the moment when your brain starts outputting naturally. Suddenly, when you’ve received enough comprehensible input, the little machine in your head starts to run in reverse. Your TL will start spilling out of you.
Once you reach this point, you’re ready for output. You’ve spent all this time building a pool of latent ability through input. The next step is to convert that latent ability into output ability.
In Stage 3, you will deliberately expose yourself to situations that force you to output: writing, then speaking. Exposing yourself to these situations causes your brain to search through your pool of acquired language and make those words and phrases available to you for output.
Sometimes, your brain won’t be able to find the right thing to say. These moments show you where you haven’t yet acquired the necessary language. Armed with this knowledge, you can target your immersion and fill in the gaps. This output/input loop allows you to quickly achieve basic fluency.
Stage 4: Refine to Mastery
By this point, you will have acquired the language to a B2 level and will be able to comfortably understand and communicate.
If you want to go beyond B2 level, repeat stages 2 & 3 with more areas of the language. Each time you repeat those steps, the process gets easier. Pretty soon, you’ll be at a C1, C2, or native level of fluency.
Starting Is Half the Battle
The other half is to keep showing up.
Learning a language takes time, but it’s not complicated. The challenge of language learning isn’t like learning calculus. It’s more like losing weight. There’s no single thing that’s difficult, but you have to be consistent in your effort over months and years.
The rest of Stage 0 will focus on helping you adopt the mindset and habits that will make this consistency possible.
0B: Enjoy the Language
Popular language learning apps like Duolingo and Babbel focus on making the language learning process fun through gamification and cute graphics. What they fail to do is make the language itself fun.
Having fun in your target language is the only way to acquire the language. If you hate the content you are immersing with, it doesn’t matter how hard you try, your brain won’t absorb the language.
Enjoying your immersion content is THE MOST important part of language acquisition.
Enjoyment helps in two ways.
Fun Is More Motivating Than Work
Many language learners give up because the process takes a lot of work over a long time. However, if you can find content you enjoy and that you want to consume, then it stops feeling like work.
When you enjoy your immersion, it will keep you coming back for more. Enjoyment reinforces your desire to spend time with the language.
Boredom, on the other hand, detracts from your desire to spend time with the language. If you get bored with a TV show or book, then move on to the next one. There is nothing more detrimental to motivation than forcing yourself to consume content you hate.
Do not force yourself to immerse with content you aren’t interested in.
Enjoyment Catalyzes Acquisition
When you find your immersion content compelling you will lose yourself in the story. The language fades into the background and you engage fully with the content.
This flow state is the optimal acquisition experience for your brain to soak up the language. The more interested you are, the more engaged you’ll be, and the faster you will learn.
If you aren’t engaged, your mind will wander and you won’t acquire anything. The boredom you feel will cause your brain to filter out the language entirely.
In Stages 1 & 2, you won’t yet have the language ability necessary to lose yourself in the content, so it can be hard to stay engaged. Don’t worry: there are other ways to enjoy content even if you don’t understand it. We provide tips and exercises at each stage that will help you stay engaged.
A word of advice: The Refold method is just a guide. It is far more important to follow your interests than to adhere to our plan. If you are compelled to read a book before you’ve reached “Stage 2C: Reading”, then, by all means, go for it. No need to wait. Your intrinsic motivation to consume that content will drive your language acquisition more than any learning method, including this one.
0B: Tolerate the Ambiguity
Traditional learning in school is based on the idea that you should strive for perfection. You are graded out of 100% and any deviation from perfection is punished by a lower grade, a lecture from your teacher and parents, or detention. This teaching mentality trains us to avoid situations outside our comfort zone where we might feel incompetent.
The experience of not understanding a foreign language is jarring. When faced with this challenge of incomprehensible input, it is natural to feel stupid, get frustrated, and shut down. These negative emotions hurt your motivation, and they also make it difficult for your brain to absorb the language. This phenomenon is called the ” Affective Filter Hypothesis ”
Language education in school attempts to solve with this problem by sheltering you. They encourage students to learn through skill-building before moving on to “real” language so that they won’t feel the pain of not understanding.
Skill-building DOES NOT WORK for language acquisition.
Waiting until you’re confident doesn’t make any sense. To illustrate why, let’s look at the skill of swimming. You can’t learn how to swim by studying. No amount of theoretical knowledge will teach you how to swim. If you want to learn, you have to jump in the pool and figure it out.
Same with language. No amount of studying vocabulary and grammar will prepare you for the real language. People in the real world mumble, use slang, speak quickly, and slur their words. To understand them, you have to jump in and figure it out.
Between jumping in and figuring it out, you might feel like you’re drowning. The hardest part of learning a language is accepting your own incompetence and tolerating the ambiguity of a language you don’t understand.
How to Build Tolerance for Ambiguity
First off, stop calling yourself stupid. Stop saying “I’ll never get this”. Just because you don’t understand yet doesn’t mean you never will. The more you insult yourself, the worse you’ll feel, and the harder it will be to learn.
Reframe the problem: the issue is not that you “don’t understand”, it’s that you can’t accept not understanding. It’s OK to not understand. It’s a natural and necessary part of the process. Make peace with it.
Don’t look up every word. When you are uncomfortable with the ambiguity, you may be tempted to look up every unknown word in order to understand. Resist this temptation. Constant interruption breaks the flow of your immersion and hampers your brain’s process of absorbing the language.
Start slow. You aren’t used to not understanding. You may even get a headache. Give yourself time to build endurance. Pretty soon you’ll be able to watch an hour-long TV show without a problem.
Celebrate the wins. Maybe you hear a new sound or word. Maybe you understand a whole sentence. Celebrate these moments.
Most important of all: remember to enjoy yourself.
0C: Active Immersion
Active immersion means paying full attention to the content that you are consuming, whether that is listening to audio, watching audiovisual media, or reading written material.
Active immersion is THE most important activity in language acquisition.
When you first start immersing, your brain will discard most of the information because it doesn’t think that information is important. Focusing intently on target language (TL) content signals to the brain that it needs to start paying attention.
It may feel odd and unproductive to spend time watching TV in your TL. Rest assured : it’s not a guilty pleasure. It is where language acquisition happens. Even when something is largely incomprehensible, your brain is hard at work, looking for patterns, testing hypotheses, and building your internal language machine.
It is critical to find content that appeals to you. Compelling content will draw you in and keep you engaged. You will be able to spend longer stretches of time immersing, and crucially, it will keep you coming back again and again—long enough to learn the language. If you get bored with something, then let it go and move on to something more exciting.
Each stage of the roadmap prioritizes different immersion activities that develop specific skills. We will provide guidelines at each stage on the recommended quantity and type of immersion.
Finding Content
When searching for TL content, start with the same places you already consume native-language (NL) content. Try to replace your NL consumption with TL consumption.
Netflix and Other Streaming Sites
Try out various genres of movies and serial shows to get a sense for what you might like.
YouTube
Whether it’s cooking, knitting, mountain biking, lock-picking, travel diaries, or any other topic of interest—YouTube almost certainly has a wealth of content for you in your TL.
Other Platforms
For some languages, there will be other platforms and products that provide a good source of content: you should be able to find them with a quick Google search.
Tools
Language Learning With Netflix (Chrome Extension )
This shows both the TL subtitles and your NL subtitles at the same time. It allows you to pause automatically on every subtitle segment, as well as to blur the NL subtitles so that they only show if you need them. It also includes a built-in dictionary that you can use with the subtitles on the fly
Dedicated TL YouTube Account
To help break away from your NL, you can create a YouTube account that you only use in the TL.
Set your location to a country that uses the TL, and change the default language for the account to your TL. This will cause YouTube’s algorithm to prioritize content in your TL.
On the home page, teach YouTube to not show you content in your NL by clicking “Not interested” or “Do not recommend this channel” on videos that are not in your TL.
Dedicated TL Immersion Device
If you find yourself easily distracted by NL email, NL social media accounts, and other NL habits, you may want to try having a tablet or other device that is only used for spending time in you TL.
0C: Passive Listening
As noted in the last article, active immersion is the most important activity in language acquisition. Unfortunately, busy people can’t always fit a lot of active immersion into their daily lives. Fortunately, there are lots of opportunities in your day to passively listen to your target language (TL) during mindless tasks like cooking, cleaning, commuting, or exercising.
We call this ” passive listening” because you are not 100% focused on the content. Your attention is split between multiple activities.
You might currently use music or podcasts as entertainment during these mindless tasks, but we advise you to reclaim this time for language learning.
The key to passive listening is to make it a habit. Every time you reach for audio to listen to, your first choice should be your TL. We advise at least 30 minutes per day of passive listening. 30 minutes per day quickly adds up to a lot of extra immersion hours that accelerates your comprehension.
Choosing Listening Content
We recommend re-listening to content you have actively immersed with. Your brain benefits from repetition because it gets another opportunity to parse sounds and words. Unfortunately, repetition is boring and boredom is the enemy of learning. Passive listening is an easy way to give your brain a second chance to listen to the same content you’ve already actively immersed with.
You won’t understand much in the beginning so it is important to learn how to tolerate ambiguity and keep listening anyway. Listening to content you’ve already watched can help keep you interested because you will remember the story even if you can’t understand the words.
In the beginning, you should focus on hearing the sounds of your target language. You may not feel anything happening, but your brain is subconsciously learning how to parse the foreign sounds.
As your vocabulary and listening ability improve, you will understand more of your passive listening content. Eventually, you will be able to listen to fresh content like podcasts, audiobooks, and talkshows.
Remember, boredom is the enemy of learning. If you get bored with your passive listening content then trade it in fun!
0C: Active Study
As adults, we have the ability to study grammar and memorize vocabulary. This gives us an advantage over child learners. Grammar study shows us how to break down the language into parts for easier comprehension. Meanwhile, memorization prepares us to acquire the language in three ways: priming, comprehension, and retention.
Priming
Have you ever bought a new car and then started seeing the same model everywhere? This is called the Frequency Illusion.
When you learn a new word, your brain creates a “mental dictionary entry”. This dictionary entry primes your brain to notice the word in immersion. Every time you encounter the word, your brain will put a little more information into this dictionary entry you’ve created. Once you see the word many times, your brain can deduce the meaning and usage of the word.
Comprehension
Remember, we acquire language through comprehensible input. When you memorize the meaning of a word, you add a definition to the mental dictionary entry. Armed with this definition your input becomes more comprehensible. The more you comprehend, the more you acquire.
Retention
Forgetting is a natural process of the brain. Every piece of information in your brain is slowly rotting away. The brain has an aggressive pruning mechanism that deletes everything that isn’t important to you. If you want to keep a piece of information, then you need to refresh and reinforce it occasionally.
Once you’ve learned a word and seen it many times in your immersion, it will get acquired. Acquired vocabulary is resistant to your brain’s pruning and takes a long time to be forgotten.
Unfortunately, if you don’t see the word often enough in your immersion, your brain might delete the entry before the word gets acquired. Reviewing these fragile entries occasionally helps retain words long enough for you to acquire them through immersion.
Once you’ve acquired a word, the memory will be strong, but it’s not invincible. To retain words long term, you need to review them around once per year through immersion or study.
Intelligent Memorization
Many of us have used flashcards to memorize words and concepts for school, but these are ineffective for long-term memorization. You eventually forget whatever you don’t review.
In order to retain a word in your long-term memory, it needs to be reviewed occasionally. How often depends on how well you already know it. Ideally, the best time to review something is right before you forget it. If you review a word at these optimal intervals, you can remember enormous quantities of information with minimal review.
Enter the SRS
A spaced repetition system (SRS) is a program that intelligently predicts when you are likely to forget a piece of information. It shows you this information before you forget so you can retain and strengthen your memories.
When you first learn a new word, the associated memory is weak, so the SRS will show it to you often. Over time, as the memory grows stronger, the SRS will show the word to you less and less often. Eventually, you only review the word once per year (or longer) to keep it in your memory.
Anki: The Chosen SRS
Anki is a digital flashcard program based on the SRS concept. It is currently the best option on the market for spaced repetition systems.
Studying in Anki has two components: learning new cards, and reviews.
The first step to memorizing a word is to create the mental dictionary entry for that word. In Anki, this takes the form of “new cards”. Anki lets you choose how many new cards you want to learn each day. Once you have learned a card, it transitions to being a “review card”.
Each day, Anki creates a list of cards you are likely to forget soon. Some may be recently learned. Others, you may not have seen for months or years. You don’t get to choose how many reviews are assigned for that day because you don’t get to choose when your brain deletes information. It is important to keep up with reviews or you will forget.
Anki works extremely well, but ultimately, the algorithm can only guess when you’re going to forget things; it can’t know for sure. Some things always slip through the cracks.
This is why Anki asks for your feedback. When you study a card, you’re asked to grade yourself on how well you remembered it. This feedback is used to determine the next time you should see the card.
If you tell Anki you remembered a card well, you won’t see that card for longer than the last time. If you tell Anki that you didn’t remember, you’ll see the card again soon so you can refresh your memory.
Your retention rate refers to the percentage of cards that you successfully remember when reviewing. Anything within the 80%~90% range is great.
In Stage 1, you will set up Anki and begin studying your first set of vocabulary words.
Stage 1: Lay the Foundation
Overview
Learning a language doesn’t happen overnight. It takes a while, so it’s important to build a solid foundation of skills, tools, habits, and knowledge that will prepare you for the journey.
Stage 1 has three parts:
- A) Setting Up Tools and Habits
- B) Learning the Building Blocks
- C) Jumpstarting your Comprehension
By the end of Stage 1, you will be ready to learn directly from native content.
Stage 1A: Setting Up Tools and Habits
As noted in Stage 0, there are three core activities that we use throughout the entire learning process: active immersion, passive listening, and active study.
Since these are daily activities, it’s important to integrate them into your routine. Stage 1A is focused on setting up the tools and habits to support these daily exercises.
By the end of Stage 1A, you should have Anki set up and you should be immersing with Target Language (TL) content.
Stage 1B: Learning the Building Blocks
Each language has its own sounds and writing system. Even languages with a shared writing system have different pronunciations and phonetic rules. Before jumping into learning vocabulary you need to understand the sounds and writing systems of your TL.
Learning the sounds of your TL will help with listening comprehension, but more importantly, it is a prerequisite for learning vocabulary. It’s much easier to learn words if you know what they sound like.
Meanwhile, learning the writing system allows you to build your reading ability and associate those sounds with text.
In general, if your native language (NL) and TL are similar (for example, English and Spanish), this substage will only take a few minutes. If the languages are vastly different (for example, English and Japanese), this substage can take a few months.
The goal of Stage 1B is not to understand these concepts perfectly: just aim for general awareness.
By the end of Stage 1B, you should be aware of the phonetics of your TL and should have started or completed studying the writing system. For languages with vastly different writing systems than your NL, you should have set up a daily habit of studying the writing system.
Stage 1C: Jumpstarting Your Comprehension
So far your TL has been incomprehensible. In Stage 1C, your focus will shift to learning the most common vocabulary and grammar of your TL to build up your comprehension.
As you learn more grammar and vocabulary, you’ll start understanding more of your immersion content. By the time you finish with the 1,500 most common words, you should be able to recognize at least one word in almost every sentence you read or hear.
By the end of Stage 1C, you should be studying grammar and vocabulary on a daily basis.
Graduating to Stage 2
The goal of Stage 1 is to prepare you to learn directly from your immersion.
Before moving on to Stage 2A, you should feel comfortable enough with your TL’s writing system that you can do lookups when reading subtitles.
You should be engaging with your TL every day and feel comfortable watching media that you don’t understand.
You should also be regularly studying vocabulary, though you don’t need to finish learning all 1,500 words before moving on to Stage 2A.
See you in Stage 2.
1A: Active Immersion
As mentioned in Stage 0, active immersion is, hands down, the most important activity in learning your target language (TL).
During active immersion, you will focus all your attention on the content you are watching, listening to, or reading. This intense focus signals to your brain that it should start paying attention to the TL.
In the next stage (Stage 2), you will be watching TL content without native language (NL) translation. This can be challenging for two reasons:
- You currently have a habit of watching only NL content.
- Watching TL content requires you to accept your inability to understand.
Changing Your Content Habits
In day-to-day life, we eat, breathe, live, and entertain ourselves with NL content. It’s what we grew up with, it’s only natural. Most people aren’t used to consuming content they don’t understand. Especially not in other languages.
Learning through immersion means consuming content you don’t understand and aren’t quite comfortable with, at least at first.
It takes hundreds of hours of watching, listening, and reading for your brain to make sense of your TL. The more you immerse with your TL, the more quickly you progress. To accumulate those hours, you will need to reduce time spent with NL content to make room for TL content.
To get started, aim for at least 30 minutes per day of active immersion in your TL.
During this phase, you should explore the available video content in your TL. Explore different types of media: cartoons, anime, serials, dramas, movies and so on. Shop around. Try different genres, and get acquainted with the tropes. If you find a director or scriptwriter or actor you like, watch more of what they’ve made.
Try things that you would never watch in your NL. Explore the culture. You may be surprised by the culturally specific content you enjoy.
When you discover things you really like, make a note of them. In Stage 2 you will start learning directly from the immersion material on this list.
Tricks to help you get started:
- Create a separate YouTube account. Take advantage of YouTube’s recommendation algorithm.
- Watch with NL subtitles to help you enjoy your immersion as you build this new habit.
Accepting Ambiguity
If you haven’t read the article on tolerating ambiguity, STOP and read it before reading the rest of this article.
One of the hardest parts of language learning is not understanding your TL. It can make you feel stupid, depressed, and frustrated. Don’t let this discourage you. This is a natural part of the process that everyone goes through.
These negative emotions stop your brain from learning the language. This phenomenon is called the Affective Filter Hypothesis. It’s important to work through the emotion so you can enjoy your immersion.
It is impossible to skip this phase of learning. Working through the ambiguity is a necessary part of the language acquisition process, but don’t worry. Remind yourself that it’s only temporary and that you will get through it.
 By the end of Stage 1, you will have trained yourself to be comfortable with not understanding.
How to Accept Ambiguity
When first getting started, it’s OK to use NL subtitles to aid your understanding and help you avoid frustration. Watching with NL subs doesn’t directly help with language learning, but it does help you build a habit of consuming TL content and builds a body of content you can rewatch later. You should move away from NL subtitles once you are comfortable with the daily habits laid out in this stage (1A).
Once you remove NL subtitles, it will be harder to follow the plots of the shows you watch, so you will need to learn to tolerate the ambiguity of not knowing exactly what’s going on. Here are a few things you can do to help you build a tolerance to ambiguity:
Limit NL Subtitle Usage
The tool Language Learning with Netflix can be configured to blur NL subtitles. This way, you are prevented from seeing the translation unless you really need to.
 Try to limit the number of subtitle lines you look at. For example, only look at ten translations in a 30- minute episode of a show. Reduce this number until you can watch an entire episode without checking the translations.
Rewatch Content
We all have favorite shows where we know the story, characters, and dialogue by heart. Netflix has many of these shows dubbed in various languages. Pokemon, for example, is available in 15 languages. Try watching these in your TL. Because you are already so familiar with the show, you can stay engaged even without understanding the words. This allows you to focus your attention on the language rather than trying to follow the story.
Watch Simpler Shows
Children’s shows and sitcoms usually provide a lot of visual context to support your understanding. This can help you follow the story even if you don’t understand the words.
This can also be an opportunity to watch culturally significant shows. These are shows that get referenced in other media and in daily life. A quick Google search will uncover which shows native speakers your age used to watch.
Note of advice: don’t force yourself to watch children’s shows if you don’t enjoy them. Enjoyment is more important than comprehensibility.
Make It a Game
In order to stay engaged with incomprehensible content, you can create minigames for yourself:
-
Focus on the sounds. Try to focus on the sounds of the language rather than the meaning. In Stage 1B: Phonetics, you will learn that your TL has sounds that your brain can’t hear yet. Try listening for these sounds.
-
Listen intently to the words. Try to identify where one word ends and another begins. Make mental notes of what it sounds like when two words blur together.
-
Search for known words As you learn vocabulary, search for these words in your immersion. See how many known words you can pick out.
1A: Create a Passive Listening Habit
As mentioned in Stage 0: Passive Listening, you can accelerate your listening comprehension by listening to your target language (TL) while doing mindless tasks like cooking, cleaning, or commuting.
Your brain needs a lot of audio input to learn how to parse the sounds of your TL, and when first starting out, you may need to hear the same thing several times before the brain is able to pick out and distinguish the sounds. Passive listening is a way to provide that quantity and repetition.
Passive listening is a core activity throughout the language acquisition process, so it’s important to set up a good workflow in the beginning.
There are two habits necessary for effective passive listening:
Listen During Mindless Tasks
Take a moment right now to think about when you can fit passive listening into your day. Some common opportunities are:
- While commuting or traveling.
- While walking or exercising.
- While cooking, cleaning or doing household chores.
- During your morning routines, such as while walking the dog or eating breakfast.
- During your bedtime routine, such as while brushing your teeth, or falling asleep.
Make a plan for when you will reach for passive listening and what tools you’ll need (for example, an audio playlist on your phone and a set of headphones). One simple setup is to open YouTube or Netflix on your phone and listen to something you’ve already watched.
Make Listening Easy
In order to make the habit as effortless as possible, it’s important to have a passive listening playlist ready at all times.
Although it’s easy to passively listen to Netflix or YouTube videos, both apps require the phone to be unlocked. Instead, we advise you to create a local playlist on your phone that is always on repeat.
Passive listening content can get boring, so it’s important to frequently add new content and remove old content from your rotation. Every week or two, set aside time to extract audio and put it on to your phone for easy access.
How to Make a Playlist
Download Content
You may not always have an internet connection so it’s important to download the content you want to passively listen to.
Youtube
- JDownloader: a program that easily downloads audio and video.
- youtube-dl: a command-line tool for downloads.
- Y2 Mate: a website for downloading YT. There are many of these websites.
- NewPipe: An Android app that replaces the YouTube app and allows you to download videos
Netflix
- FlixGrab: A program to download Netflix shows (Windows Only)
Extract Audio
Extracting audio from video is key to creating a passive listening playlist.
For those that aren’t confident with technology, there are easy-to-use online audio extractors. If you are comfortable with technology, then here are a few programs you can use to extract audio:
Online
Mac
- QuickTime Player (pre-installed)
- FFmpeg Command Line
PC
- VLC: A media player that can extr#act audi#o
Load Audio onto your Phone
Guides provided below:
Optimizations
Once you have a good habit of listening to TL audio, there are a few optional optimizations you can make:
Upgrade your headphones to be more convenient (e.g. wireless, noise-canceling, bone conducting)
Condense audio for higher dialogue density. Explanation video
Note: For Mac and Linux users, the tool SubStudy replaces Subs2Srs
Use a separate MP3 player for the ideal passive listening setup. Explanation video
Content Recommendation
The primary goal when choosing passive listening content is to find something that will hold your interest. Listening to audio from TV shows you’ve already watched helps because you already know the story.
Another option is to listen to a TL audiobook of your favorite novel. If you already know the story by heart, it’s relatively easy to follow along with an audiobook even if you only understand a few words.
Music is not a good passive listening choice. Though entertaining, its learning value isn’t very high. The lyrics often don’t make sense and are easily confused. Think about how often you mishear lyrics in your NL.
If you love listening to music, then TL music is better than nothing, but we encourage you to branch out into dialogue or narrative audio instead.
If you get bored with what you are listening to, then switch to something else. Follow your interests.
Boredom is the enemy of language acquisition.
How to Stay Interested in Gibberish
When you first start passive listening, you won’t understand anything. Your mind will wander and that’s OK! It’s a natural response. Your brain filters out “unimportant” sounds, so you’re likely to get bored and jump to another train of thought.
To keep your brain engaged, try the following exercises:
- Focus on hearing the sounds instead of the words.
- Try to hear where one word ends and another word begins.
- Don’t worry about meaning yet.
As you learn new vocabulary, scan the audio to try to hear that new vocabulary being used.
1A: Basic Anki Setup
As explained in Stage 0: Active Study, we’ll be using a spaced repetition system (SRS) to actively study target language (TL) vocabulary.
There are many different SRS programs, but we recommend Anki. It’s multi-platform, rich with features, and free on most platforms. The only downside is that it can be difficult to learn how to use. If you find yourself confused about how Anki works, don’t worry: you’ll get the hang of it after a week or two. The bulk of this article will focus on explaining the basics of Anki. To help you get things up and running as quickly as possible, we won’t go into exactly what all the settings do or all the logic behind our recommendations.
Towards the end of the article, we’ll also provide some resources for advanced users who want to understand the behind-the-scenes of Anki more deeply.
Installation
The newest stable version of Anki can be downloaded from the Anki website. The desktop version is completely free and is compatible with Windows, Mac, and Linux.
There is an official iOS app, AnkiMobile, which can be purchased from the app store for $24.99 (price varies per country). There is a 3rd party Android app, AnkiDroid, which is available for free on Google Play. There is also an official fully-online version of Anki: AnkiWeb.
AnkiMobile, AnkiDroid, and AnkiWeb are great for reviewing cards, but the interface for creating cards is limited. For now, we’ll focus on how to add new cards on the desktop version.
The rest of this article will focus on setting up the desktop version of Anki.
The Building Blocks of Anki
Decks
 When you open up Anki, the first thing you see is your list of decks. Initially, you will only have one deck: ” Default ”.
Decks are essentially groups of flashcards. When studying, you study one deck at a time.
You can create a new deck by pressing the “Create Deck” button at the bottom. You can have as many decks as you want, and there is no limit to how many cards can be in a single deck.
In general, we recommend putting all your cards into one or two decks. Splitting your cards up into many decks makes answering cards artificially easier. For example, if you had a deck just for “animal names”, when reviewing cards in that deck, your brain would automatically know that the answer must be an animal name. This “hint” would make recalling the answer easier. Since you won’t have these sorts of hints to rely on in real life, it’s best to practice without them.
Notes and Cards
The distinction between notes and cards is probably the most confusing aspect of Anki. If it doesn’t make sense at first, don’t worry. To start using Anki you only need to know that these exist. Over time, it will make more sense.
The most basic unit of Anki is a “note”, which is an abstract idea. You can’t touch and hold a note, which makes it all the more perplexing.
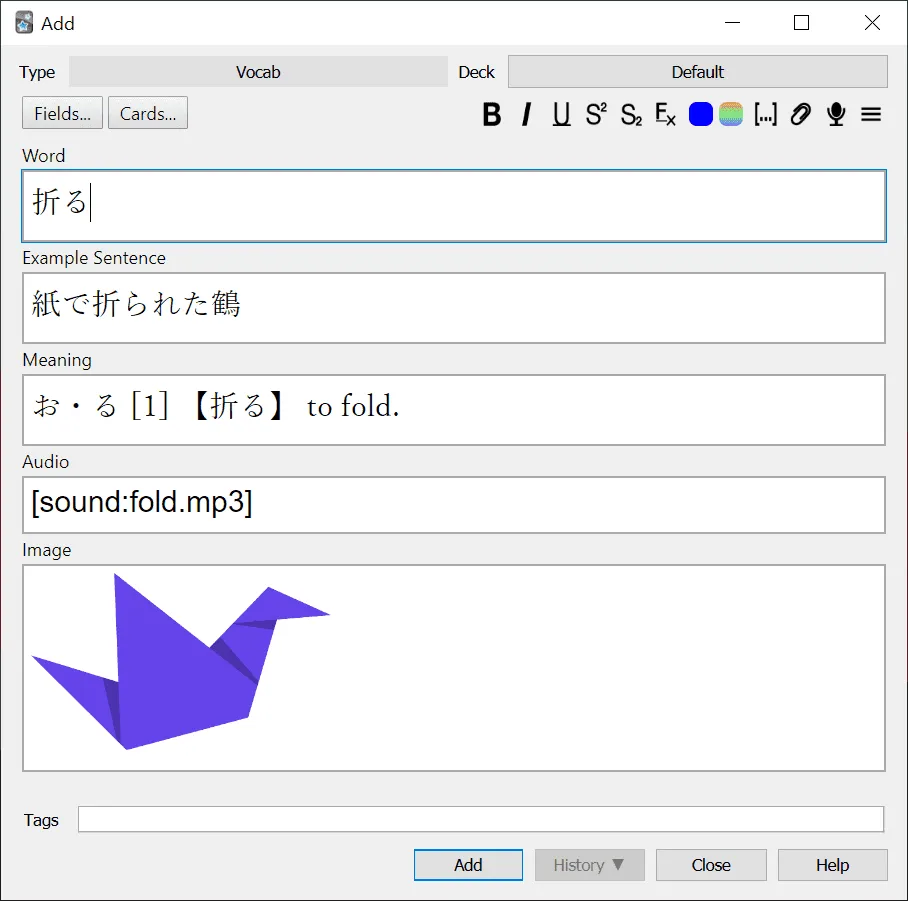 A note is a collection of data that belongs together.
As an example, you could have the following five pieces of data:
A note is a collection of data that belongs together.
As an example, you could have the following five pieces of data:
The written form of a word in your target language
A sentence that uses the word in context
A rough translation of the word in your native language
The audio of a native speaker saying that word
A picture that you found on Google Images when searching for the word
So a note is these five pieces of data, bound together (invisibly).
These values get turned into flashcards (or “cards” in Anki’s terms). These are the cards that you review on a day-to-day basis.
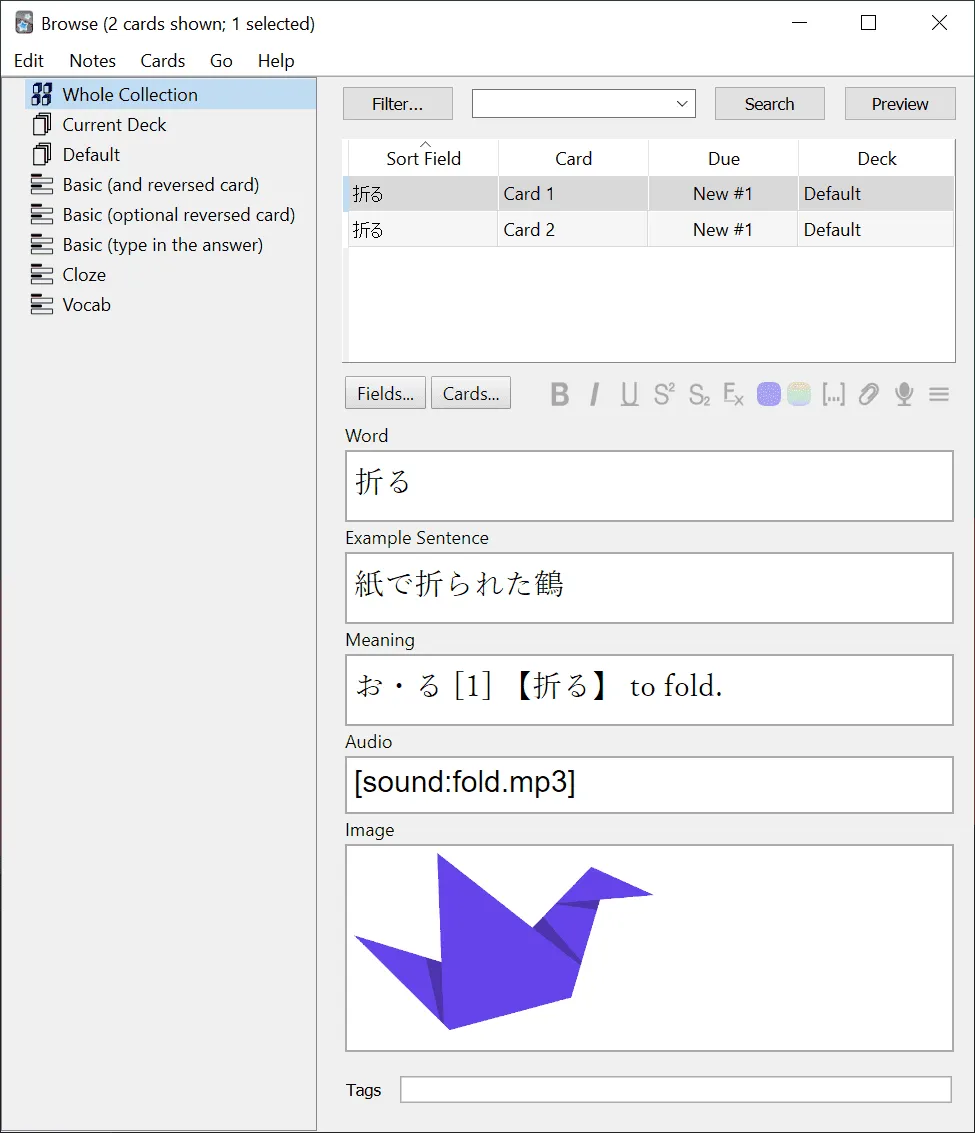 To summarize: a note is a collection of data, and that data is used to generate one or more cards.
You might be wondering how these cards get created, which brings us to yet another abstract concept: note types.
Note Types
 A note type is even more abstract than a note, and you will be forgiven if you are confused right now.
A note type is a blueprint for notes. It consists of:
A name
A list of fields
A collection of card types
To reprise the example from above, the name of the note type might be “Vocabulary”, because it is used to create notes that will generate vocabulary cards.
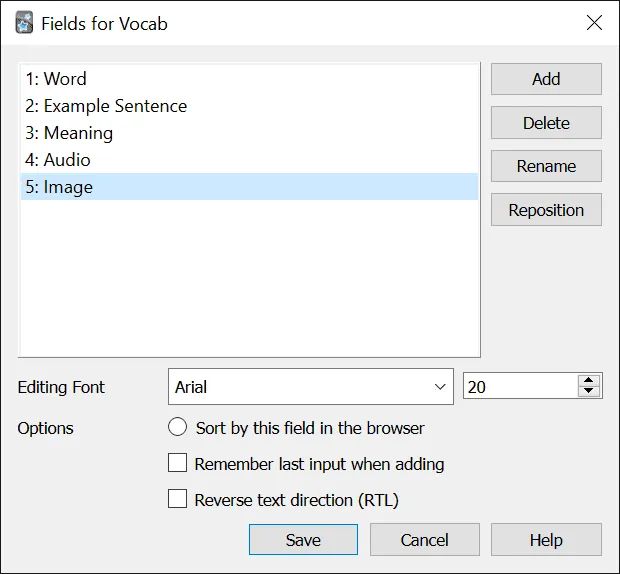 The list of fields could be:
Word
Example Sentence
Meaning
Audio
Image
Each field is the placeholder for the data that will be stored in the note.
Card Types
Card types are visual templates that Anki fills in with data to generate cards. This is where you decide what the card will look like and what data will go on the front and back of your cards. Anki lets you create multiple card types for a single note type, but we don’t recommend doing this.
To Summarize
The Note holds the data.
The Card is what you review.
The Note Type describes what data the note can hold.
The Card Type configures what is shown on the card.
If a change is made to a note type, all cards associated with that note type will instantly change as well. If a change is made to a card type, then all cards associated with it will also change.
Anki comes with five note types. You can modify these note types, as well as create new ones from scratch. To modify or create note types, go to “Tools > Manage Note Types” from Anki’s main window.
Adding Cards
 Anki doesn’t come pre-loaded with any material to learn.
Instead, you either make your own cards or import a deck of pre-made cards.
Anki doesn’t come pre-loaded with any material to learn.
Instead, you either make your own cards or import a deck of pre-made cards.
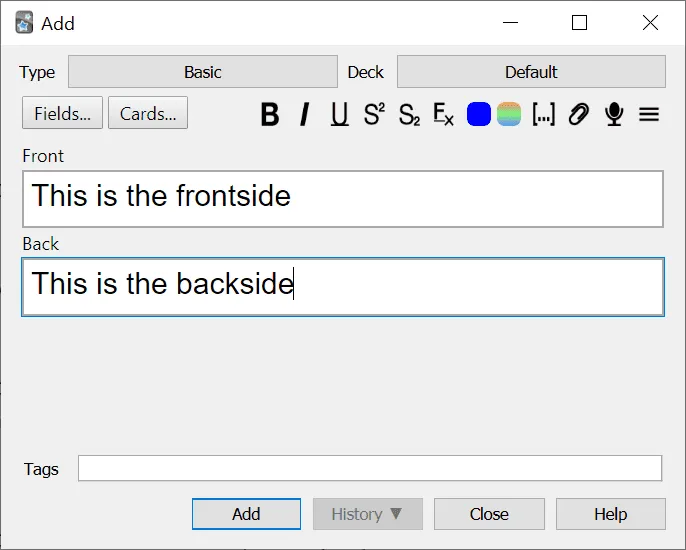
To create new cards, open up the add window by clicking “Add” at the top of Anki’s main window.
At the top of the add window, you can select which note type you want to use, and which deck you want the card to go into. Then fill in the relevant fields and press “Add”.
Pre-made Decks
In addition to making your own cards, you can download decks made by other people from the Anki website.
Because every card is always associated with a note type, when you add someone’s deck to your collection, it will usually come with a new note type. This note type will be added to your collection, and you will be able to use it when making new cards yourself.
Browser
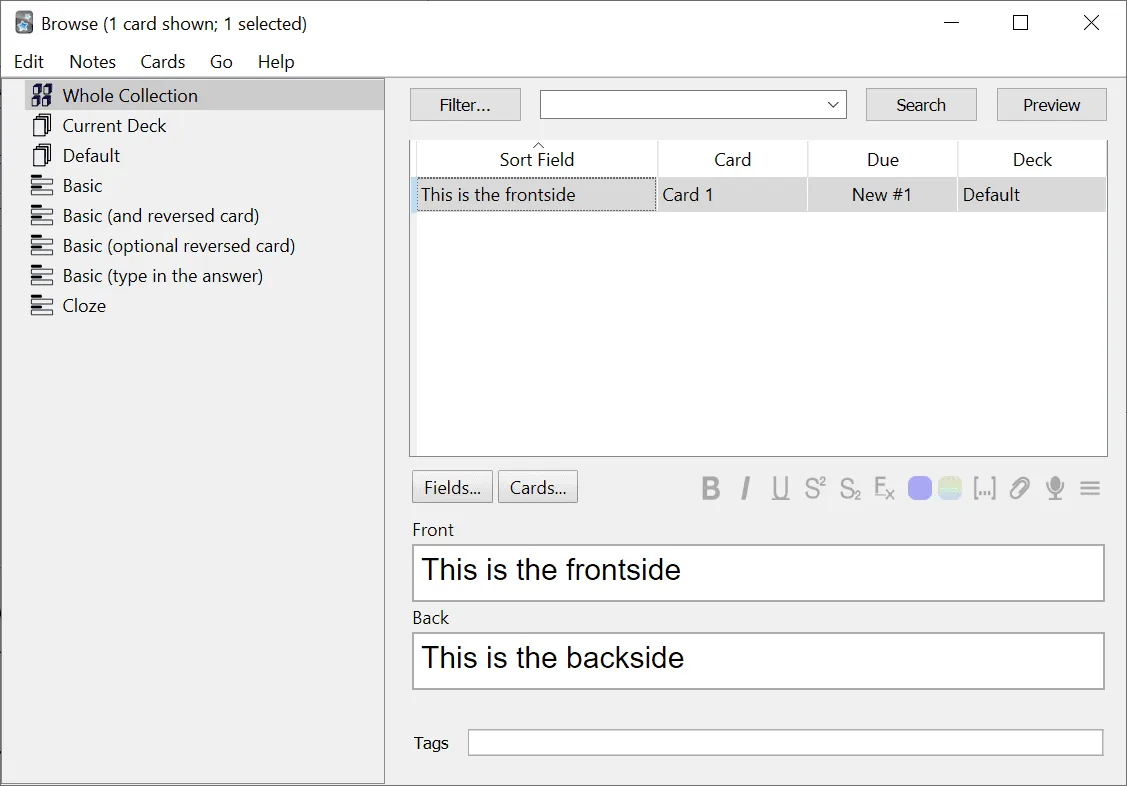 The browser is where you can view all the cards in your collection and make any necessary changes.
To open the browser, click on “Browser” at the top of Anki’s main window.
When looking for cards in the browser, you can filter by deck, note type, or tags. You can also use the search window.
You can modify the content of a card’s field simply by selecting it in the browser. To delete a card or move it into a different deck, right-click on the card and select the relevant option.
Preferences
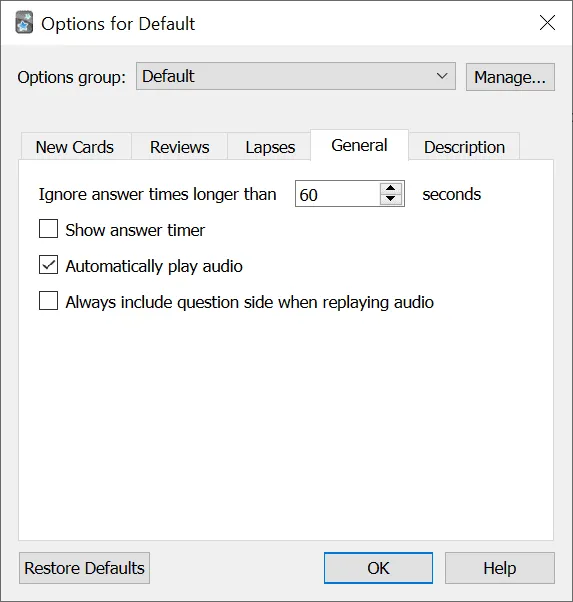
Preferences are global settings that affect the entire Anki program. You can access preferences by going to “Tools > Preferences…” on Anki’s main window.
There is one setting in Preferences we recommend changing: “Show next review time above answer buttons” in the Scheduling tab. When this is turned on, when reviewing cards, an estimate of the next time a card will be shown is displayed above each answer button. This can make you second-guess your memory and grade cards too conservatively. It’s better to trust the algorithm and not worry about the specific numbers.
If you would like to sync your Anki collection with an AnkiWeb account, you can set that up in the “Network” tab. This will let you sync to Anki on your other devices.
Options
Options are where you customize the specifics of how Anki’s algorithm works. Options are set on the level of individual decks.
At the top of the options window, you can see which “options group” is being applied to the current deck. An options group is a set of options. You can create an option group for each deck, or have multiple decks share a single options group.
If you use multiple decks, we recommend creating a separate options group for each deck. You can create a new options group by pressing “Manage..” on the top right, and selecting “Add”.
Recommended Options Settings
The default options settings that Anki comes with are very problematic. It’s important to adjust them to something more suited to language learning.
Below are the options settings we recommended using:
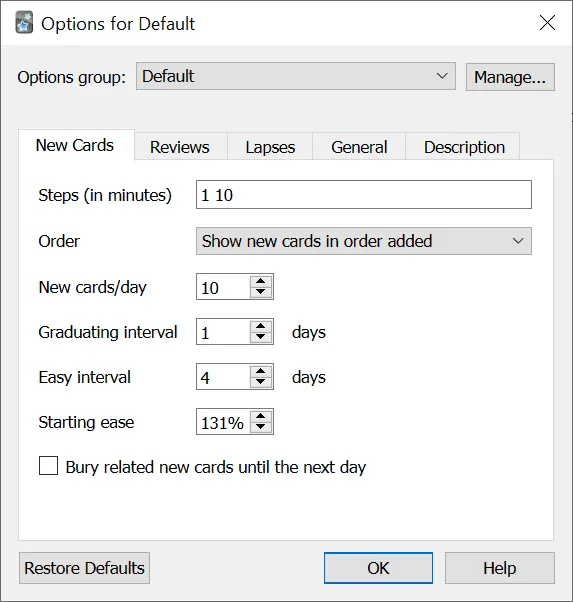
The only option we recommend personalizing is the “New cards/day” setting in the “New Cards” tab. This option controls how many new cards Anki will show you each day. We will explain how to determine what value to set this to in a later article.
Fixing Old Settings
If you’ve been using Anki for a while then you’ll need to update older cards and remove older addons.
To update older cards, use the Refold Ease add-on. The default settings of Refold Ease are good enough (though we are aware of the 1% discrepancy on interval modifer).
If you have any of the following addons installed, they should be removed:
No Penalties or Boosting
ResetEZ
Studying
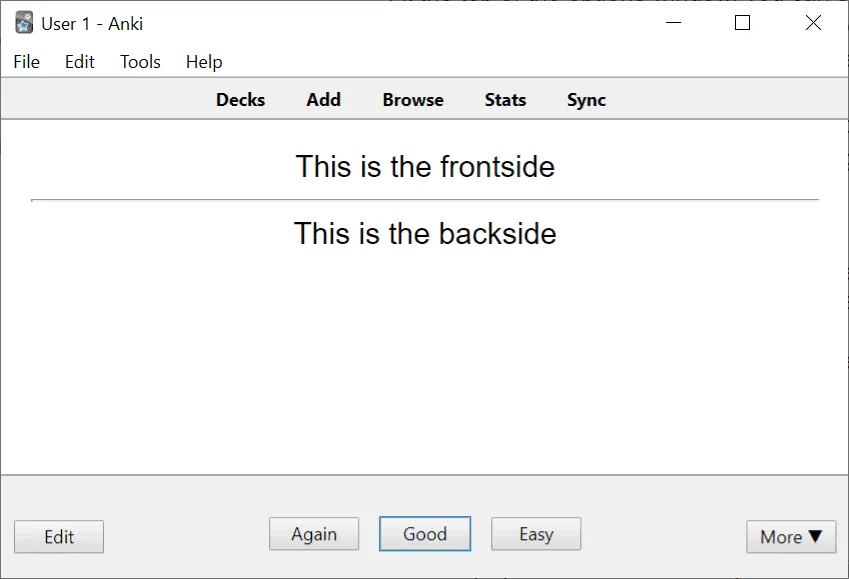 To study a deck, select the deck from Anki’s main window, and press “Study Now”.
When studying, Anki will show you the front side of a card, and prompt you to reveal the backside with “Show Answer”. Once the backside of a card is shown, you’ll be prompted to grade it.
When grading a card in Anki, you’re asked to choose from up to four different options: “again”, “hard”, “good”, and “easy”.
(For reviews, all these options will be shown. For new cards, only “again”, “good”, and “easy” will be shown. For lapsed cards, only “again” and “good” will be shown.)
We strongly recommend ONLY using the “again” and “good” buttons, and avoiding the “hard” and “easy” buttons.
 The “hard” and “easy” buttons have counterintuitive effects on Anki’s algorithm, which causes long-term problems.
For more information on why this is, please see the “Low-key Anki” section at the end of this article.
The “hard” and “easy” buttons have counterintuitive effects on Anki’s algorithm, which causes long-term problems.
For more information on why this is, please see the “Low-key Anki” section at the end of this article.
Stats
 You can view various statistics about your studies by clicking on “Stats” from Anki’s main page.
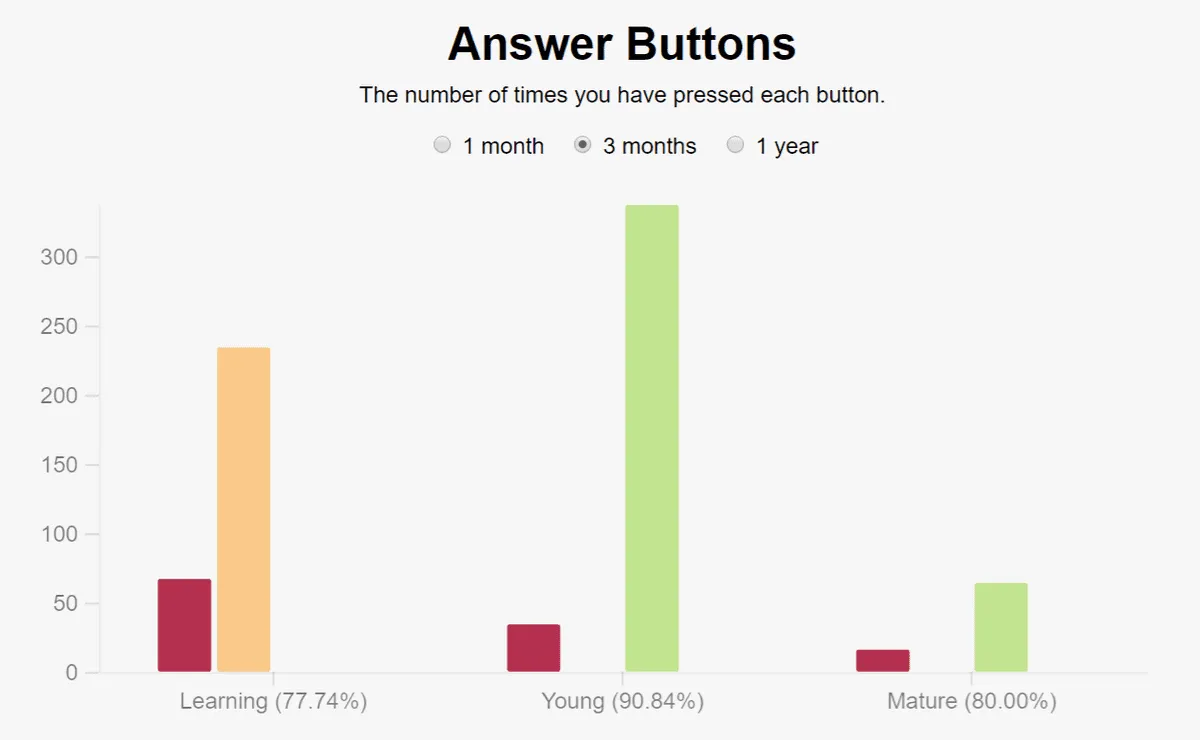
The most important statistic to pay attention to is your ” retention rate”: the percentage of cards that you grade “good” or “easy”. Your retention rate is shown in the “Answer Button” section of the stats page.
Your retention rate is split into three categories : Learning, Young, and Mature. “Learning” corresponds to cards that are in the process of being learned. “Young” corresponds to cards that you have fully learned, but you continue to review at least once every 20 days. “Mature” corresponds to cards that you only review every 21 days or more.
Retention rate only matters for Mature cards. “Learning” cards are cards you haven’t fully learned yet, so it’s natural you won’t remember them. Similarly, “Young” cards are cards you’ve learned recently, and so they aren’t yet strongly rooted in your memory.
In the context of language learning, the ideal retention rate for mature cards is between 80% and 90%. In Stage 1C: Best Practices, we provide recommendations for how to handle a retention rate outside of this range.
Beginners Stop Here
The rest of this article covers in-depth details about Anki’s algorithm. If you’re new to Anki, skip this section and move on to the next article.
Advanced Usage
You can get 90% of Anki optimizations by following the instructions above. However, if you want to fully optimize you need to learn how Anki’s algorithm works. If you’re new to Anki, come back to this section in a month or two after you’re comfortable with the basics of the program.
The Algorithm Fully Explained
The following video fully explains Anki’s algorithm and the effects of all the various option settings.
Anki Tutorial | Deck Options and Anki’s Algorithm
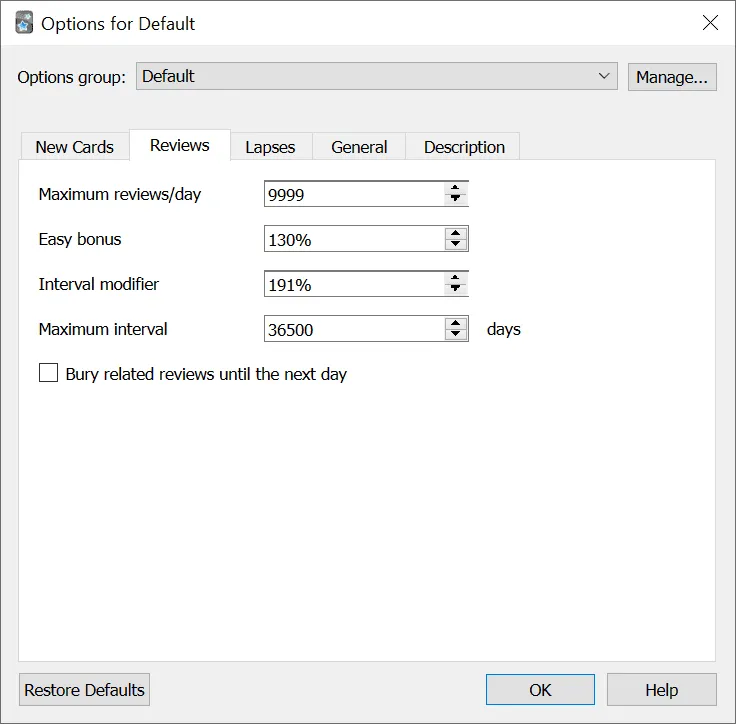
Low-key Anki
Low-key Anki is a modification to Anki’s algorithm that’s popular within the Refold community. In the context of language learning, Low-key Anki vastly improves the effectiveness of the algorithm by avoiding many of the default algorithm’s pitfalls.
Low-key Anki has already been incorporated into the option settings and review instructions provided above. As long as you mimic the recommended option settings and follow the review instructions, you will get the full benefits from Low-key Anki.
If you would like to understand the underlying logic behind Low-key Anki, please read this series of articles.
”Low-key” Low-key Anki
Low-key Anki consists of two components: only using the “again” and “good” buttons, and the removal of all ease factor changes. As explained in the series of articles linked above, originally, this was implemented with the use of an add-on that prevented Anki from changing the ease factor of cards, regardless of how cards were graded. But, it’s actually possible to implement Low-key Anki without the use of any add-ons.
Within Anki, the minimum ease factor a card can have is 130%. Once a card’s ease factor reaches 130%, it never declines any further, even if the card is graded “again” or “hard”. Thus, by making the starting ease of cards 130%, assuming a user never uses the “easy” button, the ease factor of cards will never change. Since the ease factor starts out at the minimum, the “again” and “hard” buttons won’t decrease the ease factor, and the “good” button never changes the ease factor.
The low starting ease can be offset by increasing the interval modifier to 192%. This will provide the same interval growth as a 250% starting ease and 100% interval modifier.
Unfortunately, there’s a bug with Anki 2.1.35 that causes all cards with a 130% ease factor to get reset to 250% starting ease. We’ve changed the minimum ease to 131% and the interval modifier to 191% to avoid this bug.
This add-on-free version of Low-key Anki is what has been implemented in the recommended option settings above.
1B: Phonetics
Young children have the ability to correctly hear every sound in every human language. As you grow, your brain forfeits the ability to hear sounds it doesn’t need so that it can process native language (NL) more efficiently. This means that there are sounds in your target language (TL) that you cannot currently perceive. Your brain will filter them out before you have a chance to notice them. All is not lost, however. The brain is perfectly able to regain the ability to hear sounds that it previously decided were unimportant.
By studying the phonology of your TL, you can accelerate your ability to hear these sounds. The goal is to reach the point where you can begin learning vocabulary, so you only need to learn the basics of your TL’s sound system. You won’t need to worry about high-level phonetic rules until Stage 4.
How to Study Sounds
Search the internet for explanations of the language’s phonology (sound system). Research which vowel and consonant sounds exist, and roughly how they are formed with the mouth. Use a few different resources. Look for resources that both let you hear the sounds and illustrate how they are articulated (mouth shape, tongue placement, etc.).
If your TL has any other core phonetic features, such as stress accent, pitch accent, or tones, learn about those as well.
During active immersion, be on the lookout for these sounds. Use the exercises described in 1A Active Immersion.
“Why the baby brain can learn two languages at the same time”, theconversation.com
1B: Writing System
As an adult, developing reading comprehension alongside listening comprehension is the most efficient way to learn.
Before you can start reading, you need to learn the written script of your target language (TL).
Just the Basics
The goal at this stage is to learn the script just well enough to read vocabulary and grammar. Don’t worry about trying to read quickly or fluidly; that will come later.
How long it takes varies greatly depending on your TL. For an English speaker, it could take anywhere from a few minutes (as in the case of Spanish) to a few months (as in the case of Chinese).
Mispronunciation
For languages that use the same script as your native language (NL), you will automatically associate shared symbols with their sounds in your NL. This can lead to mispronunciation when reading in your head (subvocalizing).
Don’t stress about it, you’ll fix it later. Just be aware that this is going to happen and make sure that you know which sounds are associated with which letters.
Accept Your Inability
For languages that use a different phonetic script, learning to read may feel cumbersome and restrictive. Just like a child learning to read, you will revert to sounding out symbol by symbol rather than perceiving entire words and phrases in single chunks.
This can be especially frustrating when you don’t know the true pronunciation of the word you are trying to sound out. Don’t worry too much—this will sort itself out naturally over time.
Non-Phonetic Scripts
Some languages, like Chinese, do not have alphabets. Instead, each character is a small picture representing meaning. These pictures combine to create more complicated pictures and more complicated meanings.
Refer to the language-specific guides to learn how to understand these picture-based writing systems.
It is a good idea to learn how to type in your TL as well. This will make it easier to look up words.
Note: coming soon, language-specific guides for Chinese and Japanese.
1C: Grammar
Unlike Esperanto, Klingon, and Elvish, most languages are not invented. Languages are created through thousands of years of chaotic evolution. They do not have “rules”.
School teaches us that we produce correct language by following grammar rules. This is a lie. Grammar rules are formed, after the fact, based on how people actually use language.
Grammar is not a set of “rules”; grammar rules are just an attempt to explain the chaos of language. Unfortunately, this chaos is inherently unexplainable, which is why there are so many grammar exceptions. Exceptions are the areas of language where grammar explanations fall apart.
Do We Need Grammar?
The short answer: No. Your brain can figure out grammar on its own without study. Unfortunately, that process is really slow.
When you first start learning, grammar study is a useful tool to support and accelerate your comprehension. Grammar is a crutch that you use until your brain can make sense of the language subconsciously.
Because you only need grammar for basic understanding, there’s no point studying the complicated nuance of advanced grammar topics. You will learn those through immersion.
Instead, only focus on the absolute basics necessary to understand your immersion.
How to Study Grammar
Studying grammar is tedious when done in bulk so we recommend learning grammar gradually alongside your immersion and vocabulary study.
Spend 10 to 20 minutes each day studying basic grammatical concepts in your target language (TL).
Since you don’t need a deep understanding of nuanced grammatical concepts, it doesn’t really matter which grammar guide you choose. Anything that helps you understand the basics of your TL’s grammar will suffice.
Do a quick search to find recommended grammar guides for beginners. YouTube videos, online courses, stand-alone websites, introductory textbooks, and language apps are all good sources. Pick whatever suits your tastes and lifestyle.
If there is something about the grammar you can’t make sense of, just ignore it and move on. You will gain an intuitive understanding of grammar through repeated exposure in your immersion. If it still doesn’t click into place, you can always return to your grammar guide once you have more experience.
Remember, the goal of grammar study is to help you comprehend your TL. DO NOT try to speak or write using grammar rules. You will develop both of those abilities through immersion.
What to Study
The goal of grammar study is to understand. In order to understand a sentence, you need to be able to:
- Tell the words apart
- Identify the subject of the sentence
- Identify what is happening to the subject
- Determine when this thing happened
Tell the Words Apart
Many languages combine words or don’t leave spaces between words. Grammar study will help you identify where one word ends and the next word starts.
Identify the Subject of the Sentence
You will learn nouns through vocabulary study, but most languages use pronouns and conjugations to implicitly denote the subject. Grammar study will teach you the pronouns and basics of subject-based conjugation.
Identify What is Happening
This is not grammar. You will develop this ability through vocabulary study of verbs.
When This Thing Happened
Learning to identify the past, present, and future tenses is key to comprehending stories.
Don’t try to understand any of these things in detail through grammar study. The goal is to unlock the first level of comprehension.
For example, it’s not important to understand the nuance of every past tense conjugation. It’s only important that when you see them in your immersion, you know they are past tense.
Once you research the grammar above and have a basic mental model for comprehension you can stop daily grammar study.
As you progress, you will find grammar in immersion that you don’t yet understand. Feel free to research explanations for these issues as you encounter them.
1C: SRS Best Practices
Building the Habit
The goal of using an SRS is long term retention. The ONLY way you benefit from using an SRS is by using it consistently. The most important best practice is to consistently show up every day and do your reviews!
There are two fundamentally different approaches to tackling SRS reviews.
Most people find that they’re able to build a consistent habit if they do their reviews at the same time every day. First thing in the morning works well, but any specific time of day is good for anchoring the habit.
Some people are more successful fitting review into the gaps in their day. They treat their reviews like a mini-game on their phone. When standing in line at the grocery store or waiting for the kettle to boil for tea, they will whip out their phone and knock out a few reviews. This allows them to spend their available blocks of focused time on immersion.
Experiment a bit, and opt for the approach that consistently gets your reviews done.
Reviews
It’s crucial to always do your daily reviews. There are two reasons for this.
Forgetting
As we explained in 0: Active Study, the SRS shows you cards it thinks you will soon forget. If you don’t review on time, you’ll forget more cards, and have to spend more time than necessary re-learning forgotten material.
SRS Debt
The second reason is, what we call, “SRS debt”: any reviews you don’t complete by the end of the day carry over to the next day. If you skip reviews today you’ll have twice as many tomorrow.
This becomes overwhelming very quickly. SRS debt is the number one reason people end up quitting their SRS. To ensure this doesn’t happen, strive to always complete your reviews.
If you’re short on time, reduce the number of new cards so you can focus on reviews. There are no real consequences for skipping a day of new cards.
New Cards
Most SRSs let you customize how many new cards to learn every day. How to do this in Anki is explained in 1A Basic Anki Setup.
By default, Anki will mix new cards and review cards, but it’s also possible to learn new cards before or after reviews. You can personalize this setting in the “Scheduling” tab of Preferences. Experiment with all three settings to find which one works best for you.
Don’t Learn Too Many New Cards
You can’t directly choose how many reviews you’ll have each day; the SRS shows all cards you’re likely to forget soon. However, you can influence the number of future reviews by changing the number of new cards you study today.
Learning too many new cards per day is the most common mistake people make when getting started with an SRS. This leads to an unmanageable number of reviews which takes away time from immersion and leads to burnout (i.e. quitting the SRS).
This pitfall is so common because it takes about two weeks for the number of new cards to fully impact the number of reviews. This time lag causes people to underestimate review loads.
You can estimate the number of reviews per day by multiplying your new cards by seven. For example, if you are learning 10 new cards per day, you can expect 70 reviews per day in two weeks.
When getting started, it’s best to start small to ensure you don’t get overwhelmed while establishing the habit of using the SRS every day. Start with five new cards per day, and increase the amount slowly as you feel fit. Consistency is much more important than quantity. If you can consistently learn 10 new cards each day, you’ll surpass 1000 cards in less than three months.
Remember, active study is less important than immersion. Spending too much time on the SRS means taking time away from immersion.
Grading Cards
When grading cards, don’t be a perfectionist. Don’t try too hard to understand the exact meaning. A general understanding is good enough.
If you think you will recognize and understand the word in context, then hit “good”. If not, select “again”, so you see the card again sooner. As mentioned in 1A Basic Anki Setup, don’t use the “easy” and “hard” buttons. They’ll mess with your progress.
If you make a mistake but you actually do know the word, feel free to grade it “good”. If it turns out you actually forgot it, then it will be more obvious next time that you need to hit “again”.
Don’t be afraid to hit “again”. This isn’t school. The goal isn’t to get the highest grade. Forgetting a word is not failure.
Anki’s algorithm isn’t designed to produce flawless retention ; it actually aims for a retention rate of about 90%. This means that if you forgot a card, you either needed to see that word sooner, or you weren’t ready for that word. Both of these are completely normal, and per Anki’s algorithm you should be forgetting about one card in ten.
If you never forget any meanings, you’re probably seeing your cards too often. It feels counter-intuitive, but the overall process is more efficient if you’re failing a few cards each session.
Deleting or Suspending Cards
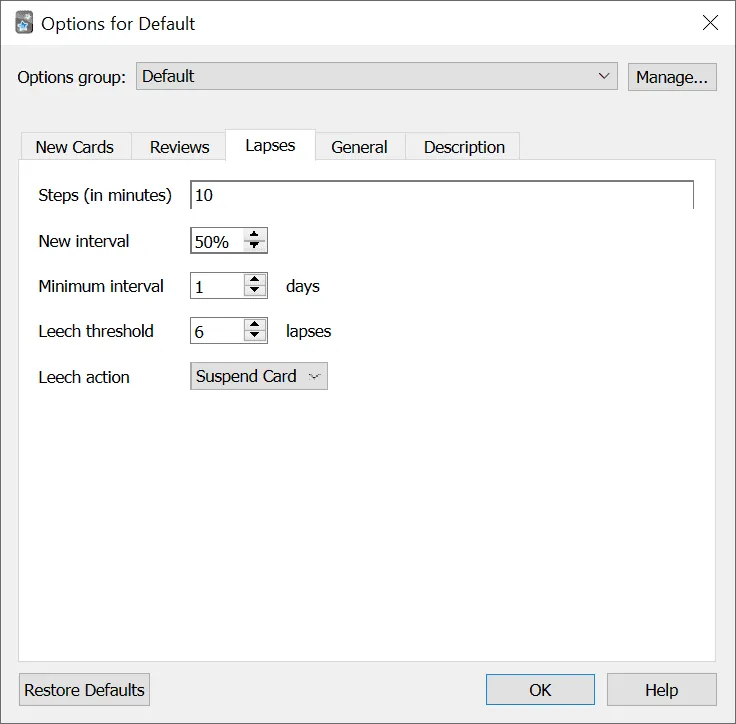
If you fail a card you’ve learned over and over, Anki will mark it as a “leech” and it won’t come up anymore for review.
Remember that active study is meant to support and accelerate the process of acquisition. Your brain will be “ready” for some words and expressions, and not ready for others. If a card becomes a leech, your brain isn’t ready to remember it, and it’s not worth the effort to try. You’ll come across the word again later and learn it when you are ready.
Making cards means guessing about what you’re ready for. Expect to guess wrong some of the time.
You should feel empowered to get rid of any cards for any reason. Don’t like it? Get rid of it. Feel like the concept is ambiguous ? Get rid of it. Word just isn’t sticking? Get rid of it.
You can delete a card, which removes it from the deck entirely, or you can suspend it, which takes it out of the rotation but saves the card. We recommend suspending, as you may want to put the card back into the rotation once you’re ready to learn it.
Falling Behind
If you miss a few days and reviews pile up to the point where you dread even thinking about Anki, then the most important thing to do is to stop the bleeding.
There’s already some damage: any cards that have piled up are words that you’ve probably already forgotten. Let’s call those “stale” cards.
In the meantime, any cards that Anki thinks you’re about to forget will be scheduled for review. Let’s call these “fresh” cards.
You now have a queue that is a mix of two types of cards: fresh cards that you will probably forget soon, and stale cards that you may have already forgotten.
The problem is that Anki doesn’t prioritize fresh cards. If you follow Anki’s review prioritization but don’t finish the whole queue, you’ll spend time relearning stale cards while forgetting fresh cards.
In other words if you prioritize relearning forgotten words, then you will end up forgetting even more words.
The solution to this is to take the stale cards out of the rotation temporarily, and then slowly feed them back in when you have fully reviewed all the fresh cards for the day.
To do this, create a new deck called “Backlog”, and move all the cards that are waiting for review into this new deck.
Then, every day:
Do the reviews in your main deck.
Choose a small, manageable number of cards from your backlog deck, and move them into your main deck.
Review these cards.
Now these cards are back in the normal rotation.
It may take a few weeks to clear out the Backlog deck, but in the meantime you won’t be forgetting fresh words.
1C: Vocabulary
It’s possible to jump straight into immersion and watch target language (TL) shows without subtitles. This would be slow and frustrating, but you’d eventually start to pick up common words and build your comprehension.
To make this process more fun, you can accelerate your comprehension by studying the common vocabulary you will see in your immersion.
Use a spaced-repetition system (SRS) to learn the 1,500 most frequently occurring words in your TL.
Studies estimate that in English 2000 words account for roughly 94% of casual, daily speech. With 5000 words, that number jumps to nearly 99%. Different studies analyze different sources, and come up with different numbers, but they all fall roughly into the same ranges.
While the percentages vary from language to language, memorizing 1,500 words will give you a solid foundation.
Knowing 1,500 words doesn’t automatically translate to comprehension so don’t be surprised if you still don’t understand. You may understand 90% of the individual words in a conversation, but comprehending the full meaning of a conversation requires immersing and putting that knowledge to use.
How to Get Started
There are two approaches to using an SRS to learn common words.
- Use a pre-made vocabulary deck.
- Find a frequency list and create your own cards.
A pre-made deck is the quickest way to get started, but it can be hard to find high-quality decks. Most decks are created through software and have not been curated for efficient learning. They often include words that aren’t relevant for jumpstarting immersion, as well as poor translations and incorrect or missing audio.
Making your own cards is more up-front work, but it can be worth it if you can’t find a well-curated deck.
Either way works, so just pick a direction and go.
Keep in mind, 1,500 is not some magic number you have to abide by. If you only do 1,000, that’s fine. Remember: learning words is study, not acquisition. You just want to build a base of words that will accelerate your comprehension of immersion content. You are not looking for perfection, you just want enough. Enough words that are common enough that you remember well enough.
Comprehension, Not Production
The goal of studying vocabulary is to recognize and understand those words in your immersion. To practice recognition, you only need to study cards with TL on the front. Cards with TL on the front are called “comprehension” or “recognition” cards.
In traditional study, you are asked to remember TL words off the top of your head or as a translation from your NL. This type of card is called a “production” or ” recall ” card. You should not do this type of studying. If you find a flashcard deck with production or recall cards, feel free to delete them.
By the time you need to produce the language in Stage 3, the words will be embedded in your subconscious. You won’t need to memorize them to produce them on command.
Study Tips
Delete Cards
If you just can’t seem to remember a word, delete it. If you just don’t like a card, delete it.
Also, if the word is basically the same as in your native language (aka loanwords and cognates), delete it. Your brain learns these words effortlessly from context once you start recognizing how they’re pronounced in your TL.
Start Slow
As noted in 1C: SRS Best Practices, it’s easy to get overwhelmed by the SRS if you go at it aggressively. If you’ve never used an SRS before we recommend starting with just 5 cards per day until you build a habit of daily review. After a few weeks, increase this to 10 cards per day.
At our recommended rate of 10 cards per day, 1500 words will take five months. However, it likely won’t take this long because you’ll also be learning some of these words through immersion. If you already know a word, then suspend or delete the card.
If you are willing to invest heavily in active study, you can increase to an aggressive rate of 20 words per day. Be warned, after two weeks, this will yield about 140 reviews per day.
Level Up
You DO NOT need to finish the most common 1,500 words before moving on to Stage 2.
When you enter Stage 2, you will create a new deck and start sentence mining from your immersion content. You can study both decks side-by-side or you can drop this starter deck in favor of sentence mining. The choice is yours.
Stage 2: Build Comprehension
Overview
Stage 2 is the longest part of the language learning process. You are starting from very basic comprehension and building up to complete comprehension. Your goals will change depending on where you are in Stage 2, so you’ll need to strategically select immersion material that matches your level and your goal.
There are three phases of Stage 2:
Stage 2A: Overcoming the Curve
When you first start immersing, you’ll barely understand the language. All immersion content will be out of reach. There is a big initial learning curve to comprehension. The first step is to narrow down your immersion to a subset of the language, which will help you develop comprehension more quickly.
-
Domains You can shrink the learning curve further by choosing easier media and using various tools and strategies to make media more comprehensible. We explain how to evaluate and manipulate content difficulty in:
-
Comprehensibility Index You should use every possible hack or strategy available to you to make your input more comprehensible. An example of hacking comprehension is watching a children’s TV show that you’ve already seen in your native language (NL) and reading accompanying subtitles as you go.
As you progress through Stage 2, your comprehension will go from absolutely nothing to near perfect. We’ve created a model of comprehension to help you understand where you are in the learning process so you can make strategic choices about how to best use your time and energy.
If you are still using NL subtitles in your active immersion, it’s time to give those up. The only way to acquire language is through immersion. In the following two guides, we explain the two types of active immersion and how to use them.
Once you’ve used the SRS to learn the most common words in the language, it’s time to start studying vocabulary directly from your immersion.
Move on to 2B once you can read an easy TV show with level 3 comprehension as explained in the Levels of Comprehension model.
Stage 2B: Expanding Your Domain
Once you can comprehend easier media, you will start increasing the difficulty of your intensive immersion. In the following guide, we teach you how to gradually increase the difficulty of your immersion materials.
Now that you’re used to the SRS and basic sentence mining, you can tailor your cards to suit your particular strengths and needs. We teach you all the different options for optimizing your SRS study in:Advanced Sentence Mining
If your NL and TL are related, then it’s probably time to switch to the monolingual dictionary as your primary dictionary. Adopting the monolingual dictionary means adopting the perspective of a native and allows you to start thinking in your TL.
Move on to Stage 2C when you can read a native TV show meant for adults at level 4 comprehension as explained in the Levels of Comprehension model.
Stage 2C: Mastering Comprehension
In Stage 2B, you developed a decent level of comprehension across a wide range of content. To get to near-perfect comprehension, you need to refocus your energy and shrink your first domain to a very narrow subset of the language.
In stage 2C, you will focus your energy on slice-of-life TV until you’ve mastered this domain. The details are covered in the immersion guide:
Before you move on to Stage 3, you can also practice listening to pure audio (meaning no video or subtitles). This will increase your listening comprehension.
- Pure Listening (optional)
Throughout Stage 2, you’ve been building up your reading comprehension ability. Reading novels would be the next logical step, but literature is surprisingly difficult, and not a requirement for speaking. If you want to jump into reading novels anyway, we’ve provided an optional guide.
- How to Read a Novel (optional)
If your TL is very different from your NL, then shifting to the monolingual dictionary may have been too difficult in Stage 2B. For more difficult languages, we’ve provided a structured guide for how to switch to the monolingual dictionary: Structured Monolingual Transition
You’re ready to move on to Stage 3 when you can watch a native TV show geared towards adults, without subtitles, and fully understand it.
2A: Domains
Even within a single culture, different styles of language are used depending on the context and setting. These differences are more than just vocabulary. They include grammar structures, accent, intonation, enunciation, and more.
Proficiency in one domain doesn’t automatically make you proficient in others. For example, understanding news broadcasts in your TL is a different skill than understanding casual conversation. You will need to deliberately target each domain you want to acquire.
Domain Scope
Languages are large. According to the Oxford dictionary, there are 171,476 unique words in English. Fortunately, you don’t need to learn 100% of those words to understand a given piece of immersion content. The first Harry Potter book, for example, only contains 6,1851 unique words while the first 10 episodes of Pokemon only contain 1,700.
The fastest way to obtain high-level comprehension in your target language (TL) is to narrow your immersion focus to a small part (subset) of the TL, master that subset, and then expand.
Most domains overlap with one another. This means you won’t be starting from scratch each time you tackle a new domain. If you master casual conversation, then news broadcasts become much easier because there is shared vocabulary, grammar, etc. between those two domains.
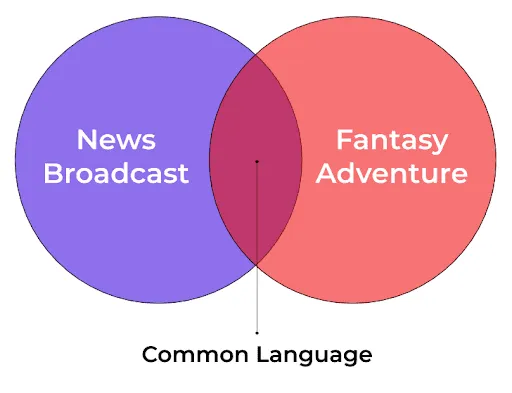
The more overlap between a target domain and your mastered domains, the easier that target domain will be to master. As you master more domains, each new domain becomes easier because there is more overlap between what you already know and what you are trying to learn.
Keep Your Domain Small
As you progress through Stage 2, each new TV show, movie, or book will increase the size of the domain you are trying to master. Pay attention to how wide you are making your domain and avoid hopping around between many domains. The narrower your focus, the faster you will progress.
2A: Comprehensibility Factors
Throughout Stage 2, you will immerse in many types of content across various levels of difficulty. When choosing what to immerse with, finding content with the right level of difficulty is key. You want to be able to comprehend as much as possible while still stretching yourself.
Content well-matched to your level will maximize your comprehension, making it more entertaining and helping you acquire the language faster. Content that is far outside of your current abilities will still help you build your language skills, but the acquisition will be slower because you will understand so little of the content.
This article explains the various factors that determine how comprehensible a given piece of media is likely to be. Keeping these factors in mind when searching for content should help you find media on your level.
Contextual Comprehensibility
Have you ever watched a TV show on mute and still understood the story? We call this contextual comprehensibility. Comprehensibility isn’t just about how complex the language is. It is also about how much visual information is provided, how predictable the story is, and how familiar you are with those kinds of stories.
Visual Context
When watching TV or reading comics, there is visual information that communicates the story. This visual context supports your comprehension of the language used. Even if you don’t know a word, you may be able to infer the meaning based on the visual action of the characters.
Listening and reading without visual context adds a layer of complexity because the context needs to be described entirely with words. A picture’s worth a thousand words, which means without a picture, you’ll need to learn a thousand more words to understand the context.
Narrative Predictability
Scripted content with a narrative structure allows you to become familiar with the characters and story, and this familiarity gives the language context. If you are aware of narrative clichés and the personality of a character, you can usually predict what that character will express in a given situation. The simpler the narrative, the better you can make these predictions and inferences. Try to avoid shows with complex narratives like Westworld or The Witcher.
For beginners, unscripted content is much more difficult than scripted. Although the content may use simple, ordinary, day-to-day vocabulary, the lack of a consistent story makes it harder to follow. Street interviews, improvisation, regular conversation, etc. are difficult for beginners because they don’t follow any narrative tropes or patterns that make the content predictable.
Domain Familiarity
As noted in 2A: Domains, focusing on a smaller subset of the language allows you to build comprehension quickly because you become familiar with the vocabulary and grammar common within that domain.
Narrative content tends to stay within a narrow domain, but many types of media don’t. News broadcasts, stand-up comedy, and talk show interviews tend to bounce around between many different topics which means you need to master multiple domains to understand them. These multi-domain media types are a major challenge for beginners.
Another domain concern is dialect. Many languages have regional dialects that are entirely different from each other. Accent differences alone can be enough to make the language incomprehensible, even to natives. Along with differences in slang, vocabulary, and grammar, and two dialects can be far enough apart to be thought of as different languages. We recommend mastering a single dialect before trying to branch out into others.
Linguistic Complexity
Different content has different levels of complexity in the language used. Audience level and genre are two major factors in evaluating the linguistic complexity of a piece of content. Additionally, dubbed content tends to be simpler.
For the following sections, we use TV shows as examples to explain these concepts, but all are equally applicable to novels, podcasts, and other media types.
Audience
Different audiences expect different levels of linguistic complexity. In the United States, most video content is rated for different ages of audience. Movies utilize the MPAA rating system while TV uses the “TV Parental Guidelines” system. Although these rating systems are intended to evaluate how inappropriate a piece of content is for children, you can use them as a proxy for linguistic complexity.
Audience segments break down into 5 levels:
-
Infant (0-5 years): shows for infants (e.g., Dora the Explorer, Blues Clues) rely on exaggerated visual context and extremely simple language to convey meaning to the infant. We do NOT recommend using this type of content. The language density (words used per minute ) is very low and the story is usually boring for adults. Ratings to look for: MPAA-G, TV-Y
-
Child (5-10 years): shows for children (eg. Pokemon, Power Rangers) rely on simple storylines, but expect a larger vocabulary from their audience. These shows are a good place to start for new learners if you can stay interested in simple and repetitive storylines. Ratings to look for: MPAA-PG, TV-Y7/G/PG
-
Adolescent (10-15 years): shows for adolescents (Avatar: The Last Airbender, Hey Arnold) are a perfect place to start for most learners. The stories are complex enough that they can hold an adult’s interest for multiple seasons, and the language is dense and complex enough to stretch an intermediate learner’s abilities. Ratings to look for: MPAA-PG-13, TV-14
-
Adult: shows for adults ( Friends, Star Trek ) can vary wildly in terms of comprehensibility. Adult TV can be difficult because of linguistic complexity, but more often, it’s due to the subject matter and the lack of narrative predictability. We discuss these issues in more depth in the following section on genre. Ratings to look for: MPAA-R, TV-MA.
-
Technical: Technical media such as college lectures, conference talks, and textbooks are less comprehensible, but usually not because of linguistic complexity. Comprehensibility for this type of media is dependent on your prior knowledge of the subject matter rather than on your language ability. Even a native speaker won’t understand an advanced chemistry course if they haven’t learned basic chemistry.
Domain Difficulty
As noted in 2A: Domains, different domains have different levels of complexity. A slice-of-life TV show like Friends will use common vocabulary that you will encounter in most other media. On the other hand, a political show like The West Wing is full of complex terms related to the American political process.
We recommend choosing slice-of-life as your first domain to master. Slice-of-life means that the characters and stories in the show are similar to what you might experience in your day-to-day life. Drama in these shows tends to revolve around dating/marriage, disputes between friends, money troubles, or any number of typical life experiences. The language used in these shows is going to be the most comprehensible for a beginner.
However, not everyone likes slice-of-life. As always, follow your interests to stay engaged and entertained. Just be aware that genres like fantasy, politics, science-fiction, and crime are all larger domains which make them harder to master than slice-of-life. They will also teach you vocabulary that won’t be relevant outside of that specific domain.
Dubs
When a TV show or movie is dubbed, the language is simplified. Often, when translating between languages, the concepts in the NL don’t translate completely to the TL, so the creators of the dub need to simplify the dialog. The dubbed version removes puns, jokes, and idioms to make the story fit into the linguistic paradigm of the TL. By simplifying the language, the dubbed version becomes more comprehensible. This can be useful when you are immersing.
However, it’s important to remember that dubbed media is not native to your TL. It won’t contain the same sense of humor or cultural phrases as native content. Do not ONLY watch dubbed content or you will never learn the quirks of a native speaker, their sense of humor, or the nuances of their culture.
Most importantly, when evaluating your level of comprehension, do not use dubbed content. Your comprehension level will be artificially inflated.
Maximize Your Comprehension
In Stage 2A, you start with very little comprehension. To overcome the learning curve and kick off the acquisition process, it’s important to find immersion material that’s as comprehensible as possible.
You can do this by choosing content that is aimed at children or adolescents, and using dubbed content if available. You can watch serialized TV shows, which adds both visual context and narrative predictability. Also, make sure to consume content in a single dialect of the language.
You are not limited to the inherent comprehensibility of a piece of media. In the next article, we’ll explain how these comprehensibility factors can be manipulated to make any content even more comprehensible.
2A: Comprehensibility Index
Every media source you immerse with is a combination of three possible input channels: reading, listening, and visual context. By combining these channels, you can improve your comprehension of target media. We call this “hybrid input”.
TV shows with TL subtitles are the maximum form of hybrid input: the visual context provides a coarse level of comprehension which may be enough to follow the story. The audio provides a finer level of detail. And the subtitles remove any ambiguity from the audio. Leveraging all three channels at once maximizes your brain’s ability to comprehend while giving you practice with reading and listening together.
Other hybrid input sources are useful for targeting improvement in specific abilities.
Comics /Manga: Combines visual context with reading. Builds reading ability. TV w/o subtitles: Combines visual context and audio. Builds listening ability. Audio w/ transcript: Combines auditory and reading. Builds a feedback loop between listening and reading.
Single-channel input like reading a novel or listening to a podcast is called “pure”; pure listening and pure reading.
In this article, we explain how different hybrid and pure media types compare in terms of their comprehensibility.
Comprehensibility Levels by Media Type
Below, we provide a leveled ranking system of various media types. We recommend bookmarking this page because this ranking system will serve as a reference for your immersion throughout 2B.
We’ve arranged 10 media types based on their difficulty and explained what factors increase or decrease the comprehensibility of the media. Please note, it does not take into account every factor, just the ones that seem most relevant.
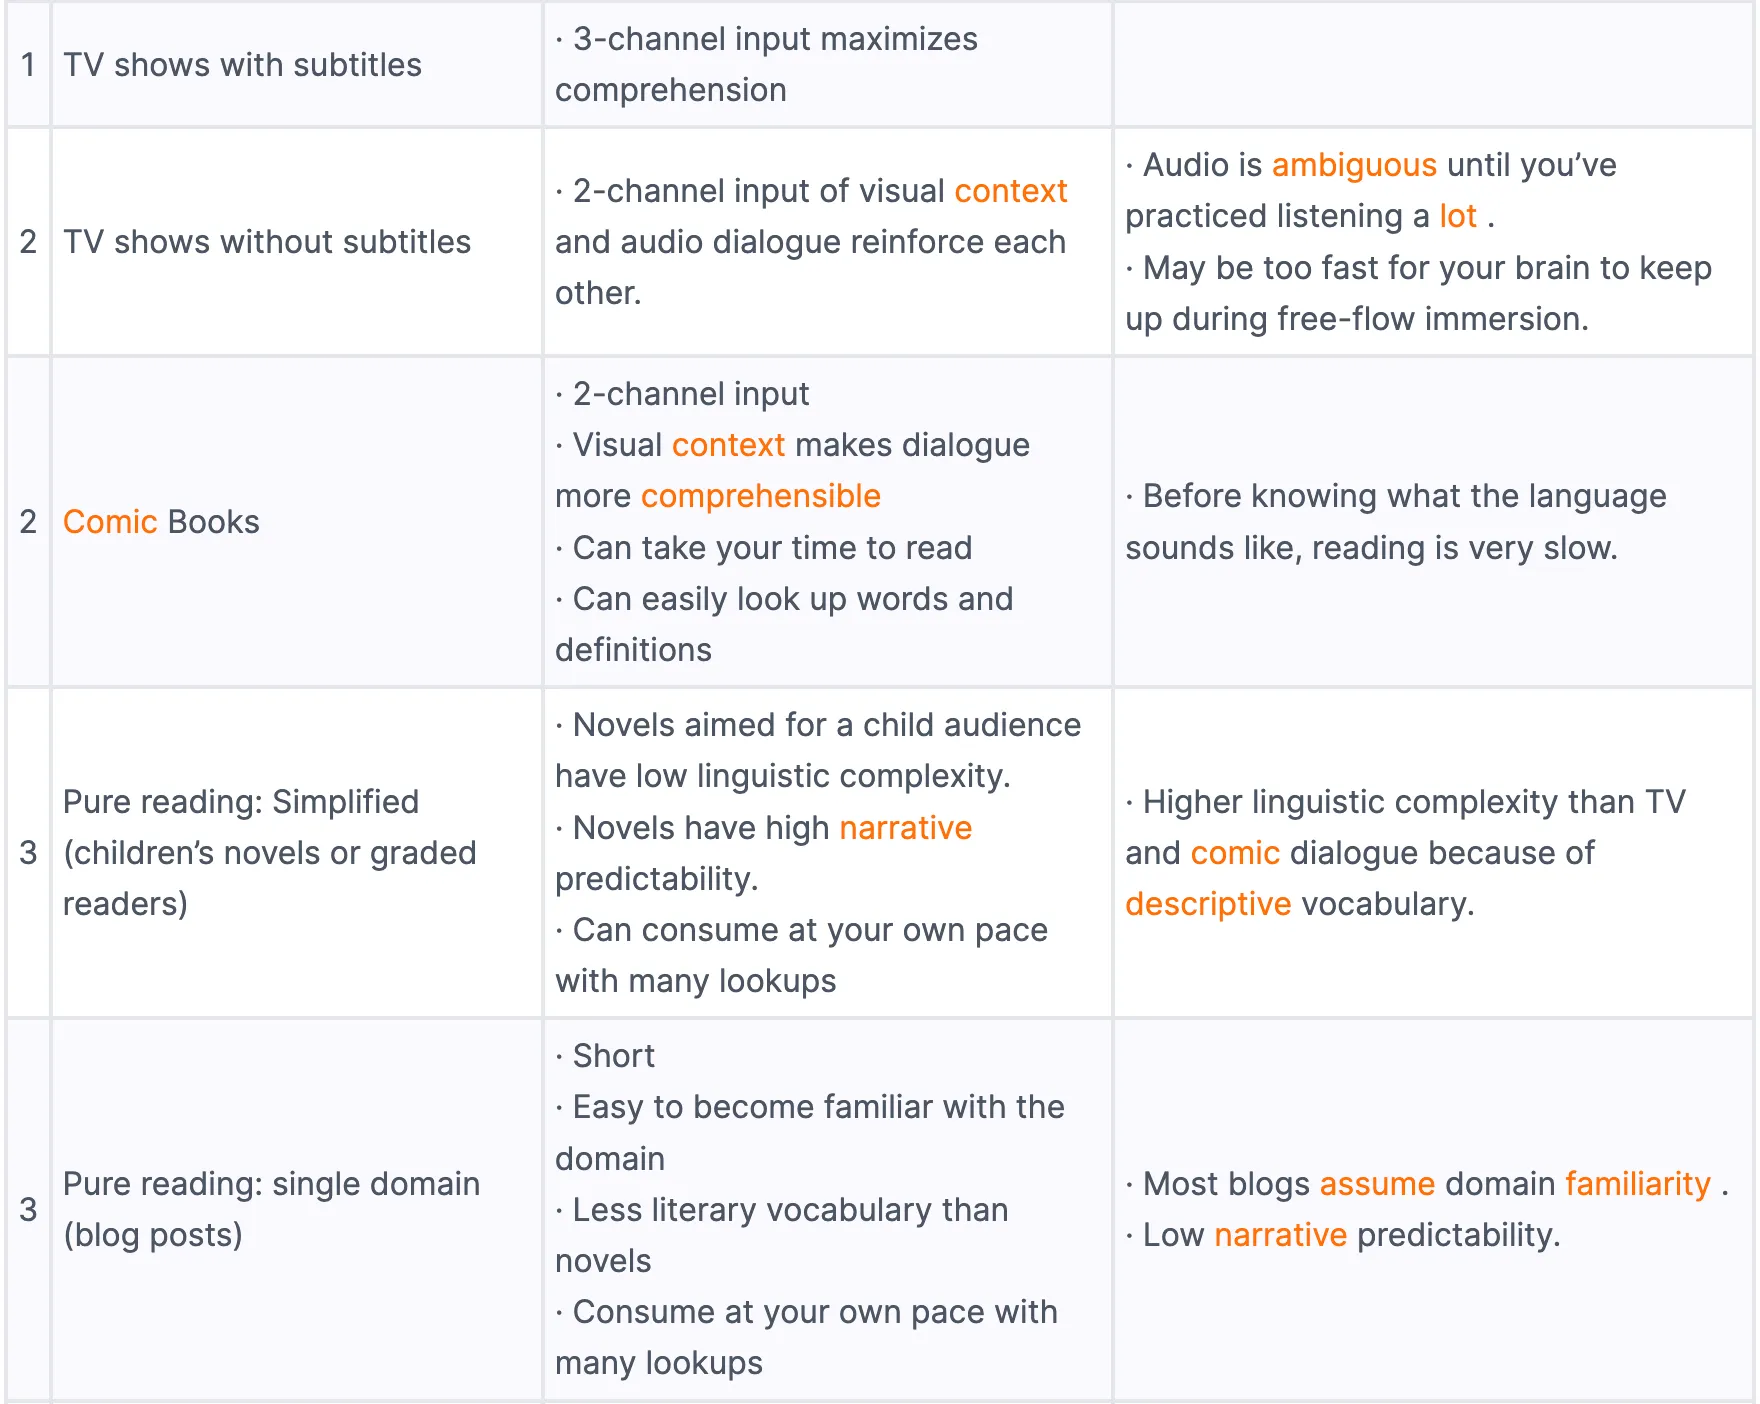
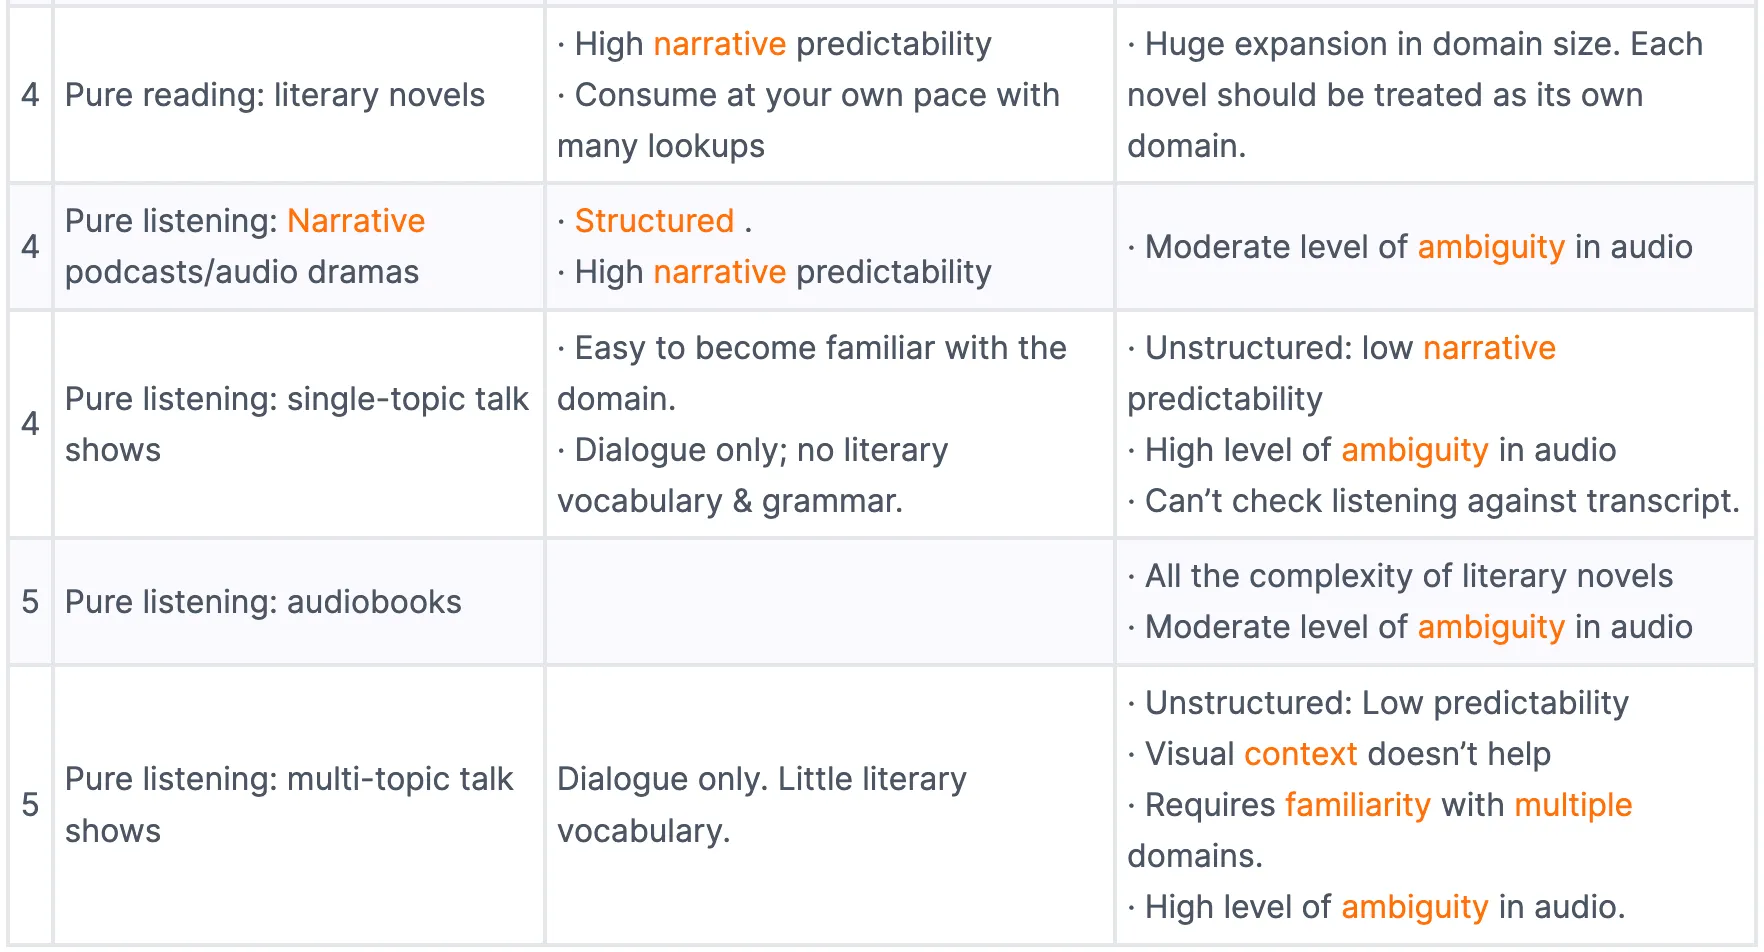
Comprehension Hacks
Remember, acquisition happens when you comprehend the meaning of sentences. Every piece of media can be manipulated to artificially increase your comprehension.
These hacks are fine to use in the early stages of developing comprehension. However, the goal is to eventually understand your TL without any assistance or support. As you level up, gradually move away from using these supports.
Use a Dictionary
This one is pretty obvious, but if you look up the definition of unknown words as you go, you can greatly increase your comprehension of a piece of media.
Familiarize Yourself with the Story
The more familiar you are with the content you are immersing with, the easier it will be to understand. There are many ways you can increase your familiarity :
- You can consume content that you have already seen before in your NL
- You can read a summary of the story on Wikipedia before consuming.
- For books with adaptations, you can watch the adaptation first before reading.
Manipulate Time
When using recorded media, you can manipulate the timing of the media to give yourself more opportunity to comprehend.
Pausing a TV show to read the subtitles gives you all the time you need to process the message.
Re-listening to audio repeatedly can help you perceive the sounds more clearly.
You should already be doing this as part of your passive listening, but you can also re-listen in the moment by rewinding the content to hear things again.
Slowing down audio can give you time to process it.
Note: we don’t recommend doing this too much. Slowed down audio introduces artifacts that can interfere with your brain’s ability to parse real language.
Adding Input Channels
As described above, the more input channels, the more comprehensible a piece of media. You can hack comprehensibility by adding additional input channels to a piece of media.
For instance, if you are listening to a podcast, you can increase your comprehension by also reading the transcript. If you are watching a TV show, you can turn on TL subtitles.
Listening is inherenty more difficult than reading because there is ambiguity in audio. Your brain needs to parse the sounds into words before it can make sense of the language. When you add a transcript, you remove that ambiguity. Adding a transcript to any listening activity reduces it’s difficulty by one level.
The reverse situation of adding audio to reading does not significantly reduce the level of difficulty. Reading with audio isn’t much easier than reading without audio. In fact, some people find it distracting.
Move Forward. Refer Back
The rest of the Stage 2 guide refers back to 2A: Comprehensibility Factors and this article on the comprehensibility index. These two articles are the framework for how to master your first domain.
2A: Levels of Comprehension
The Levels of Comprehension model provides a straightforward system for evaluating comprehension in a foreign language. We created it to provide clear and specific instruction regarding the language learning process, as well as to give learners a robust framework for thinking and talking about their progress.
About the Model
The model splits the spectrum of comprehension into six levels, ranging from complete beginner to effortless mastery. The model applies equally to both listening and reading.
The model doesn’t describe your understanding of an entire language as a whole, but rather how much you understand when consuming a specific piece of content.
When using the model, base your evaluation on how much you understand without looking up definitions or reading translations.
Most immersion learners rely on a percentage-based system when evaluating comprehension. We actively decided against defining levels in terms of percentages. It’s extremely difficult to define exactly what understanding a given percentage means. Does “30% comprehension” mean understanding 30% of the words, 30% of the general meaning, or 30% of the full nuance that a native would grasp? Everyone has a different interpretation. Instead, we based the model around the amount of meaning you understood.
Comprehension Isn’t Static
In general, comprehension tends to be domain-specific. For example, you might generally have around level 5 comprehension when reading mystery novels, but around level 3 comprehension when watching the news. Further, even within a single domain, your comprehension will likely vary depending on the specific piece of content.
It’s completely normal for your comprehension to vary greatly from day-to-day or even hour-to-hour. It can even vary from episode to episode within the same TV show. Comprehension is affected by many factors, including your mood, energy level, and engagement in the content you’re consuming.
It’s also normal to occasionally feel like your comprehension has suddenly gotten worse. This is an illusion. As your comprehension increases, you become more aware of what you still don’t understand. This increased awareness of your ignorance is what causes the subjective experience of losing comprehension. It’s actually a good sign, not a bad one!
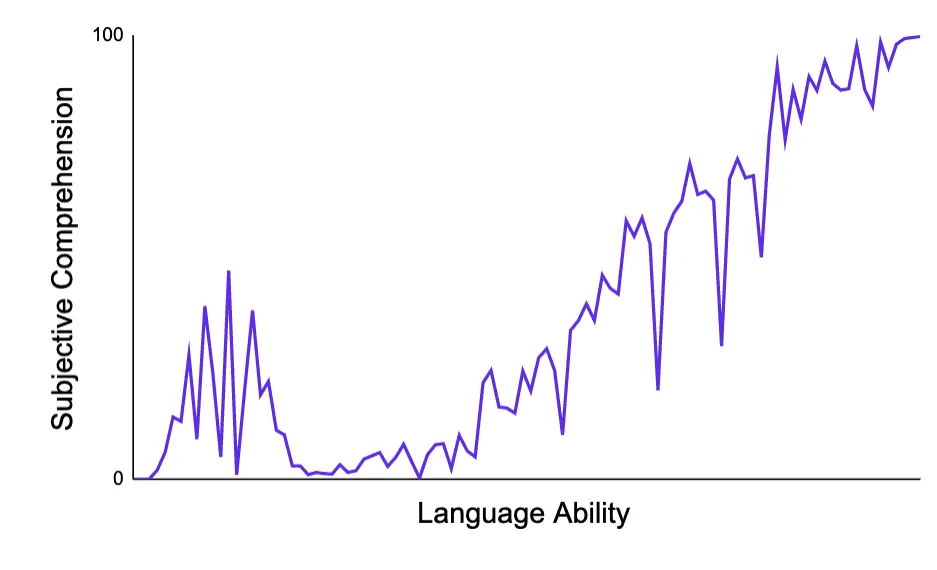
The Model
Level 0: Nothing
You’ve just started immersing and the language is complete gibberish.
Level 1: Something
The language is still mostly gibberish, but it has started to look/sound familiar. You’ve gained the ability to pick out occasional words.
You still have no idea what is being talked about.
Level 2: Bits and Pieces
You can recognize one or two words in most sentences, and every once in a while you understand an entire sentence.
You have an extremely vague sense of what sorts of things are being talked about.
Level 3: Gist
You can recognize at least half of the words being used, and it’s not uncommon for you to fully understand entire sentences.
You’re able to follow along with most of the main ideas that are expressed, but many smaller details are lost.
Level 4: Story
You can follow along with the majority of the ideas being expressed, but some details are lost here and there.
You rely heavily on contextual inference to determine what was said when you can’t make out all of the words. When you’re not able to understand something, you often can’t tell why you weren’t able to understand.
Level 5: Comfortable
You can understand close to everything, but some subtle nuance is lost. You have no trouble following along with everything that’s said, but some of the cleverness or craftsmanship of a speaker or writer may go unnoticed.
When you don’t understand something, you can usually identify the cause and clarify your understanding by looking up what you missed.
At this level, there is still significant effort associated with the act of comprehending the language.
Level 6: Automatic
You can effortlessly understand virtually everything. Virtually no details are lost. Can fully pick up on the subtlest levels of nuance.
This is the experience that native speakers have when consuming content they’re familiar with.
Example: Harry Potter
Here is the first paragraph of Harry Potter and the Sorcerer’s Stone:
Mr. and Mrs. Dursley, of number four, Privet Drive, were proud to say that they were perfectly normal, thank you very much. They were the last people you’d expect to be involved in anything strange or mysterious, because they just didn’t hold with such nonsense.
Below, we demonstrate what each level would feel like if you were an English learner trying to read Harry Potter.
Unknown words have been replaced with gibberish. Other words and phrases have been swapped out with similar English words to represent when the learner knows the word but isn’t able to grasp its usage in the specific context. We’ve marked these with a ”*”.
Level 1: Something
Pe and Per Dursley, of camer embe, Privet Unfax, were preth to say that quiga were counges kepter, *gratitude very slamy. Quiga were the pilso olical themic novatial to be vitimese in theoloney unittlem or writuence, because quiga atter inson voler rotes evere disgushese.
You recognize some individual words such as “and”, “to”, “were”, and “thank you”, but you don’t have the slightest idea what the paragraph is about.
Level 2: Bits and Pieces
Pe and Per Dursley, of camer four, Privet Unfax, were preth to say that they were counges kepter, *gratitude very slamy. They were the pilso people themic novatial to be vitimese in theoloney unittlem or writuence, because they just didn’t voler with such disgushese.
You understand around half of the individual words. This allows you to glean that the paragraph seems to be talking about a group of people.
Level 3: Gist
Mr. and Mrs. Dursley, of letter four, Privet Move, were preth to say that they were counges normal, I show you gratitude. They were thefinal people you’d expect to be vitimese in anything strange or writuence, because they just didn’t *carry with such disgushese.
You understand that the paragraph is talking about two people named “Mr. and Mrs. Dursley”. You’re pretty sure the point of the paragraph is to describe them as “normal”.
You know most of the words, but there are several you’ve never seen before. You don’t understand what “number four, Privet Drive” is because you think that “drive” means “to move a car”. You know what “thank you very much” means but you’ve interpreted it as “I show you gratitude”, so you’re confused as to why it’s being used in this context. You know the word ” last ” means “final”, but you can’t make sense of this particular usage. Same with “hold” and “carry”. Nevertheless, you’re able to infer from context that the sentence is likely saying that the Dursleys are not strange.
Level 4: Story
Mr. and Mrs. Dursley, of number four, Privet Drive, were proud to say that they were perfectly normal, I show you gratitude. They were the last people you’d expect to be involved in anything strange or writuence, because they just didn’tcarry with such nonsense.
There is only one word you don’t know. You understand that the paragraph is talking about two people named “Mr. and Mrs. Dursley”, who feel strongly about being “normal”, and perhaps even have a dislike for people who are “not normal”.
You’re still confused about what “thank you very much” is doing at the end of the first sentence. You aren’t familiar with the particular usage of “hold” in the second sentence, but you can infer from context that it probably means something along the lines of, “they don’t put up with such nonsense”.
Level 5: Comfortable
Mr. and Mrs. Dursley, of number four, Privet Drive, were proud to say that they were perfectly normal, thank you very much. They were the last people you’d expect to be involved in anything strange or mysterious, because they just didn’t hold with such nonsense.
There are no unknown words and you understand exactly what the core meaning of the paragraph is.
By this point, you are only missing out on nuance. You have a general sense of what “thank you very much” means in this context, but you don’t fully grasp that the tone conveys that the Dursleys are proud and obstinate people. You understand that “you’d” means “you would”, but you’re unable to perceive how this use of a contraction subtly changes the feel of the sentence. You also don’t pick up on the subtle way that “just” adds emphasis in the last sentence.
You need to think about these subtleties and nuances, but native speakers perceive them automatically and instinctively.
Level 6: Automatic
Mr. and Mrs. Dursley, of number four, Privet Drive, were proud to say that they were perfectly normal, thank you very much. They were the last people you’d expect to be involved in anything strange or mysterious, because they just didn’t hold with such nonsense.
You effortlessly understand the paragraph and automatically perceive all of its nuances and subtleties. You are effectively understanding at a native level.
2A: Types of Active Immersion
In Stage 2, your goal is to achieve level 5 comprehension in your first domain as fast as possible. There are several tools in your toolbox to accomplish this: active immersion, passive listening, and active study.
As mentioned before, active immersion is when you pay full attention to the content you are consuming. Active immersion is the most important activity in language acquisition.
Many learners ask: how often should I look things up while actively immersing ?
On one end of the spectrum, you could look up every word and try to understand 100% of the content. On the other, you could look up nothing and just let the language wash over you.
Rather than trying to find a middle ground between these two, we recommend doing both as separate exercises.
Any media with a reading component can be used for either intensive or free-flow immersion. Some examples include:
- 3-channel: Watching TV with TL subtitles
- 2-channel: Reading a comic
- 2-channel: Listening to a podcast while reading the transcript
- Pure: Reading a novel or blog
Intensive Immersion
In traditional language learning, students are encouraged to look everything up so that they can understand 100%. This is called intensive immersion. Language learning tools like LingQ, Language Learning with Netflix, and Lingopie are built on this idea. They make it easy to look things up so you can understand as much as possible.
Intensive immersion is a powerful tool for learning vocabulary and grammar directly from real-world content. As you immerse, you attempt to puzzle out the meaning of each sentence by using lookups. In this process of puzzling out meaning, you use your analytical mind to break apart the language and try to understand it. Intensive immersion builds a pool of conscious knowledge that your brain can later acquire.
In the beginning, you won’t always be able to figure out a sentence and that’s OK! If the sentence is too difficult to understand or there are too many unknown words, just skip it and move on. It’s better to focus on the low hanging fruit.
Free-Flow Immersion
Intensive immersion is great for learning vocabulary and grammar, but it’s not great for acquisition. When you constantly interrupt your immersion to look things up, your subconscious doesn’t have the opportunity to internalize the language and build linguistic instinct.
The alternative is free-flow immersion where you let the language wash over you. You still pay full attention, but you shouldn’t be looking things up constantly. The occasional lookup is OK, but avoid constantly interrupting your immersion.
Free-flow means accepting and embracing the ambiguity of the language. If you are watching a TV show, accept that you aren’t going to understand everything. Don’t try to look up every unknown piece of dialogue.
Free-flow doesn’t mean you need to go quickly. Go at whatever speed feels comfortable to you as long as you’re not breaking your flow. If you are reading a comic or novel, then take your time, but don’t linger on incomprehensible sentences. Accept that they are currently out of your reach and just move on.
Free-flow immersion builds automaticity: the ability to understand words and structures instantly, without thinking. Automaticity relies on the subconscious mind. To build automaticity, you need to turn off your analytical mind so that your subconscious has full access to the input.
Free-flow immersion is where the majority of acquisition happens. The conscious knowledge you’ve obtained through intensive immersion and active study helps your subconscious comprehend the language and make the connections between the words you hear and the pure thought in your mind.
In the beginning, intensive immersion and free-flow immersion are very different activities. Over time, as you acquire the language, you won’t need to do as many lookups in your intensive immersion and it will start to feel more like free-flow until the two eventually converge into the same activity.
Best of Both Worlds
For the rest of Stage 2, we recommend immersing in two pieces of content simultaneously. One piece is reserved for intensive immersion while the other is just for free-flow immersion.
It’s important to find two pieces of content in the same domain. You want to have as much overlapping language between the content as possible so that the conscious knowledge learned through intensive immersion can be acquired through free-flow immersion.
For example, the TV shows “Friends” and “How I Met Your Mother” are a good pairing. Both are slice-of-life sitcoms. Both take place in New York. Both are romantic comedies. There is a lot of overlap between them. By intensively immersing with Friends, you would learn the same vocabulary that you’d find while free-flow immersing in How I Met Your Mother.
Intensive immersion takes a lot longer than free-flow immersion so you will finish one series long before the other. When searching for new free-flow content, remember to keep your domain small and choose something similar to the shows you have already watched.
2A: Immersion Guide
The goal of Stage 2 is to go from level 1 comprehension to level 5 comprehension within a limited domain. Children achieve this exclusively through listening, but as adults, we can accelerate this process by combining reading and listening.
Reading and listening are fundamental skills that reinforce each other. Reading improves your vocabulary and will help you parse words in your listening practice. Listening improves reading by teaching you what words sound like. This increases your reading speed because you’ll stop needing to sound out words letter-by-letter, and it also improves your accent when you eventually start speaking.
So far, you’ve probably been listening to your TL but not reading. Your first goal in this stage is to catch your reading ability up to your listening ability so that you can activate the feedback loop between the two.
Choosing What to Read
The ideal content is enjoyable, comprehensible, and language dense.
Enjoyable
We’ve talked about how important it is to enjoy your immersion material so that it’s something you want to spend time with, rather than something you dread.
Comprehensible
Using the comprehensibility factors, we can optimize comprehension along multiple dimensions by choosing a serialized TV show that has matching subtitles, and which is aimed at younger audiences.
TV shows generally contain only dialogue and are written using mostly simple grammar. This ensures a small range of vocabulary and grammar, which will help you build your comprehension quickly.
They also provide visual context (which books do not), audio (which comics do not), and more narrative predictability than movies, because you become familiar with the characters and storyline.
When you’re a beginner, the most important criteria when choosing a TV show for reading is that the subtitles match the audio word-for-word. Later on, when you can easily understand the difference between subtitles and audio, then you can use mismatched subtitles.
For native shows, finding matching subtitles is easy. If they have subtitles at all, then they should mostly match.
However, for dubbed shows, finding matching subtitles is more difficult. Generally, the subtitles for dubbed shows do not match the dubbed audio because the subtitles are translations of the original meaning while the dubs are rephrasings. When searching for a dubbed show to read, look for subtitle tracks labeled “CC” (closed captions ). These should match the audio. If you can’t find matching subtitles for a show you can still watch them during free-flow immersion.
Ideally, you want to start with TV shows aimed at audiences aged 7-15 because these will be more comprehensible than shows aimed at adult audiences. However, this kind of content can be difficult to find with matching subtitles. If you can’t find easier content, then jump straight to content aimed at adults. Your learning curve will be steeper, but you’ll get through it.
Language Dense
Language density is a term that describes how many unique words you are exposed to in a given amount of time.
For example, Dr. Seuss’s book Green Eggs and Ham consists of only 50 words. While you can probably read it pretty quickly, you would be exposed to significantly more words if you spent the same amount of time reading the first few pages of Matilda by Roald Dahl.
Books and shows for toddlers typically have very low language density. Some shows for older audiences can be low density as well. For example, some types of action shows have very long, very elaborate fight scenes and car chases, which contain little to no dialog.
The ideal amount of language density is “enough”. In general, denser content is more efficient, but balance that against what you’re interested in.
3-Channel Reading
In this stage, the form of intensive immersion that you’re going to be doing is reading a TV show.
Reading a TV show is straightforward, although not always easy. The idea is to pause before or after each line of spoken dialogue, read the sentence, and then continue.
If you are using Netflix, then the extension Language Learning with Netflix has a built-in autopause feature for this exact exercise.
If you are using a different streaming service, you will need to pause manually.
If you have the video and subtitle files on your computer and are watching them locally, you can use MPV and this script for auto-pausing.
What to Focus On
For each sentence you read, the goal is to try to understand it. Treat it like a puzzle game where you are decoding the meaning. Lookup unknown words in a bilingual dictionary and attempt to puzzle through the meaning of the sentence.
In the beginning, most of these puzzles will be too hard to solve. When there are three or more unknown words in a sentence, you probably won’t be able to figure out the meaning, even with lookups. That’s OK! Your brain simply is not ready for the sentence yet. For these sentences, it’s fine to look up all the words if you feel motivated, but it’s also fine to skip them and move on to the next line.
This reading process is also a good opportunity to choose what to study in the SRS. This process is called “sentence mining” and it’s explained in the next article.
Free-Flow Immersion
In addition to the intensive reading immersion, also do free-flow immersion. Doing both allows you to capitalize on the knowledge you gain from reading and convert it into acquired language.
Make sure to choose two pieces that are in the same domain. By keeping them in the same domain, you guarantee that your intensive reading will assist in building comprehension of the free-flow content.
At this stage, whether or not to use subtitles for free-flow immersion is a personal choice. Subtitles have the benefit of removing the ambiguity of the audio which increases comprehension, but some people find themselves so distracted by subtitles that they can’t turn off their analytical mind and fully enjoy the content. Try out both methods to see what you like.
While you should not be constantly interrupting your free-flow immersion with dictionary lookups, it’s fine to look up a word here and there.
Use your free-flow immersion time to explore new shows and see what you like. If you don’t like it after a few episodes, just stop watching.
Feel free to reuse shows you’ve already free-flow immersed with for intensive immersion. On your first pass, you’ll miss a lot of the details. Intensively immersing in a free-flow show is fun because you get to answer the questions from your first watch.
How Much Time
With language learning, the equation is simple: the more time you spend immersing, the faster you improve.
From this point forward, you should be looking for opportunities in your life to immerse with TL content instead of your native language (NL). If you like to binge Netflix on the weekends, then turn that binging into immersion time.
Balancing Intensive and Free-Flow
When getting started with reading, it can be pretty tough. Try to do intensive reading when you have the most energy and focus. You should aim for 30 minutes per day, but if you are struggling, start with 10 minutes per day and gradually build up to 30. The remainder of your active immersion time should be spent on free-flow immersion.
Bare Minimum
For very foreign languages (e.g. English → Arabic), we recommend at least two hours per day of focused immersion: 30 minutes intensive, 90 minutes free-flow.
For closer languages (e.g. English → Italian), we recommend at least 1 hour per day of focused immersion: 30 minutes intensive, 30 minutes free-flow.
The numbers above do not include passive listening or SRS study.
Remember, these are bare minimums. The more active immersion you do, the faster you will level up, so we encourage you to do as much as you can reasonably fit into your life without making it a chore.
Always keep the enjoyment factor in mind—it’s more efficient to do a bit less each day than to go all in, burn out, and quit entirely. Remember, efficiency doesn’t matter if you never finish.
Passive Listening
Listening comprehension will typically increase more slowly than reading comprehension. To ensure that your listening comprehension has a chance to keep up, continue to listen to previously watched shows when doing mindless tasks.
Passively listening to shows that you’ve consumed intensively will be most beneficial, but you may not have enough content to listen to. Supplement with shows that you have watched free-flow.
Level Up
You are ready to move on to Stage 2B when you have level 3 comprehension while reading an episode of a TV show. This should be an episode that you’ve never seen before, though it can be part of a series you have been watching.
To evaluate your comprehension, watch the episode line-by-line, read the subtitles, but don’t do any lookups. You should be able to:
Recognize 50% of the words being used.
That doesn’t mean that you understand or know these words, only that you get the sense that you’ve heard/seen them before.
Occasionally understand entire sentences.
Follow the plot points of the story, although the details will still be a mystery.
2A: Basic Sentence Mining
Sentence mining is the process of taking words and sentences directly from your immersion and learning them with the SRS. You can start sentence mining as early as you like, but most people prefer to start this process after they have learned the most basic grammar structures and have memorized the most frequently used words. If you haven’t completed your study of the most common words, then feel free to wait on sentence mining, or you can do both simultaneously. It’s your choice.
Sentence mining unifies study and immersion. By studying words and sentences that come directly from your immersion content, you ensure that you are focusing your study on the words that are the most relevant to you as you start to gain footing in your first domain. Since you will be handpicking which words and sentences to learn yourself, you will have a rich connection to them. This will help you build strong memories quickly and easily.
Sentence mining is a creative, exploratory process, and everyone has their own method. Over time you will discover a method uniquely suited to your preferences and lifestyle.
Here are some basic guidelines to get you started.
Choosing What to Mine
With every hour of immersion, you will encounter many unknown words that you could learn. But, some words are going to be more worth your time than others. Because you will only be able to make a limited number of SRS cards each day, it’s important to choose what to mine carefully.
The first thing to consider is whether you truly need a card to learn something. If you think you’ll remember a word without the support of the SRS, then don’t make a card for it. Some words are very similar to words in your native language (NL), and you will probably only need to hear them once or twice to learn them. Other times a word is built up of components you’re familiar with, and once you see the connection, the meaning sticks. And sometimes words just stick on their own, for no reason that you can point to.
That said, initially, most words will be difficult to learn without the SRS. When narrowing down what to mine, keep in mind that the most efficient path to increasing your potential to understand—and therefore acquire—your target language (TL) is to mine sentences that are low-hanging fruit:
1. Prioritize words that feel familiar
Words that occur frequently in your immersion provide a high return on investment. If a word seems to be drawing your attention or feels familiar to you, that’s a good indication that it’s a common word.
2. Choose words that seem accessible
If you look up a word and the definition feels hard to grasp, then skip it for now. Your time and efforts are better spent learning words that are already within reach.
3. Prioritize words that you want to learn
If a word is interesting and just seems to be calling out to you, that’s reason enough to learn it. An emotional connection to a word makes it much easier to memorize, reducing the “cost” of learning it. This can make learning a word worth it, even if it doesn’t seem particularly useful or frequently used.
Mine Sentences, Not Words
As a general rule, you should create cards for phrases and sentences, rather than isolated words. There are three reasons for this.
The first is that, oftentimes, simply knowing the meaning of a word isn’t enough to fully grasp how it’s used in the wild. Antimoon illustrates this idea beautifully with the definition of “account for”:
-
If a particular thing accounts for a part or proportion of something, that part or proportion consists of that thing, or is used or produced by it.
On its own, this definition doesn’t give you a real sense of what "account for" really means or how it’s used. However, that dictionary also provides an example sentence that makes things a lot clearer:
Computers account for 5% of the country’s commercial electricity consumption.
In this way, a good example sentence is often crucial for really grasping a word’s usage. -
The second reason for making cards based on sentences is that many words have multiple meanings. For example, the word “bark” means something completely different depending on whether you’re talking about dogs or trees.
Trying to memorize every meaning of a word with a single card often results in cards that are excessively difficult and cumbersome to review. It’s much more effective to learn the meanings of words one at a time. This is an example of the minimum information principle, which is explained in more depth in the following section.
Creating cards for sentences rather than individual words is the most straightforward way to narrow your focus to a single usage of the target word: simply focus on the meaning of the word in that particular sentence. Additionally, because the sentences will have come from your immersion content, you will be learning the particular meaning that’s most relevant to you. -
The final reason for making cards for sentences is that they’re easier to remember. Compared to an isolated word, a sentence provides a larger chunk of meaning for your brain to latch onto, and this makes it easier to internalize.
This will be particularly true if the sentence came from an actual book or show that you watched. You’ll be able to recall what character said the sentence and what scene it was used in. This personal connection to the sentence will make it much easier to integrate the target word into your knowledge of the language.
Select One Target (1T) Sentences
It’s best to mine sentences that contain only one unknown element (word or grammar structure ) each. These are known as “one target” or “1T” sentences.
Some people worry that sticking to 1T sentences is slow and inefficient, but the opposite is true. Lots of targeted, crisp flashcards will get you to your goal more quickly and with less effort. This idea is known as the minimum information principle.
If you have three words that you want to learn, it is much better to have three different cards, each of which is focused on an individual target word.
If you put all three words on a single card, then if you forget one of them, you will have to fail the card, even though you remembered two of the words. This means you’ll end up doing redundant reviews on the two you remembered.
Having to recall all three unknown words at the same time will also make the card harder to understand, making it less likely that you will fully internalize each of the words.
It would also increase the risk of introducing memory interference : even though the three words don’t have any intrinsic relationship to one another, learning them together may cause you to falsely associate them in your mind.
What to Put On Cards
In this stage, keep your card as simple as possible: put the text of the sentence on the front. On the back, put the definition of the target word, and (optionally) a screenshot of the scene that the sentence was taken from.
Remember: you’re not trying to produce the language; the goal of these cards is to improve your comprehension. So, keep your cards simple and grade yourself based on how well you were able to understand the sentence on the front.
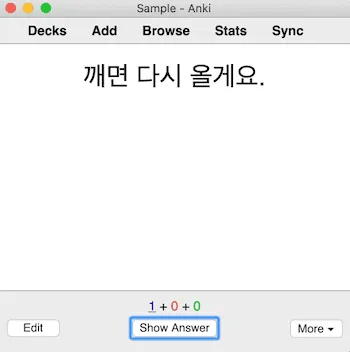

When to Mine
There are two overall approaches to sentence mining: automated and manual.
Automated mining consists of using software that automatically extracts 1T sentences from your immersion material and makes them into cards. This is an advanced technique and takes quite a bit of technical fiddling to get working, so we recommend waiting to experiment with this until later.
Manual sentence mining consists of hand-picking what sentences to learn from your immersion content and creating cards yourself. You can do manual sentence mining either during intensive immersion while reading a TV show, or during free-flow immersion. Try both, you may find that both are fine, or that one suits you better than the other.
There are two ways to go about manual sentence mining: synchronous and asynchronous.
In synchronous mining, when you come across a sentence you want to learn while immersing, you pause your immersion and make a card for it right then and there. The benefit of this approach is that your active immersion and sentence mining become unified into a single activity. This can help to streamline your overall language learning routine.
Some people find synchronous mining disruptive to their immersion. They prefer asynchronous mining, which separates card creation from immersion. In asynchronous mining, while immersing, you simply make note of sentences and words you want to learn. You can do this by copying and pasting the sentence into a text file or noting down the timestamp of the sentence. Then, at a later time, you go through the sentences you have collected and create cards for them in bulk.
Best Practices
Our SRS recommendations don’t change from Stage 1, so feel free to reread 1C: SRS Best Practices.
2B: Immersion Guide
In Stage 2A, the goal was to learn the basics of reading your TL. You should now have level 3 comprehension while reading a simple TV show of your choice and using all available tools and supports described in 2A: Comprehensibility Index.
In Stage 2B, you are going to gradually increase the difficulty of your immersion. By the end of Stage 2B, you will achieve level 4 comprehension while immersing with native content meant for adults.
Ideally, you would keep all your content in the same genre while increasing the difficulty level. Unfortunately, this is an unrealistic expectation. Most people will want to branch out into different genres to keep themselves entertained and engaged. In Stage 2B, it’s okay to branch out and expand your knowledge to other domains.
The downside of expanding your domain of focus is that leveling up your comprehension becomes more difficult. In Stage 2C, you will refocus your energy in order to quickly increase your comprehension from level 4 to level 5.
How to Increase Difficulty
In Stage 2A, you wanted to make your immersion content as comprehensible as possible. That meant using easier media and tools to aid comprehension.
As you progress through Stage 2B, you will gradually increase the difficulty of your immersion. As we described in 2A: Comprehensibility Factors, there are many ways to control the difficulty level of your immersion. Below we explain which to use and which to avoid.
Contextual Complexity
Don’t try to increase contextual complexity just yet. Keep using visual media with a narrative structure and try to stay within a domain that you are already familiar with.
That said, prioritize your enjoyment over strictly keeping to one domain. If you want to consume content in a different domain, then go for it. Just be aware that there will be less overlap and you won’t be as familiar with the language used, which will make the content more difficult.
Linguistic Complexity
So far, you’ve been immersing with simplified content because it’s more comprehensible. Recall from 2A: Comprehensibility Factors that linguistic complexity is determined by three factors: audience level, domain difficulty, and whether the content is dubbed or native.
Audience Level
By the end of Stage 2B, you should be intensively immersing with content aimed at adults. Shows for children and adolescents may still be used for free-flow immersion because they will help solidify and acquire the knowledge you’ve obtained.
Domain Difficulty
Don’t pursue difficult domains yet. Try to keep things easy. Slice-of-life will be easier than politics or fantasy.
Dubbed vs Native
Dubbed content is artificially simplified. By the end of Stage 2B, you want to be using only native content for your intensive immersion. This will allow you to become familiar with your TL’s culture and how natives actually speak (e.g. what idioms do they use, what is their sense of humor ).
Hacks, Tools, and Supports
In Stage 2B, you should still be using all the tools available to you to help you comprehend your intensive immersion.
Comics
So far, you’ve only been immersing with TV shows and using that immersion as your intensive reading activity.
Another reading activity you can choose is to read comics /manga. Comics are a form of hybrid input that combines text and visual context. The visual context reinforces the meaning of the text.
Comics are a great stepping stone towards reading more complex things like blogs, news, and novels. The text in comics is mostly dialogue and the visual context makes the story comprehensible even if the words are not.
Novels, on the other hand, replace visual context with literary and descriptive language. Learners at this early stage usually find the language in novels too difficult to comprehend and wind up frustrated. How to read novels is explained in Stage 2C.
Webcomics
Nowadays, manga and comics are available online and are known as Webcomics or WebToons.
The downside of webcomics is that the text is usually hardcoded, meaning you can’t highlight and copy/paste words for easy lookups. This isn’t a huge problem for languages with phonetic writing systems, but for Chinese and Japanese, it can be difficult to identify unknown characters. This can be remedied by using Optical Character Recognition (OCR) tools, which allow you to copy text from pictures.
Helpful Links
Webcomics:
- Cover: Comic book reader for windows
- WebToons: Read comics online or via an app
- WebComicsApp: Read comics online or via an app
OCR:
-
ShareX (OCR guide): A tool to take screenshots and OCR captured text
-
Google Lens: A tool built into Android that allows you to copy and paste text you see in the real world.
-
Google Keep: A note-taking service where you can save images.
Text in images is automatically extracted using OCR.
Free-Flow Immersion
Free-flow immersion in Stage 2B is almost the same as in Stage 2A. You will continue to immerse yourself and watch TV shows in real time.
However, at this point, you should start moving away from subtitles in free-flow immersion so that you can get more listening practice. At least 50% of your free-flow immersion time should be without subtitles.
You should have a sizable library of shows you’ve watched free-flow by this point, so pick your favorites and line them up to use for intensive immersion.
How to Spend Your Time
For all of the active immersion activities described above, our recommendations are the same as in 2A. At least 30 minutes of intensive reading (TV or comics ) with the remainder of your time spent with free-flow immersion.
Passive Listening
You will get more benefit by passively listening to a show you have intensively immersed with than a show you have free-flow immersed with because you spent the time and energy looking up words and trying to puzzle out the meaning of sentences. This will make passive listening more comprehensible and more engaging. The sooner you passively listen to the content you have intensively immersed with, the more you will get out of it because the memories will be fresh.
If you have built up a decently sized library of passive listening material, then try to focus on that subset of content. However, as always, don’t force yourself to use ONLY that content. Do what’s interesting and engaging.
Level Up
By the end of Stage 2B, you should have level 4 comprehension while reading native content.
To evaluate your comprehension, pick a native show that’s meant for an adult audience (ie. not a children’s show). Watch an episode that you’ve never seen before, stopping to read each subtitle line, but without doing any lookups. You should be able to follow along with the majority of the ideas expressed by the characters, though some details will still be lost.
2B: Advanced Sentence Mining
Broadly speaking, two different categories of SRS cards are used for language learning: comprehension and production.
Comprehension cards prompt you with a chunk of language, and your job is to understand it. You might be shown a word, a phrase, or a whole sentence. The back of the card would have information that allows you to check your understanding.
Production cards prompt you to produce a chunk of language from memory. For example, you might have a picture of a refrigerator on the front of the card, as a cue to prompt you to produce the target language (TL) word for “refrigerator” from memory.
In the Refold method, the role of the SRS is to help you understand more of your immersion, not to help you produce the language yourself. Remember, the ability to speak and write your TL results from acquisition, which comes from comprehending your immersion.
Therefore, all cards that you make when sentence mining will be comprehension cards, not production cards.
Different Card Formats
Card formats are differentiated by what you put on the front of the card. This is the important part because it’s what you are testing yourself on. The back of the cards is much less important. Its purpose is to help increase your understanding of what is on the front.
The front of cards can feature either an audio recording or written text. Never put both the audio and text form of a sentence on the front of a card. You wouldn’t be truly testing your listening ability or your reading ability.
The audio or text can be just the target word or a one-target (1T) sentence here the target word is the only thing in the sentence that you don’t already know.
This results in four different card formats:
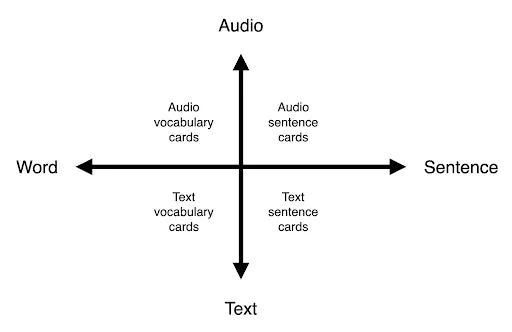
The four card formats have unique pros and cons. Experiment with all four to get a feel for the benefits. You may settle on one or two formats that work best for you, or continue to use all four. You may also find that certain formats are more or less useful depending on what stage of the language learning process you’re at.
Audio Sentence Cards
Audio sentence cards test your listening comprehension of a 1T sentence.
The front of the card consists of
- an audio recording of the sentence. This audio will typically be taken from a show that you are watching, but can also come from any other source, as long as the sentence is spoken by a native speaker.
The back of the card should have at a minimum:
- The written form of the sentence.
- The definition of the target word.
You can also add other things to the back of the card that will help you understand it better. For example, you might add a screenshot of the scene that you mined the sentence from.
For audio sentence cards, it’s crucial to choose sentences where you can hear the target word clearly. Training your listening comprehension on a clearly spoken sentence will let you understand mumbled ones; the opposite is not true.
If you find a sentence you really like but that is too blurry to use for an audio sentence card, use one of the other formats. You can always put the audio sentence on the back of the card.
Audio sentence cards primarily train listening ability, but because the written form of the sentence is on the back, they help you develop your reading ability as well.
The biggest drawback of this card format is that it creates highly context-dependent memories. The audio recording will have a huge number of clues and artifacts : the intonation, pauses, the pacing of the sentence, the actor’s voice, background noises, and music. You’ll also remember the scene that the audio clip was taken from, and perhaps even the emotional reactions that you had while watching the scene. Your memory of the meaning of the sentence will often be tied to these elements. You’ll be able to easily understand the sentence when reviewing the card, but sometimes you won’t be able to recall the target word’s meaning when you come across it in your immersion. Occasionally you won’t even recognize it as a word that you have a card for.
Since making audio sentence cards requires capturing audio, and because the requirements for the clarity of the audio are so stringent, it can sometimes be difficult to find suitable sentences for this card format.
When grading yourself, pass the card if you understand the meaning of the sentence when you hear it. It’s fine to replay it two or three times. If you still don’t understand it, fail the card so that you will see it again sooner.
Text Sentence Cards
Text sentence cards test your reading comprehension of a 1T sentence.
The front of the card consists of the
- written form of a sentence.
The back of the card should have
- at minimum the definition of the target word.
- You can optionally add other elements that help you understand the card to the back of the card such as an audio recording of the target sentence, the audio of the target word, a picture that represents the target word, a screenshot taken from the scene where you encountered the sentence or pronunciation hints.
Don’t put pronunciation hints on the front of the card, whether that is IPA or a phonetic transliteration (e.g. romanization, pinyin, furigana, etc).
Text sentence cards are quick to make and very natural to review since the target word is embedded in a context that helps make the meaning of the word clear. Having the target word used in a sentence also helps you internalize the usage of the word.
That said, this context can also be a disadvantage, because sometimes you remember the meaning of the sentence as a whole, and become unable to recognize or understand the target word in other contexts.
In the beginning, when your reading ability is completely undeveloped, reviewing text sentence cards can be quite mentally taxing because you have to read a whole sentence. This can reduce your overall study capacity during a review session.
Text sentence cards don’t train listening ability, though reading ability does transfer to listening ability over time through immersion. You can help train listening ability more directly by adding sentence audio to the back of cards. In this case, it’s fine to have blurry or unclear speech, as your brain will already know what it is listening for by the time you hear it.
When grading yourself, pass the card if you understand the meaning of the sentence when you read it. Otherwise, choose “again” so that you will see the card again sooner.
Audio Vocabulary Cards
Audio vocabulary cards test your listening comprehension of a single word.
The front of the card consists of:
- an audio recording of the target word spoken by a native speaker.
The back of the card should have at a minimum:
- The written form of the word.
- The word, used in an example sentence, in written form.
- The definition of the word.
The back of the card can also have other elements like an audio recording of the example sentence, a picture representing the word, or a screenshot of the scene that you mined the example sentence from.
The example sentence for an audio vocabulary card doesn’t have to be strictly 1T. Since you’re testing your understanding of the word in isolation on the front, there won’t be any memory interference from unknown elements in the sentence on the back.
Audio vocabulary cards primarily train listening ability in a way that is less context-dependent than audio sentence cards. This tends to help you recognize and understand the word more reliably in your immersion. This lack of context is also the card format’s largest disadvantage: it can make the word harder to learn in the first place. It can also make the card more awkward to review, because the lack of context means that you often end up spending more time performing a search pattern against your memory, trying to attach the word to the correct meaning.
Audio vocabulary cards train reading ability to some extent, but it’s not their main strength.
When grading yourself, pass the card if you understand the meaning of the target word when you hear it. Otherwise, choose “again” so that you will see the card again sooner.
Text Vocabulary Cards
Text vocabulary cards test your reading comprehension of a single word.
The front of the card consists of the
- written form of the target word.
The back of the card should have:
- The written form of an example sentence that uses the word.
- The definition of the word.
- The back of the card can also have other elements like an audio recording of the example sentence, an audio recording of the word in isolation, a picture representing the word, or a screenshot of the scene that you mined the example sentence from, or pronunciation hints for the target word or example sentence.
Don’t put pronunciation hints on the front of the card, whether that is IPA or a phonetic transliteration (e.g. romanization, pinyin, furigana, etc).
Text vocabulary cards are easy to make, and generally quick to review. However, having the word tested in isolation can make it harder to learn and can make review awkward because the unit of meaning is so small that it can be difficult to attach the word directly to the concept it corresponds to. As a result, it may take more time to review these cards than cards with a sentence on the front, because you spend a lot of time thinking about the word and making connections to the meaning.
Since text vocabulary cards have an example sentence on the back, they still provide enough context to build an understanding of the word and its usage. This sentence doesn’t have to be 1T, as it is simply providing additional context after your recall has been tested. Therefore, there’s no concern about memory interference.
When grading yourself, pass the card if you understand the meaning of the target word when you see it. Otherwise, choose “again” so that you will see the card again sooner.
If you have audio on the back of the card, you can also grade yourself on reading the correct pronunciation.
Guidelines
Don’t make multiple cards for the same meaning of the same word.
If a word has multiple meanings, then use separate sentence cards for the different meanings, since the word in isolation is not enough to differentiate the meanings.
For each word you learn, choose the card format you think will help you learn it the best. You can transition a card from one format into another at any point in a card’s life.
Be careful not to put additional clues and context (e.g. images) on the front of cards, as this can lead to creating memories that are reliant on that additional information. This makes it less likely that you will understand the target word when you come across it in your immersion.
Having a picture on the back can help create stronger memories. It’s especially useful to have a picture for cards where the target word is a noun. In these cases, a picture can be more helpful than a definition.
Automated Sentence Mining
An advanced sentence mining technique is to use software to automatically create flashcards from videos with subtitles. This creates a large “sentence bank”, which you can then use to select cards to study, either by searching for words that they want to learn and sifting through the resulting sentences or by using software that automatically prioritizes cards to learn based on a frequency list.
Here are some useful tools for automated sentence mining:
Convert media with subtitles into Anki cards:
- Subs2Srs (Windows)
- Subs2cia (Linux and Mac)
- Substudy (Mac)
- Morphman: Order your cards for optimal learning
2B: Casual Monolingual Transition
Language is a tool that we use to understand the world around us. Each language is its own paradigm : a lens through which we see the world. When you first start learning a language, the natural inclination is to translate between your native language (NL) and target language (TL) because you have only ever seen the world through one lens. Unfortunately, if you attempt to force your TL to fit into the paradigm of your NL, big parts of the TL will get distorted in the process. To be truly fluent, you need to build a new paradigm for your TL.
Using a bilingual dictionary is a great tool when you first start learning a language because it uses your NL paradigm as a scaffolding for learning your TL. This scaffolding accelerates your comprehension. Unfortunately, it also tangles the two languages together and distorts the meaning of your TL.
Immersion alone is enough to untangle the languages and build this new mental paradigm, but you can accelerate the process by adopting a native (monolingual) dictionary as your primary reference guide for the language.
Building this new mental paradigm unlocks the ability to think in your TL. When you learn new words and concepts, you associate them with other TL words and concepts rather than associating them with your NL. This allows you to describe a TL concept using your TL. As an added benefit, reading a monolingual dictionary is a form of active immersion and allows you to accumulate additional time in your TL.
Using a monolingual dictionary also gives you a more accurate understanding of a word or concept. Up until now, you’ve been using a bilingual dictionary to translate the meaning of TL words into your NL so that you can comprehend. When you translate from TL to NL, you force the TL to fit into the paradigm of your NL which distorts the original meaning of the TL words. By using a monolingual dictionary instead, you can learn your TL directly without distorting the meaning.
By forming this new mental paradigm early, you will dramatically accelerate your journey to fluency.
When to Start the Transition
The monolingual transition is more difficult for some languages than others. For related languages, the transition is pretty easy and only takes 1-2 months. For these languages, we recommend making this shift towards the end of Stage 2B. The gradual transition guide we’ve provided below should be sufficient to make the switch.
For more distant languages, we recommend waiting until Stage 2C. Trying to use the monolingual dictionary before you have a solid foundation in the language is too overwhelming. By waiting, you will make the transition much easier.
If you try the gradual approach below and it doesn’t work for you, wait until Stage 2C where we’ve provided a more structured tutorial.
Gradual Transition
The monolingual transition is a gradual process. You don’t need to move 100% to the monolingual dictionary overnight (or ever, really).
When you start using a monolingual dictionary, it will take extra energy. If you find the process too draining, then revert to only using the bilingual dictionary until you have more mental energy.
1. Check the Monolingual Dictionary First
During immersion and sentence mining, start looking up words in the monolingual dictionary first before reverting to the bilingual dictionary.
Many words have multiple meanings. Try to identify which definition is relevant to the sentence you are trying to understand.
2. Add Monolingual Definition to Cards
Assuming you can figure out which definition matches the sentence you are trying to understand, add that monolingual definition to your cards in addition to the bilingual definition.
By using HTML summary tags, you can hide the definitions in expandable sections. While reviewing, read the monolingual definition first before th bilingual one. It’s ok if you don’t fully understand the monolingual definition. Each time you review the card, you’ll have an opportunity to try again.
If there are unknown words in the definition, then create cards for them.
Here’s a sample Anki deck with an example card type that uses the summary tag to create hidden sections:
This is what the hidden sections look like when collapsed :
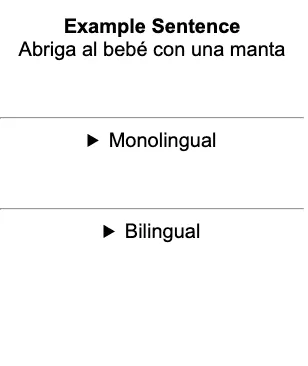 Here, the hidden sections are expanded :
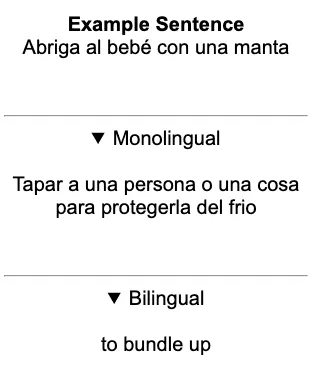
3. Shift to Monolingual
If you can fully understand the monolingual definition during immersion or sentence mining, then there’s no need to use the bilingual dictionary for that word. Over time, you will gradually stop using the bilingual dictionary.
You’ve completed the transition when you can understand 90% of your lookups in the monolingual dictionary without needing to rely on the bilingual dictionary.
Choosing a Dictionary
There are many monolingual dictionaries available. The way words are described can vary greatly depending on the dictionary. We recommend keeping multiple dictionaries on hand or using a dictionary aggregator so you can search multiple dictionaries at once. Reading through a word’s entries in multiple dictionaries will increase the chance you find one that makes sense to you.
When Not to Go Monolingual
Certain categories of words have disproportionately complex and convoluted monolingual definitions. It’s best to revert to the bilingual dictionary for these types of words.
Simple Words
It may seem counterintuitive at first, but very simple words often have complex and abstract meanings.
Examples
Thing: an object or entity not precisely designated or capable of being designated.
The: used as a function word to indicate that a following noun or noun equivalent is definite or has been previously specified by context or by circumstance.
Additionally, simple and common words can sometimes have twenty, slightly different definitions. It’s best to just use a bilingual dictionary for these words.
Concrete Nouns
Concrete nouns refer to objects that you can experience through touch, taste, and smell. The alternative is abstract nouns that describe certain ideas.
You’ve likely experienced most concrete nouns and just need to associate the TL word with that experience. Some concrete nouns have very technical or abstract definitions that don’t help you make the connection to your experience.
Examples
Piano: a musical instrument having steel wire strings that sound when struck by felt-covered hammers operated from a keyboard.
Camera: a device that consists of a lightproof chamber with an aperture fitted with a lens and a shutter through which the image of an object is projected onto a surface for recording (as on a photosensitive film or an electronic sensor) or for translation into electrical impulses (as for television broadcast).
If you find a definition that is overly technical and abstract, don’t use it. It just complicates things. Instead, see if you can use an image instead. If the target word is a place, color, species of plant or animal, or any kind of physical object, then an image is going to be more valuable than a definition.
If an image isn’t possible, then just use the bilingual definition.
Technical or Academic Terms
For academic or technical vocabulary, you can rely on the bilingual dictionary. These words have standardized technical meanings across languages, so you won’t be losing any information by using a bilingual definition.
In fact, for technical terminology, we recommend making clear associations between your NL and TL because it helps transfer technical knowledge between the languages.
For example, the word “hydrogen” means the same thing as the French word “hydrogène” and the Japanese word “水素” (suiso).
If you already know what “hydrogen” means in English, then there’s no need to learn your target language’s word for “hydrogen” through the monolingual dictionary. Simply associate the English word “hydrogen” with the corresponding word in your TL.
example-definition-thing html-summary-tags sample-anki-deck-with-summary-tag
2C: Immersion Guide
In Stage 2B, you increased the difficulty of your immersion content until you could comprehend native media aimed at adults. You should now be at a level 4 comprehension with native media while continuing to use most of the supports described in 2A: Comprehensibility Index.
Stage 2C explains how to gradually remove those supports until you can fully understand native media in preparation for writing and speaking in Stage 3.
Focus Your Domain
In Stage 2B, you probably jumped around between domains to follow your interest. If so, you have a decent understanding of many different domains, but you haven’t mastered any of them yet. As mentioned in 2A: Domains, the fastest way to learn a language is to master a single domain first before expanding to others. The fastest way to master a single domain is to narrow it down as much as possible.
We recommend choosing slice-of-life as your first domain to master because it will be the most relevant to your output in Stage 3. Slice-of-life content follows the lives of regular (though very beautiful) people.
You could start with a different domain, but keep in mind that you probably won’t need vocabulary related to law enforcement, surgery, court proceedings, starships, and 14th-century swordsmanship to have everyday conversations.
For the rest of this article, we will assume that slice-of-life is the domain you choose to focus on.
Master the Domain with Supports
3-Channel Reading
Recall that 3-channel hybrid media means audio, visual, and subtitles. By this point, you should be pretty comfortable reading a native TV show in your TL. As you get more and more comfortable, you’ll pause less and less often because you need fewer lookups. Eventually, you’ll stop pausing entirely and just read in real time. At this point, intensive immersion of 3-channel media converges with free-flow immersion of 3-channel media.
The first step of Stage 2C is to build up to this convergence so that you can read the subtitles of your TV show in real time.
Free-Flow. No Subs
Your reading comprehension has likely outpaced your listening comprehension. Outside of 3-channel reading, you should use the rest of your immersion time for free-flow watching without subtitles so that you can build up your listening abilities.
Listening to native slice-of-life is the most optimal because it matches your first domain, but if you get bored and need variety then you can use dubbed content or content outside the domain. It’s very important for your intensive immersion to be native slice-of-life; what you choose for your free-flow immersion doesn’t matter as much.
Remove All Supports
Once your intensive reading has converged with free-flow watching with subtitles, you are ready to start removing the supports that are helping artificially increase your comprehension.
You should no longer read show summaries ahead of time, or watch dubs or adaptations of stories that you already know. Similarly, focus more on new shows than on rewatching previously watched shows.
Only use subtitles to occasionally double-check your understanding or to ensure that you get the correct spelling while sentence mining.
Stop rewinding sections to give yourself a second chance at parsing audio and catching details.
Now that your comprehension has grown, you will be able to enjoy movies, which removes the support of having long-running storylines with familiar characters.
Your dictionary lookups should become rarer until you can comfortably watch without a dictionary. There will still be unknown words, but they won’t get in the way of your comprehension.
Pure Listening (Optional)
As your comprehension increases, you’ll be ready to stop relying on the visual context for comprehension. To practice your listening comprehension you can use pure audio (i.e. podcasts, audiobooks, etc.) or talking-head video.
Pure listening is considered optional because understanding TV is good enough to move on to Stage 3. However, pure listening will help accelerate your listening comprehension of TV shows and also help you further down the line.
Not all audio is the same level of difficulty so we’ve provided a guide on how you can level up. It’s easiest to start with audio content with a strong narrative structure such as scripted radio dramas and simple podcasts that tell short stories.
Over time, your comprehension of pure audio will increase to the point where you can do mindless tasks while listening to and understanding new content. At this point, active listening converges with passive listening.
Non-TV Reading (Optional)
If you want to explicitly practice reading outside of TV shows then go for it! Increasing your general reading comprehension will help you read faster while immersing in 3-channel media.
As mentioned in Stage 2B, comics are a great pairing with reading TV because they are dialogue-heavy and provide a visual component. When choosing comics, try to find ones in the slice-of-life domain so that it will align with your goal of level 5 comprehension.
You can also start reading blogs. These aren’t necessary for casual conversation but if you read blogs about topics that interest you, then it will give you the vocabulary to talk about your interests in casual conversation.
In Stage 2, reading novels is completely optional. While TV and comics use visual context, novels use literary and descriptive language. This literary language will massively expand your first domain so reading novels can slow down your progress from level 4 to level 5. If your goal is to speak as fast as possible, then skip novels for now.
However, if you are interested in reading a novel then go for it! Always follow your interests. We’ve provided a guide for how to choose your first novel and different approaches to tackling that challenge.
Monolingual Transition
If your TL is very different from your native language (NL), you should be ready to tackle the monolingual transition once your reading comprehension is at a high level 4. With a difficult language, it can be useful to take a more structured approach than the casual monolingual transition process described in Stage 2B. We’ve provided a guide for how to deliberately tackle the monolingual transition.
Level Up
You’re ready to move to Stage 3 when you have level 5 comprehension of slice-of-life TV shows intended for adults, without using any significant supports.
To evaluate your comprehension, pick an episode of a native show that you’ve never seen before. Watch the episode without subtitles and without pausing. You should have near-perfect comprehension of everything said.
As you progress to Stage 3, continue immersing in this first domain until you reach level 6: effortless comprehension. Having a level 6 domain enables you to relax with your TL for those times when you’re too tired to focus.
2C: Pure Listening (Optional)
So far, you’ve been practicing listening comprehension with visual context through TV shows. Both TV and movies give your listening a significant comprehension boost through visual storytelling.
When having a conversation, there is some visual context in the form of body language, but it’s less descriptive than the visual context you get from a TV show or movie. To help you prepare for real-world conversation, you can practice listening with pure audio which will improve your listening comprehension.
Start Easy and Level Up
As outlined in 2A: Comprehensibility Index, different media types have different levels of difficulty.
We recommend starting with scripted radio dramas or narrative podcasts because the audio is clean and the story is more predictable.
Another good place to start is single topic, single speaker YouTube videos. These are within a narrow domain which makes them easier to master, and the video context provided is about the same as you’d get in a face-to-face conversation. TED Talks are a good example of single topic, single speaker videos.
The next level is multi-speaker talk shows covering a single topic. These are still within a narrow domain, which makes the vocabulary easy to master, but because there are multiple speakers, the audio is going to be messy. They will cut each other off, speak over each other, and mumble. This will help you develop the ability to understand messy audio.
Though you may not consider them “talk shows”, street interviews are also multi-speaker, single topic with messy audio and help develop the same abilities.
The hardest mode is multi-topic, multi-speaker talk shows. You will need proficiency in all domains they reference in addition to sufficient listening comprehension to understand people talking over each other and speaking quickly. Don’t expect to fully understand these until Stage 4.
If you decide to read novels, you can also listen to audiobooks. The audio from audiobooks is very clean so it won’t help with real-world conversation, but it will help you acquire listening comprehension for the massive amounts of vocabulary you’ve absorbed from reading the novel.
How to Spend Your Time
At this point, how you spend your immersion time depends on your goals and whether or not you’ve decided to pursue literary reading.
If you are following the recommendations outlined in 2C: Immersion Guide, then adding 30 minutes of pure listening will help accelerate your general listening comprehension.
If you’re tackling the challenge of reading novels, it’s your choice how to split your immersion time. You could focus on reading one day, watching TV the next, and pure listening the next. Another option is to try to balance the activities evenly each day.
If you decide to focus heavily on one activity for a week or more then be sure to spend a bit of time regularly using the other abilities, to ensure that they don’t atrophy.
Types of Listening
Active listening is the process of focusing your full energy and attention on your pure listening content. If you’ve decided to pursue pure listening, then dedicate 30 minutes per day to active listening. Treat it as seriously as you would watching a TV show or reading. Don’t try to do other activities simultaneously.
As your comprehension of pure audio increases, you will find that active and passive listening converge. You won’t need to pay 100% attention to hear and comprehend everything. If you can easily understand a piece of pure audio content, then feel free to use it for passive listening.
2C: How to Read a Novel (Optional)
Reading literature is not a prerequisite for learning to output.
Reading compelling stories is a powerful and effective way to develop competency in a language, but the language in literature is richer and more complex than the language used in day-to-day life.
Understanding a novel is significantly more challenging than understanding comics or TV shows. Developing this understanding takes a lot of time and effort but doesn’t particularly help with casual conversation. If your goal is to speak as quickly as possible, then wait until Stage 4 to start reading literature.
However, if you are intrinsically interested in reading novels and are ok with delaying your output, then there are some benefits to reading in Stage 2. You will enter Stage 3 with a much larger vocabulary and you will be more familiar with the idiomatic phrases and cultural aspects of the language.
If you decide to tackle literature, then start with simpler content and increase the difficulty as your language ability grows.
The ideal content is compelling, and just barely above your level. It will have some unknown words, but because you understand everything around those words you may be able to infer the meaning from context without looking up the meaning. When you read, you will lose yourself in the story.
When first getting started, this ideal content is rare. If you find content like this when tackling your first novel, savor it and count yourself lucky. Most of the time, when you first start reading novels you’ll be forced to choose between mind-numbingly boring or mind-bendingly difficult.
Graded Readers
Graded readers are books that are written with specific levels of grammatical complexity and vocabulary scope in mind. There are typically several carefully calibrated levels, allowing the reader to gradually increase the difficulty of what they’re reading. The books in these series are often adaptations of more complex novels where the language has been simplified.
If you can find them for your TL, they can be an excellent place to start. Aim for a level where only 2-3% of the words are unknown. This lets you read more quickly, which means that you will encounter unknown words at a greater rate than when reading content where your comprehension is lower. You’ll spend less time looking words up, and more time in a flow state where you forget about the nitty-gritty details of the language, because you’re so focused on the story. As a result, all the words and grammatical structures that are in the process of being acquired will be reinforced much more quickly.
Once you’ve reached a comfortable, fluid reading speed at a given level of graded reader, move to the next level.
Novels
If you do decide to read novels, it may be a big jump to go straight to novels written for adult native speakers. Novels intended for older children and adolescent readers can be a great place to start. They’ll have smaller vocabularies than novels for adults, while still having compelling stories.
The company Lexile has created a framework for evaluating the difficulty and readability of children’s books. They’ve provided a search portal to easily compare the difficulty of different books. Lexile focuses on English books, but the scores for the English versions of books should be roughly equivalent to the version in your target language.
When considering books to read, compare their Lexile scores, and start with books with a lower score.
If you find a book you enjoy, try reading more books by the same author. Authors tend to have a characteristic writing style and often use a fairly consistent vocabulary. Acquainting yourself with their style and vocabulary will make their writing more comprehensible to you.
How Much to Look Up
There is a spectrum between full-on intensive reading where you look up every word and complete free-flow reading where you look nothing up, tolerating every bit of ambiguity.
Even when reading intensively—especially when reading your first novel—you will often need to tolerate some amount of ambiguity. There will be so many unknown words that you won’t even have a vague idea of what the sentence is talking about. If you try to look up every word, you’ll probably forget the meanings by the time you get to the next word.
Don’t agonize over it. If you want to, look up a word or two that seems key to the sentence. Look up more words if you feel like it. If not, that’s fine. If you grasp some bit of meaning, count it as a win, and move on.
Often, the meaning of unknown words will become clear later in the sentence so don’t immediately look up the word. Read the full sentence first and try to infer the meaning before looking up any definitions.
Reading Strategies
Single Pass Reading
The most straightforward approach to reading a novel is to just read it. Look up as many words as you need to to stay engaged.
The downside of this strategy is that there’s a pretty significant learning curve to novels. Your first pass through will teach you a huge amount, but you will miss a lot of the story and details along the way. Some people find it too difficult to push through a story they don’t understand.
2-Pass Reading
By using a structured, 2-pass reading approach, you get 2 opportunities to understand the story and to acquire the language in the novel. This can help you stay engaged with the novel, even if it’s very challenging.
The downside: it takes twice as long to read. In the 2-pass approach, you read the book twice, once as intensive and once as free-flow.
Intensive First
In the “intensive first” approach, you read a chapter intensively, looking up most unknown words and puzzling through the meaning of sentences. Once you finish the chapter, you free-flow reread it with minimal lookups.
Because you’ve already read intensively, you will understand much more during your free-flow second pass and solidify the knowledge you gained on your first pass. The downside of this approach is that you are limited by how fast you can intensively read.
Free-Flow First
In the “free-flow first” approach, you read at whatever pace you like, only looking things up occasionally. When you have the mental energy, you start reading the book intensively. The first pass gives you the gist of what happened, and the second fills in the details.
Because you’re not intensely focused on puzzling out the meaning, you will use less energy during free-flow and be able to read faster. The downside of this approach is that you may not understand enough on your first pass to keep you interested and engaged in the story.
Time Boxing
Intensive reading can be tough when you’re first starting. Rather than trying to track the number of pages or chapters you are reading, focus on the amount of time. We recommend at least 20 minutes per day of intensive reading so that you can start to build the base vocabulary and grammar necessary to understand the novel.
Over time, that 20 minutes will yield more and better results and you’ll eventually build up the tolerance to read for even longer periods of time.
2C: Structured Monolingual Transition
For languages that are far apart (e.g. English → Chinese), the monolingual transition can have a steep learning curve. If the casual approach isn’t working for you, here is a structured guide for how to jumpstart your use of the monolingual dictionary.
If you haven’t read the casual monolingual transition article, read it now before pursuing the structured approach.
The Dictionary Domain
The dictionary is its own domain and uses vocabulary that you rarely encounter elsewhere. This domain is quite small compared to others, but it’s a good idea to tackle this domain in a structured and deliberate manner because you won’t see these words in your immersion. Once you learn the key vocabulary for the dictionary, the definitions will become much more comprehensible.
The Structured Approach
The following phases explain how to actively study the dictionary domain and overcome the learning curve of the monolingual dictionary. Go at your own pace and move on to the next phase when you feel ready.
1. Mine the Dictionary
Set aside time each day to look up the monolingual definitions of words you already know. If there are unknown words in the definitions, then use a bilingual dictionary to help you understand them.
Most words have multiple meanings and definitions, so try to identify a definition that matches the meaning you already know. If you can find one, then create bilingual cards for the unknown words in that definition.
2. Recursive Lookups
Continue to mine the dictionary by looking up known words, but try to use the monolingual dictionary to understand any unknown words in the definitions. Try to puzzle through the meaning of these words and then check your understanding against the bilingual dictionary.
Continue to create bilingual cards for unknown words.
3. Add Both Languages to Cards
While sentence mining, try to understand unknown words in the monolingual dictionary first before reverting to the bilingual.
If you can clearly identify a definition that matches the meaning of the word in the target sentence, then include both monolingual and bilingual definitions on your card even if you don’t fully understand the monolingual definition.
Use HTML Summary tags to hide both definitions. When you review the card, read the monolingual definition first before the bilingual one.
For any unknown words in the definition, create cards with both monolingual and bilingual definitions. Schedule these cards several days before the original target sentence card.
Here’s a sample Anki deck with an example card type that uses the summary tag to create hidden sections:
Example Anki deck This is what the hidden sections look like when collapsed :
Here, the hidden sections are expanded :
4. Switch to the Monolingual Dictionary
Start using the monolingual dictionary as your primary dictionary, both while sentence mining and while doing lookups during immersion. It’s fine to fall back on the bilingual dictionary when you need it.
You’ve completed the transition when you can understand 90% of your lookups in the monolingual dictionary without needing to rely on the bilingual dictionary.
Stage 3: Learn to Speak
Overview
Welcome to Stage 3. After many months (or years) of learning to comprehend your target language (TL), you will finally learn to speak!
The ability to speak is not a single skill; it’s a mix of four different skills:
-
Comprehending the person you’re conversing with (3A).
-
Quickly converting your thoughts into words (3B).
-
Physically moving your mouth to pronounce the language (3B).
-
Embodying natural mannerisms and styles of expression (3C).
In Stages 3A and 3B, you will separate these skills and practice them each individually. You will then combine them in Stage 3C, culminating in fluency.
Stage 3A: Preparing for Output
In Stage 3A, you will focus on preparing for the various output practice activities in Stages 3B and 3C.
First up, you need to overcome any aversion to output. After months (or years) of avoiding output, some people experience psychological blockers that prevent them from writing and speaking.
3A: Starting Output You won’t be able to speak in a domain that you can’t comprehend. Everyday conversation is a different domain than what you mastered in Stage 2, so you’ll need to learn how people write and talk to each other in real life. Because you’ve already mastered one domain, this second domain should come quickly. In the following article, we explain all the activites necessary to master the domain of everyday conversation.
3A: Activity Guide In Stages 3B and 3C, you will deliberately practice pronunciation and accent. To sound like a native, it’s easiest to copy a native. In the following article we explain how to choose a good native to adopt as your model for how to speak. 3A: Adopt a Language Parent Move onto Stage 3B once you have level 5 comprehension of the everyday conversation domain and while listening to your language parent.
Stage 3B: Deliberate Practice
Output within the Refold method is not the same as traditional methods. You won’t be translating in your head and consciously constructing sentences from memorized vocabulary and grammar.
Instead, you will let your subconscious power your output. If you have level 5 comprehension in at least one domain, then you already have a large pool of acquired language available to you for writing and speaking. All you need to do is make a small mental connection and that acquired language will be ready for output.
In the following article, we explain the process of making these connections through writing. If you struggle with any step in the activation process, we’ve also provided a troubleshooting guide to help you diagnose and fix any problems.
To prepare you for speaking, you will also start working on your pronunciation and accent. The primary activity for pronunciation training is shadowing, but there are many other techniques you can use to improve your accent. We explain these in:
Output practice is important, but input will always be the engine of language mastery. As you identify problems in your output, you will address them using input. You will continue listening to your parent until you have level 6 comprehension. You should be able to easily and automatically understand virtually everything they say.
We explain how all of these activities fit together in:
When you have level 6 comprehension of your parent and you are comfortable writing, then move on to Stage 3C.
Stage 3C: Speaking
Now that you are comfortable expressing yourself through writing and have developed the muscle memory for good pronunciation, you are ready to speak.
Right off the bat, you should be able to have conversations with natives without a problem.
However, you will still make mistakes while speaking and you won’t yet sound completely natural. There are two categories of speaking mistakes: competence-based and performance-based. We explain these concepts in the following article:
To master speaking, there are many subtle aspects of native speech that you need pay attention to. In the following article, we explain each of these aspects and how to identify them:
You can’t learn to speak without speaking! There are many different practice exercises for speaking depending on your goals and preferences. We explain these in detail in the following article:
As you develop your speaking ability, you will run into various difficulties. We’ve collected questions from our community and written a troubleshooting guide for the most commonly reported problems.
At this point, there’s a lot of different activities you can do depending on your immediate goals and needs. In the following article, we explain how to think about your daily schedule and choose the right activities for your goals.
Level Up
By the end of Stage 3, you should be comfortable with everyday speech. Move on to Stage 4 when you want to expand into new domains.
3A: Starting Output
After months or years of immersion, some learners wake up one morning able to speak their target language (TL).
Check out these videos of Japanese learners speaking for the very first time:
Stevijs 3 speaks after 21 months immersion.
Chris speaks after 18 months immersion.
Infinite Rain speaks after 18 months immersion.
They’re not perfect, but they can express themselves. What’s awesome about these videos is that these learners are speaking from their subconscious. They aren’t translating from their native language.
However, we’ve observed in our community that not everyone has this experience. Some people wind up on a treadmill of indefinitely getting input without ever feeling “ready” to output.
We hypothesize that this issue is caused by psychological blockers rather than differences in how acquisition functions.
After months or years of religiously following the guidance of “don’t output early or you’ll cement your mistakes”, these learners feel intense pressure to only output correctly or not output at all.
Language acquisition produces an intuition of what sounds right and natural, and this intuition can be so strong that it becomes a barrier to beginning to output. When you are first starting to output, your ability won’t live up to your intuitive understanding of the language, which can create a jarring experience. You will be able to notice many errors, but not yet be able to correct them.
As you enter the next stage of your learning process, know that it is OK to make mistakes.
Am I Ready for Output?
If you have level 5 understanding of the native content you’ve been immersing with day-to-day, then you are ready for output. There is a large chunk of the language you’ve already acquired; you just need to activate it.
How to Start Outputting
We recommend starting with writing rather than speaking. Writing gives you more time to think and lets you express yourself without worrying about your accent.
If you’re feeling output anxiety, the best thing to do is to just start writing. The goal at this stage is to get the output gears turning and activate the language that you have acquired.
Any writing that isn’t stressful is a good option at first. This could be writing emails to yourself or writing in a journal; anything that helps you get the words flowing.
Pretty quickly, you should find a way to engage in text conversations with native speakers. Interacting socially signals to your brain that outputting is important. Chatting with real people turns writing into communication, rather than simply practice for the sake of practice. We provide more detailed instructions for getting started in the next article.
As you write, try to stick to phrases you are confident in. Don’t try to use advanced words that you haven’t acquired just to impress people.
For now, don’t worry about making mistakes. Your intuition should be strong enough to prevent mistakes from becoming bad habits. We’ll go into more depth about handling mistakes in Stage 3B.
3A: Activity Guide
The activities in Stage 3A are meant to prepare you for Stages 3B and 3C. You will start outputting, but the majority of your time will be spent on input in preparation for writing in 3B and speaking in 3C.
Preparing for Writing
Basic Output
As noted in 3A: Starting Output, it’s important to start some level of output to get the gears turning in your brain. For some people, output comes naturally. Others will need to dedicate time to practice.
If your TL uses a different keyboard layout or typing system then you’ll need to learn how to use it. We’ll address learning these keyboard layouts in the language-specific guides.
Use a text-based chat application like HelloTalk, Tandem, or Discord to begin writing. Don’t worry about trying to write perfectly and correctly. Don’t look up words or conjugations as you write. The point of this exercise is to just start doing it.
We recommend outputting once per week for 30-60 minutes. You can do more if you like, but your time should still be much more heavily weighted towards input.
Conversation Domain
In Stage 2, you learned to comprehend the slice-of-life domain. Your first goal in Stage 3 is to learn to comprehend your second domain: everyday conversation.
Everyday conversation over text is different from speaking or literature. You will need to immerse in this domain to acquire the relevant vocabulary and grammar.
Spend time reading casual language: emails, Twitter, Instagram posts, YouTube comments, blog comments, forums, SMS messages, etc. Try to find public chatting websites/apps where native speakers talk to each other.
The language used in texting, chatrooms, and forums is casual, messy, and unstructured. It will take a bit of time to get used to. Sentence mine this content the same way you would a TV show or book.
If you don’t enjoy public chats, reading blogs can be another good place to start. Blog posts tend to use more structured language than forums and chatrooms but they are more casual than literature.
Preparing for Speaking
Listen to Your Parent
So far, your input has come from thousands of different people. When you try to output, you will mix their various speaking styles which will sound pretty strange.
To make yourself sound more natural, pick a single person to imitate while speaking. This person is called your “language parent”. We explain how to choose a good language parent in the next article.
In Stage 3B and 3C, you will imitate your language parent’s pronunciation, word choice, and mannerisms. However, before you can imitate your parent you need to be able to fully understand your parent.
Spend 50% of your active immersion time watching and listening to your parent. Spend 100% of your passive listening time with your parent. By Stage 3C, you should have level 6 comprehension of your parent meaning you are able to fully understand them automatically without thinking.
Listen to Conversation
If you want to be an active participant in a conversation, you need to be able to understand colloquial speech. Real-world conversation is messy, unscripted, and unstructured. People speak in incomplete sentences, backtrack, and go off on tangents.
One way to experience real-world conversation is to do a language exchange where each person only speaks in their NL. That way, you can practice hearing real-world conversation while getting the benefits of social interaction.
Street interviews and one-on-one interviews are also good places to start to understand conversation. Street interviews are unscripted, but they still have some structure because the interviewer typically asks the same series of questions to each interviewee. The audio of street interviews is usually messy which can help train your ear to focus on language and filter out noise. One-on-one interviews, meanwhile, are fully unscripted, but they are typically recorded with very clear audio.
Once you can understand both of those types of content, move on to messier conversations. Look for content with people yelling, mumbling, and talking over each other. Variety shows, reality shows, talk shows, and panel discussions are good examples of this type of content.
Narrowing Dialect
If you’ve been jumping between different dialects in your TL, now is the time to focus on a single one. Focusing on a single dialect will help you master a single speaking style instead of mixing different ones.
Once you have chosen a parent, make sure that the rest of your input matches their dialect.
Example Schedule
By this point in your language journey, there are a lot of competing activities. Here is an example of what your day may look like:
- Anki first thing in the morning
- Passive listening to parent throughout the day
- 1 hour immersing with paren
- 30 minutes reading chat conversations
- 30 minutes listening to interviews
- Once per week, 30 minutes of writing
Feel free to continue watching TV shows or reading in your TL. By this point, your comprehension should be high enough that this activity becomes leisure.
Each person will have a different daily schedule depending on their immediate goals. If you are very focused on writing, then weight your immersion more towards reading conversations. If you are very focused on speaking, then weight your immersion more towards listening.
Level Up
Move on to Stage 3B once you have level 5 comprehension of your language parent. Level 5 means you can fully understand them but it takes your full attention and effort.
3A: Adopt a Language Parent
If you’ve ever spent time with a 3-year-old, you’ll hear them say funny things like: “This house is a mess!”. Clearly, they’ve heard that exact expression a couple of hundred times.
Children copy every aspect of the language that they hear around them. Young children copy their parents and siblings while older children are influenced by their friends and the media they consume.
As adults, we do the same. We naturally mimic the people we have acquired the language from. You can leverage this natural mimicking ability to make yourself sound more like a native by adopting a parent.
What’s a Language Parent?
When a child first learns a language, most of their input comes from one or two people (their parents). This shapes the child’s speaking style for the rest of their life.
You can recreate this process by choosing a language parent. By focusing your input to only one person, you can absorb every detail of that person’s speaking style. Your brain’s natural ability to mimic will take over and your speaking style will sound similar to your parent’s.
Why Adopt a Parent?
So far, you’ve been getting input from hundreds (or thousands) of different people. Each person has a distinct style of speaking. Some differences like vocabulary, phrases, slang, and idioms are obvious, but there are subtler differences too, such as emphasis, enunciation, intonation, and speech register.
This mix of linguistic styles comprises a person’s outward persona. When you start outputting, your speech will be a mix of all the speaking styles and personalities of the people you have immersed with. You’re going to sound a bit weird. Choosing a parent will help you have a coherent, natural way of expressing yourself.
Most learners want to sound “native-like”, but that term is nebulous because every native sounds different. Instead, we advise you to pick a specific native to sound like. It’s much easier to ask “do I sound like this person?” than to ask “do I sound native?”.
Over time, you’ll develop your own style and idiosyncrasies, but for now, just borrow the speaking style of your language parent.
How to Choose a Parent?
There are several factors to consider when picking a language parent.
Criteria
Your language parent should be the same gender as you.
Men and women speak and act differently in society so you want to make sure you are copying the linguistic customs of your desired gender.
Your language parent should be close in age to you (within 10 years).
Language changes over time and people adjust their style of speech as they age. Teenagers speak completely differently than the elderly. Try to find a parent that reflects how you would speak if you were raised in their culture.
You should like their personality.
You’re going to be spending a lot of time listening to this person and you’ll eventually take on a lot of their personality. Make sure it’s someone you like.
Requirements
Your parent needs to be prolific. They need to have a very large volume of unscripted and unedited (raw) content for you to watch and listen to. It is very important to find raw content because that will show you how they truly speak. You want to hear every stutter, quirk, and verbal tic that make their speech sound natural.
We recommend your parent have at least 100 hours of raw content. Ideally, this person would also have a large volume of video footage so you can see their facial expressions and body language. Communication between people goes beyond verbal language and it’s important to act the way a native would act.
If you can’t find a parent with a full 100 hours of raw content, then it’s ok to compromise and use some scripted/edited content.
We recommend trying very hard to find a single language parent. Unfortunately, you won’t always be able to find one that can check all of the above boxes and has enough content. In that case, feel free to use a second parent. We don’t recommend using more than two.
Example Parents
Twitch streamers make good language parents because their content is unscripted and unedited. The same is true of radio hosts and interviewers.
YouTubers and podcasters can also be a good choice but you need to make sure they have enough unscripted and unedited content. Many prolific YouTubers script and edit all of their videos, which makes them a bad choice of parent.
What to Do With Your Parent?
You’ll be spending a lot of time with your parent throughout Stage 3. In Stage 3A, your goal is to learn to understand your parent as quickly as possible. At least 50% of your active immersion time and 100% of your passive listening time should be spent with your parent. It’s very difficult to mimic a person if you can’t understand what they’re saying.
In Stage 3B, you will continue immersing with your parent until you can understand them automatically and without thinking. You will also start deliberately mimicking them in a practice called “shadowing”.
Shadowing is the exercise of listening to your parent and repeating back what they say. This allows you to notice discrepancies in your pronunciation and make adjustments until you can sound just like them. We explain this process in detail in Stage 3B.
By the time you reach Stage 3C, you should be able to understand your parent without thinking (level 6 comprehension). With this connection to a native speaker, you can learn to embody their speaking style through imitation. Many people can imitate an accent for a few sentences, but when speaking in your TL, you need to imitate a native accent all the time, the way an actor would.
In Stage 3C, we explain how to imitate your parent and the various linguistic features of their speech.
3B: Language Activation
Once you reach level 5 comprehension or higher, the majority of that comprehension is automatic and effortless. Even if you tried to not understand, you wouldn’t be able to stop yourself. This is possible because, through input, your brain has constructed a subconscious model of how your target language (TL) works. Because the model is subconscious, it doesn’t take mental effort to activate. Your brain automatically utilizes the model to convert TL input into pure meaning, allowing you to understand.
Output ability comes from taking this model and running it in reverse. You have something you want to express, and your brain runs it through the model to convert it into your TL. Just like with comprehension, it’s largely a subconscious process. This allows output to become automatic and effortless, which is the key to speaking your TL fluently.
The process of learning to run the model in reverse is called “language activation”.
Stages of Activation
Language goes through three stages in the activation process:
- Acquisition
- Availability
- Activation
Acquisition refers to your brain’s subconscious model of the language. If you can understand a word or structure effortlessly when you come across it in immersion, that means you’ve acquired it.
When you want to express a given idea in your target language, your subconscious mind will search through the pool of language you’ve acquired to find relevant words and phrases. The language it finds will naturally appear in your consciousness. We refer to these words and phrases as “available language”.
Combining available pieces of language into full sentences is like solving a puzzle. You evaluate the fit of the puzzle pieces through intuition: what feels right and what feels wrong. If you’re able to combine the pieces together and you are certain that it feels right and that it fits the idea you want to express, then the language will activate.
Activation can be thought of as the process of connecting your pure thought to a specific piece of language. Once you make the connection, you’ll be able to effortlessly use that piece in the future.
For example, let’s say your TL is English, and you want to express the idea that there is a canine who lives with you. The words, “I”, “own”, “have”, “pet, “a”, “the”, and ” dog ” pop into your mind. By reflecting on your own intuition, you’re able to construct the sentence, “I have a dog”. It feels correct, so you say it. This would activate the structure “I have a blank” as well as the noun “dog”. Through this, you become able to effortlessly use this pattern in the future.
Start with Writing
We recommend you start with writing rather than speaking. As we mentioned in the overview, speaking requires combining four different skills in unison. Writing, on the other hand, allows you to focus solely on the process of converting your thoughts into words. This makes it much more ideal for language activation than speaking.
An additional benefit of writing is that it gives you time to think. Unlike speaking, you can take as much time as you need to put together the puzzle of available language.
Most importantly, writing gives you an objective record of your output that can be evaluated. This makes writing a more effective tool for getting feedback from native speakers.
Solving the Puzzle
When writing, your goal should be activation. This means you should be working with language that your subconscious makes available to you; not looking up words or conjugations as you write. Looking things up is a crutch that hides your true linguistic ability.
If you’ve previously outputted a phrase correctly then it will come naturally and you will feel very confident in it.
If it’s your first time saying something, you might feel just as confident. Sometimes, all the pieces fit perfectly and you can feel it. It just feels right. In this case, by simply saying or writing those words once or twice, you will activate them, allowing you to use them effortlessly in the future.
However, more often than not, you will be uncertain about the vast majority of these language puzzles. You won’t be sure exactly how the pieces fit together. There may be words that pop into your mind, but you aren’t sure exactly how to use them. Or, you may think you know how to express a certain idea, but not have total confidence.
For these uncertain cases, you will need to get confirmation of whether you were right or wrong. Uncertainty blocks full activation of the language, so you need to get more confident in your guesses to accelerate activation.
Calibrating Certainty
When you first start outputting, you’ll be uncertain about many things that are actually correct. As you get more comfortable, you will likely become overly confident and start unknowingly making mistakes. Eventually, you’ll settle into a happy medium where you’ll know what you know and what you don’t.
To reach this state of self-awareness, use the tools of introspection and confirmation as you output.
Introspect
Every time you write a sentence, ask yourself how confident you are that it’s correct and natural.
It’s better to err on the side of uncertainty. Making mistakes is fine as long as you feel uncertain about the sentence. This uncertainty prevents the mistake from solidifying into a bad habit.
Confirm
Assuming your conversation partner is willing to correct you, they’ll be able to give you confirmation in real time. When you get a correction, make a mental note to look out for this situation in your immersion.
If you aren’t in a situation where you have a partner that’s willing to correct you, then you can use Google as a substitute.
At this stage, output shouldn’t be a creative process. Someone out there has probably already said exactly what you want to say. Google the word or structure to see if natives have used the same phrase before and if it’s used the same way you expected.
Confirming via Google can be a tedious process that gets in the way of conversation. If you just want to have a conversation with someone and not worry about confirmation, then just make mental notes of the things that feel uncertain and then look for them in your immersion.
Blind Spots
It’s inevitable that you will make mistakes and not realize it. You can’t fix this class of mistake by yourself and if you wait too long, they can turn into permanent habits.
Make sure that natives are regularly correcting your writing so that you can become aware of these blindspots. When a native speaker points out a blindspot, don’t narrowly focus on the specific error. Usually, a blindspot will cause an entire class of mistakes that manifest repeatedly in different situations.
For example, many people will fall into the creases of their NL without realizing. Though the sentence sounds fine to them, a native speaker will consider it strangely worded and uncommon.
Once you are aware of these blindspots, you will naturally search for them in your immersion and avoid them when trying to output. With enough input, you’ll overcome the tendency completely.
Tips for Getting Corrected
Most native speakers won’t be familiar with the Refold methodology. When correcting your writing, they will often try to explain to you why you’re wrong. It’s best to just ignore them. Native speakers can usually tell you when you’re wrong, and tell you how to make it right, but they can almost never explain why. Just notice the class of mistakes that they point out and look out for them in your immersion.
Apps like Tandem and HelloTalk allow you to get correction during real-time conversation with natives. If you don’t like the apps, do a Google search for other language exchange communities.
Be aware that native speakers won’t always correct you. Sometimes, they get caught up in the conversation and don’t pay attention to small mistakes. It’s useful to occasionally work with a tutor because they are trained to point out all mistakes.
If you want professional correction or if you feel nervous about talking to random strangers, we recommend hiring an iTalki tutor. At this stage in the activation process, we recommend text chatting with this person rather than speaking to them so you can focus on improving your writing.
Troubleshooting
If you are a natural outputter, the above information should be enough to get you through all of Stage 3. However, if you find yourself struggling with output, we’ve written a detailed troubleshooting guide in the next article.
3B: Output Troubleshooting
If output comes naturally to you, you may not need this guide. However, if you’ve been struggling with output even though you’ve gotten a ton of input, this guide provides a framework for thinking about the problems you may be facing and how to fix them.
Fundamentally, nearly all issues with output can be fixed with more input.
Stages of Activation
As mentioned in 3B: Language Activation, language goes through three stages in the activation process:
Acquisition: when you build your internal model of the language.
Availability: when acquired language pops into your head.
Activation: when you make the connection between pure thought and available language.
Your goal is to have fully acquired, fully available, and fully activated language. This produces instantaneous output that you know is right. You don’t have to think about it.
Output difficulty can be caused by a failure in any part of the three stages.
Ideal Scenario
There’s some portion of the language that you’ve fully acquired and is fully available, but you’ve never tried to output it before.
Whenever you try to output a word or phrase for the very first time, there will be some small amount of hesitation. Once you’ve outputted the phrase once or twice, it will be fully activated and the hesitation will disappear.
Availability Issues
When you’ve fully acquired something (meaning you can easily recognize and understand it in your immersion) that doesn’t mean it will always be available for output.
Partially Available
There are three types of partially available language:
-
Incomplete : Something pops into your head, but it’s not enough to express the full idea.
For example, a noun pops into your head, but you can’t remember the verb that goes with it.
-
Uncertain: Something pops into your head, but you’re not sure about it. The puzzle pieces fit together, but something just doesn’t feel right.
-
TL Conflict : Two things pop into your head, and you’re not sure which is correct.
In all three of these cases, you just need a little extra exposure to the word or pattern to build the ability to use it yourself. Make a mental note to look for this pattern in your immersion. You can also try to confirm it on the spot using Google or a native speaker.
See the instructions listed in the “Confirm” section of 3B: Language Activation for more detail.
NL Conflicts
One of the most common output errors is when you express something as a translation from your NL rather than the natural way it should be expressed in your TL.
Going back to our paper crane metaphor, this is an example of you falling back into the creases of your original language. As we described in 2B: Casual Monolingual Transition, each language has a different way of viewing the world. To speak naturally in your TL, you need to adopt the worldview of your TL.
Most of the time, you have already acquired the necessary language, but just need to change your mindset. The key to getting around this is asking yourself the right question. Instead of asking, “How do I say this?”, ask yourself “What would a native speaker say in this situation?”. This subtle reframing of the question will often produce completely different results from your subconscious.
Not available
Sometimes, even if you’ve fully acquired something, that language won’t come to mind when you need it. You feel like you know how to say something but you just can’t remember.
Your brain automatically makes notes of these frustrating situations and becomes primed to notice them in your immersion. Due to the frequency illusion, you’ll probably start seeing this situation everywhere.
As long as it’s something you’ve already acquired, you’ll usually have a eureka moment the next time you see it and the language will be available next time you want to output it.
You can also deliberately search out the phrase using google. However, if the answer you find doesn’t feel familiar, that means you haven’t yet acquired it and you should not try to use it in conversation.
Acquisition Issues
Partially Acquired
If you can recognize and understand something in your immersion, but it takes some mental effort, then you probably haven’t fully acquired the word or phrase. When you try to use a phrase like this in output, it can feel like an availability issue at first.
To determine if it’s an availability or acquisition issue, use either Google or a native speaker to confirm the correct way to use the phrase. If the correct version feels familiar and clear in your mind, then this is an availability issue. If it doesn’t feel familiar, or the meaning feels fuzzy, then it’s an acquisition issue.
Acquisition issues are solved through more immersion. This is another situation where the frequency illusion will cause you to notice the word or phrase in your immersion and will help you fully acquire it.
Try to avoid this unacquired language until you’re able to observe it’s correct usage in immersion.
Partially Acquired - Grammar
If you repeatedly struggle to output a specific grammar form even though you can understand it, that’s an indication that you have not yet acquired it.
The comprehensible output hypothesis argues that during input you won’t always notice the specific grammar or syntax of the language because they are unnecessary for comprehension. When you try to use unacquired grammar during output you’ll struggle. This difficulty signals to your brain to look for examples of the grammar in your immersion so you can acquire it more quickly.
Normally, we would advise you to avoid using this unacquired grammar until you can fully acquire it. Unfortunately, that may not be possible. Many grammar forms are necessary for day-to-day output and you will need to use them even though you haven’t acquired them yet.
This is the one and only case where we recommend using a conscious monitor when outputting. If you can’t avoid making the error, then consciously study the right way to do it, and when you output, double-check yourself to make sure you are using it correctly. Eventually, you will acquire the grammar and you won’t need to monitor yourself anymore.
Not Acquired
You won’t be able to express things that belong to a domain you haven’t learned to comprehend yet.
If you have no idea how to express something, then don’t bother trying. Say something else that you’re confident in. Don’t try to use fancy words, difficult concepts, or domains that you haven’t yet learned how to comprehend.
Remember, you are trying to master the domain of everyday conversation. Don’t try to write a dissertation on physics or politics.
Don’t beat yourself up for having gaps in your knowledge. Once you’ve mastered your first domain, expanding out into other domains becomes much easier. You’ll tackle new domains in Stage 4.
3B: Pronunciation Training
Having a pleasant and easy-to-understand accent opens the door to quickly building strong connections with native speakers. Improving your accent reduces the friction in conversation, making it easier to make friends, impress a date, or get a job.
Pronunciation is largely a physical skill and requires physical training to master. Unfortunately, no matter how much input you get, input alone won’t guarantee good pronunciation.
Input gives you the ability to accurately perceive the sounds of your target language (TL). This enables you to self-correct your pronunciation.
Without this ability, achieving a native-like accent simply isn’t realistic. Native correction and accent elimination classes can help, but there is a limit to what you can accomplish if you can’t hear your accent.
Muscle Memory
The Refold logo is an origami crane because second language learning is like unfolding the crane and trying to use the same piece of paper to fold a new shape.
The challenge with folding a new piece of origami from used paper is that the paper retains the memory of the original shape and it is difficult to avoid following the same creases.
This metaphor applies perfectly to muscle memory in your mouth. A lot of the reason foreign accents occur is that your mouth is already trained to speak a certain way, and deviating from this is extremely difficult.
To speak without an accent, you need to build up the strength and precision of the patterns of mouth movements that native speakers use, and you need to relax the muscles that native speakers don’t use.
Reprogramming Your Mouth
When you start speaking your TL, your mouth will hurt. You’ve never used your mouth like this before.
Treat your mouth like you would any other muscle in your body. This means warmups, stretching, and workouts. For the mouth, these are called “Articulation Exercises”.
Articulation
There are many types of articulation exercises. Some will be dependent on the language.
Mouth Relaxation Techniques
Your existing muscle memory will fight to take over when you try to speak. When you find this happening, try using mouth relaxation techniques that singers and public speakers use.
Self-Massage for Public Speakers
Self-Massage to loosen TMJ (Jaw Joint)
Exercises to loosen TMJ (Jaw Joint)
Mouth Stretching and Warmups
To speak your TL, your mouth needs to move completely differently than you are used to. Stretching your mouth can help loosen up tension in the muscles you use for your native language and allow them to move more naturally in your TL.
Also, when you find your mouth hurting from speaking your TL, stretching exercises can help the muscles recover more quickly.
The first half of the following video shows how to stretch your mouth. The second half is a set of articulation exercises specifically for English learners.
Exercises for English Learners
Tongue Twisters
Tongue Twisters are deliberately difficult expressions that sometimes generate humorous results when mispronounced. The difficulty with tongue twisters is the rapid alternation between similar (but distinct) sounds in the language.
Most languages have tongue twisters and they can be useful for training your mouth’s ability to quickly move between different sounds.
Enunciation Exercises
These are like tongue twisters, but they usually aren’t words or sentences. They are consonant and vowel combinations that alternate in sequence to help improve speaking precision and enunciation.
In the following video, you can see examples of these kinds of exercises for English:
Articulation exercises for public speaking
Specific Sounds
Sometimes, you will struggle to produce a specific sound in your TL. The rolled-R sound is an example of a common issue for learners.
Learn the name of this sound and search Google for practice guides. Practice these problematic sounds daily until you can produce them.
Shadowing
The above exercises are helpful, but to develop natural pronunciation, you need to practice with real language.
Some people do this by recording themselves reading a book out loud and then listening back. The problem with this method is that you don’t have a direct target to compare yourself against.
Instead, we recommend shadowing your parent.
What’s Shadowing?
Shadowing is the practice of listening to your language parent, repeating back what they say, and then comparing your output to theirs. Because you have a direct target, you can accurately notice differences between their pronunciation and yours. You can then specifically practice these discrepancies, creating a feedback loop that aligns your pronunciation with theirs.
Prerequisites
We don’t recommend shadowing until you have level 5 comprehension of your parent. You should be able to clearly hear every word your parent says when they speak.
If you can’t accurately hear your parent, you won’t be able to identify the differences between your speech and theirs. This can lead to building incorrect muscle memory and poor pronunciation which will be difficult to undo later.
Learn to Shadow in your NL
Shadowing is a skill that takes some practice to learn. Your brain isn’t used to keeping exact wording in your short-term memory. Usually, it just grabs the meaning and discards the specific words.
To build this skill, practice shadowing in your NL first before trying with your TL.
Types of Shadowing
There are two different types of shadowing: continuous and perfect sentence. They each have different pros and cons, so we recommend doing a mix of both.
Continuous Shadowing
Continuous shadowing consists of listening to your parent and repeating everything they say out loud in real-time. If you make a mistake or fall behind your parent, you just keep going.
The non-stop aspect of continuous shadowing makes it conducive to entering a flow state, which is ideal for building muscle memory. The downside is that it can be a bit chaotic, making it harder to hone in on specific sounds you’re struggling with.
Check out the following video to see an example of shadowing in English In the beginning, you won’t be able to keep up with your parent. This is normal. The key is to just keep going without worrying about accuracy. Without pausing or rewinding, replicate your parent as best you can for the duration of the session.
It can be helpful to shadow audio you’ve already listened to once before. That said, we don’t recommend shadowing the same piece of audio multiple times.
Once you become comfortable with simply keeping up, shift your focus to how closely your pronunciation resembles theirs. Your attention should be split evenly between your parent and your voice. The goal of shadowing is to tune your pronunciation, so don’t worry about the actual content of what your parent is saying. Noticing discrepancies between your pronunciation and theirs will naturally make your pronunciation more accurate over time.
For an in-depth explanation of continuous shadowing check out the following video
The simplest way to do continuous shadowing is to listen to audio of your parent speaking through either speakers or headphones, and repeat back what they say out loud. For this to work properly, you must be able to hear both your parent and yourself.
Finding the right volume level can be difficult. People often report that they either can’t clearly hear their voice over the audio or can’t clearly hear the audio over their voice.
You can get around this issue by using a microphone or audio interface that allows you to hear your voice through headphones. This also has the benefit of allowing you to hear your voice more objectively. You can either have your voice coming into one ear and your parent’s coming into the other or have both voices coming into both ears.
When using this technique, make sure you have an audio setup with minimal lag for your voice. If the lag is more than a few hundred milliseconds, it will completely interrupt your ability to speak. In fact, there is a device called a “Speech Jammer” that does exactly that.
Perfect Sentence Shadowing
Perfect Sentence shadowing is when you listen to an individual sentence spoken by your parent, record yourself imitating that sentence as closely as possible, and then compare your recording to the original to pick up on any discrepancies.
Perfect sentence shadowing is great for honing in on specific sounds or sound combinations that are giving you trouble. The downside is that the discontinuous nature makes it less effective for training overall rhythm and flow.
Use an app like Audacity to isolate a single sentence clip of your parent speaking. Listen to the sentence a few times to load it into your short term memory, then record yourself imitating the sentence as closely as possible. Listen back to both your recording and the original a few times, and notice whatever discrepancies you can. Then, re-record yourself pronouncing the sentence and attempt to reduce the discrepancies. Repeat this until you feel like you’ve plateaued, and then move on to a new sentence.
Tools like Audacity also allow you to overlay the two pieces of audio. This makes identifying discrepancies very easy. When you make a mistake, it will create dissonance which sounds bad to your ear. Check out this guide for an explanation on how to overlay audio.
The term “perfect sentence technique” was coined by the polyglot Marc Green to refer to a similar method. In Green’s technique, you sit with a native speaker and read a sentence out loud to them. They give you feedback on how you sound and then read the same sentence to you. You repeat this until you’re happy with how you sound.
In Refold, by the time you practice perfect sentence shadowing, you’ve already developed your ability to accurately perceive the sounds of your TL. This allows you to function as your own partner and give yourself feedback. That said, if you ever feel that your pronunciation development is stuck, it can be helpful to find a native speaker and apply Green’s original method.
3B: Activity Guide
In Stage 3B, there are three separate areas of focus to prepare you for speaking:
- Activating acquired language through writing.
- Building the muscle memory for correct pronunciation.
- Mastering comprehension of casual conversation.
Language Activation
As described in 3B: Language Activation, you will hone your writing ability by tapping into your latent language ability.
We recommend having real-time written conversations. You can find exchange partners in the following places:
Apps
Websites
If the thought of talking to random strangers makes you anxious, you can instead hire a tutor and use the lessons to communicate with them over chat. The two most well-known sites for hiring tutors are iTalki and Verbling.
If you write alone rather than in a conversation, use the “notebooks” feature on iTalki to find someone willing to correct long-form writing.
Building Pronunciation Muscles
Dedicate time to shadowing and practicing tongue twisters in your language using the exercises described in 3B: Pronunciation Training.
Understanding Conversation
Nothing here changes from the 3A: Activity Guide. Continue immersing with your parent, text chats, and talk shows.
Example Daily Routine
- Anki in the AM
- Passive listening to parent throughout the day
- 30 minutes of output practice (writing or shadowing)
- 45 minutes immersing with parent
- 45 minutes reading or listening to talk shows
We recommend alternating output activities each day. Focus on writing one day and shadowing the next.
Level Up
Move on to Stage 3C: Speaking when you have level 6 comprehension of your parent and you are comfortable expressing yourself in writing.
Some people don’t like writing and prefer to speak instead. If you are one of these people, then feel free to do Stages 3B and 3C simultaneously.
3C: Competence Vs Performance
The linguist Noam Chomsky proposed that there exist two aspects of language ability: competence and performance. As you make output mistakes, you will need to correctly identify whether the mistake was an error in competence or performance in order to choose the appropriate exercise to fix it.
Please note: our goal is not to teach linguistics, but to provide a framework for language learning. Our usage of these terms may differ from the strict linguistic definitions. To learn more about the original linguistic concepts, please see the relevant Wikipedia articles: Competence, Performance.
Competence
As you acquire a language, your brain creates an unconscious model of how that language works. Competence refers to this unconscious model. It encompasses all aspects of language, including vocabulary usage and idioms, grammar, and pronunciation.
Consciously, you access your competence in the form of intuition. It’s that sense you have of what’s correct and what’s not.
In Stage 3B, we explained how language goes from acquired to activated. Through that process, you identify what language you have not yet acquired or is not yet available for use. These gaps in acquisition or availability are competence issues.
Performance
Having the necessary competence for a piece of language doesn’t guarantee that you’ll be able to use it successfully while speaking. If you recall from the Stage 3 Overview, speaking is a combination of four different skills:
- Comprehending the person you’re conversing with.
- Quickly converting your thoughts into words.
- Physically moving your mouth to pronounce the language.
- Embodying natural mannerisms and styles of expression.
When speaking, you need to split your attention to address all four sub-skills simultaneously, under time pressure, and without the ability to edit. This makes it virtually impossible for your speaking ability to fully live up to the extent of your competence.
Performance refers to your ability to convert your competence into correct and coherent output. Your performance is directly limited by your competence. You can’t speak naturally if you’re guessing about what sounds right or wrong.
However, competence doesn’t directly translate into performance. You may be able to express yourself perfectly when writing, but that doesn’t guarantee you will be able to speak easily. If you struggle with any of the four sub-skills, you will stumble over your words.
The better your competence, the more potential you have for high performance. However, even native speakers struggle with performance, which manifests as stuttering, slips of the tongue, or freezing under pressure.
Performance is improved through output practice. Your goal in Stage 3C is to narrow the gap between your competence and your performance by practicing output.
Performance is not binary; it’s a spectrum. There are many correct ways to convey any given idea that differ in degree of elegance, conciseness, and exactness. Once you’ve achieved a base level of output ability, you can start to tackle these higher-level performance goals. We will discuss this more in Stage 4.
Identifying Mistakes
Using the distinction between competence and performance, we can divide output mistakes into two categories :
- Competence-based mistakes
- Performance-based mistakes
Different types of mistakes require different practice activities to fix.
Competence Mistakes
Competence-based mistakes occur when you have not yet acquired the relevant language. For example, you may mispronounce a word because you acquired it from reading and have not yet heard it enough while listening.
You’re usually not aware when you make a competence mistake. As we discussed in Stage 3B: Output Troubleshooting, you need correction from a native to become aware of these mistakes and address them. In the same article, we explained that awareness pushes your brain to look for the correction in your immersion. Usually, awareness and input are all you need to fix a competence mistake.
It’s also possible to compensate for these gaps by using a conscious monitor to check yourself every time you output. That said, monitoring is only a temporary solution until the competence gap has been filled through input.
Performance Mistakes
Performance mistakes are much easier to identify. You already have the competence and you know the right thing to say, you just slipped up.
Some of these mistakes will jump out the moment you make them, but others will go unnoticed. When you are focused on a conversation, you don’t have much mental bandwidth to observe your own speech. This is why we recommend recording your conversations so that you can listen back to them.
Because you’ve already developed your competence, the majority of your mistakes will be performance-based. It should be easy to identify these mistakes when listening back to recordings of yourself speaking. Once identified, you can fix the mistake through targeted output practice.
How to Identify and Fix Mistakes
When writing, you have the time and opportunity to retroactively edit what you say. This makes the process of identifying and fixing mistakes very straightforward.
Speaking, on the other hand, presents the additional challenges of pronunciation and working under time pressure. This introduces new competence and performance mistakes that don’t occur when writing.
In the rest of Stage 3C, we will describe all the various problems you may encounter while speaking and how to address them.
3C: Build Speaking Competence
By this point, you’ve achieved a very high level of comprehension in the domain of everyday speech. Now that comprehension itself is no longer an issue, you have enough mental bandwidth available to start paying attention to the more subtle aspects of native speech. Noticing and emulating these subtle aspects is key to sounding like a native.
Below, we explain three categories of language characteristics that you should be aware of when attempting to copy native speech:
- What ideas do natives express?
- How do they phrase those ideas?
- How do they verbalize those phrases?
You should not expect to master these by the end of Stage 3. Mastering all of them is a lifelong pursuit. This is just a list of things to start paying attention to as you’re listening to and emulating your parent’s speech.
What Natives Express
Speaking a foreign language isn’t simply a matter of expressing the same ideas with foreign words. There are fundamental differences in what ideas are commonly expressed in each language. To speak naturally, you need to express ideas common to your target language (TL) while avoiding ideas that aren’t.
For example, in the United States, it’s common for people to ask about your horoscope and astrological sign. In Japan, horoscopes are virtually never talked about. If you ask a Japanese person about their horoscope, they will probably give you a confused look.
Instead, Japanese people commonly ask about blood-type and associated personality traits. If a Japanese person told an American that their personality is uncharacteristic for their blood-type, the American would probably be pretty confused.
Knowing what sorts of ideas are commonly expressed in your TL is important for sounding natural and avoiding hiccups in communication.
Social Contexts
There are standard behaviors and reactions that natives expect in specific social situations. These include body language, timing, not dominating the conversation, etc. If you don’t match your behavior to your conversation partner’s expectations, it can make them feel uncomfortable.
For example, in English, it’s normal to express gratitude after receiving a compliment. In Japanese, it’s much more common to deny compliments and proclaim that the opposite is true.
These reactions and behaviors are different in different languages and cultures, so you’ll need to deliberately identify and practice those relevant to your TL.
Native Phrasing of Ideas
Although you may fully understand what a native is saying, there are subtleties in phrasing and context that may not be immediately apparent.
Same Idea, Different Phrasing
Some ideas will exist in both your NL and TL but are phrased completely differently in each.
For example, in English, we say “I am hungry”, but in Spanish, they say “I have hunger”, and in Japanese, they say “My stomach has become empty ”.
You have probably noticed many of these already through your immersion. Keep paying attention to the specific way ideas are phrased in your TL to avoid unnatural transfer from your NL.
Register
Even within the same culture, different styles of speech are used in different contexts. These different styles are called “registers”.
For example, many languages have a different register for polite speech than casual speech. These differences can be in conjugation, vocabulary, or directness.
In English, a command is impolite if you don’t know the person. When at a restaurant, we often phrase our requests as questions or statements rather than direct commands to appear more polite : “I would like two tacos, please” or “Can I have two tacos”; not “Give me two tacos”.
In Spanish, saying “I would like two tacos please” would be considered weirdly formal. “Give me two tacos” is much more natural.
Knowing the correct register for a given context is key to blending in with natives and will help you avoid embarrassing situations.
Native Register Mistakes
Not all register mistakes will make you sound foreign. There are some register mistakes that natives make too. The play My Fair Lady is about a noble Englishman teaching the English high-society register to a lowly flower girl.
To master a specific register, it’s most effective to practice it separately from general speech, just like Eliza in My Fair Lady.
Fillers
Not even native speakers speak with perfect fluidity and without hesitation. They regularly pause to think or search for the right words. “Fillers” are words spoken during these pauses. When used correctly, they allow you to pause your speech in a very natural way.
Common English fillers are “uhm” and “like”.
Because fillers don’t convey meaning, your brain tends to filter them out when listening. In fact, the better you understand your TL, the less likely you are to notice them.
To counteract this, spend some time deliberately listening for fillers while immersing with your parent. Try to get a sense of the difference between various fillers, and how often they should be used to sound natural.
Fumbling
It’s also common for natives to pivot and change what they’re saying mid-sentence. Unlike in writing, where you can modify previous ideas or phrasing at any time, in speech, you need to overwrite previous ideas in real-time to clarify or rephrase.
The specific fumbles natives use are unique to each language. Learning to pivot like a native will provide you with room to fumble without giving the impression that you lack language ability.
Examples in English:
“He was really tall, well, I mean, not that tall, but like, tall for a kid.”
“I’ve been feeling really lazy lately… well… now that I say it out loud, it’s not really laziness. More like lethargy .”
Start keeping an eye out for the specific ways that natives fumble in your TL.
Speech Connectors
Speech connectors allow you to smoothly continue an idea or transition from one idea to another. They’re important for naturally stringing ideas together when expressing multiple ideas at the same time.
Here is an example of sentence continuation and perspective change:
So I went to the market, and there was this guy there, and he told me about this concert tonight, and I was like, “Oh my god, my friend loves that band”, and so I had to text you to see if you wanted to go.”
In the above example, there are three types of connectors used.
- “And” connects a string of ideas to tell a story.
- The colloquialism “I was like” allows the speaker to transition from the past to the present speaking perspective and quote themselves.
- The connector “so” creates a cause and effect relationship between the previous ideas and the future ones.
Pay attention to how native speakers connect ideas, retroactively modify their ideas, or go off on tangents. These connectors will help you speak more naturally.
Speaker Transitions
During a conversation, there are built-in ways of linking your speech to the previous speaker’s. These transitions help put your ideas in the context of previously expressed ideas.
Examples:
Speaker A: “I believe that apples are the best fruit.”
Confirmation and expansion:“Absolutely, I couldn’t live without apple pie.”
Hard Rejection: “Definitely not. Oranges are better.”
Soft Rejection: “While I agree apples are great, I prefer grapes.”
These transitions allow the conversation to flow naturally between each speaker and their ideas.
Backchanneling
When you are having a conversation and the other person is speaking, you are expected to provide feedback to demonstrate that you are listening. This is called “backchanneling”.
Backchannelling can be confirmations, verbal reactions, or physical reactions. In English, “Yeah”, “totally”, “uh-huh”, and nodding are all confirmations that you are paying attention to the person speaking.
Every language and culture has different expectations about the type and quantity of backchanneling during conversation. For instance, in Japanese, you are expected to backchannel much more frequently than in English. If you don’t increase your backchanneling, your partner will consider you rude.
Native Pronunciation
Most people think of pronunciation in terms of vowels and consonants, but there are many deeper layers of pronunciation to consider.
Phonemes
When the average learner thinks about pronunciation, they are usually thinking about phonemes: which vowels and consonants exist within the language. Of course, vowels and consonants are the foundation of pronunciation and are crucial to master.
You also need to be able to pronounce how words flow together when they are adjacent. Some of these contractions may appear in writing (e.g., can’t), while others will not (e.g., youwanna = do you want to).
When you fully understand a language, you may not notice many of these contractions. Your brain will automatically convert them into multiple words. When listening to your parent, spend some time intentionally paying attention to the specific phonemes they pronounce.
Word Level
Depending on the language, there may be other linguistic features that can change the meaning of words beyond phonemes. If your TL contains one of these features, it’s important to look out for it in your immersion.
Stress Accent
“Stress” is the emphasis placed on a specific part of a word. In languages that feature stress accent, stressing the wrong part of a word can make it unintelligible or change its meaning entirely.
For instance, in English, when a word can be used as a noun or verb, stress accent is often used to denote which way it should be interpreted. Stress on the first syllable is a noun, stress on the last syllable is a verb: PERmit (noun) vs perMIT (verb).
Sometimes, when words are used together, they get treated as a single stress accent unit.
Example: bad TEMpered
There is usually only one correct stress accent for a word in a given context and meaning. If your TL features word-level or syllable-level stress accent, it can be useful to study and deliberately practice correct word stress to sound more natural.
Pitch Accent & Tones
In some languages, changes in pitch or tone are part of the fundamental pronunciation of words. In these languages, pronouncing the same phonemes with different pitches can yield entirely different meanings. If your TL has pitch accent or tones, deliberately study and practice them.
Prosody (Sentence Level)
Stress, pitch, tone, emphasis, and rhythm can be used at a sentence level to modify the meaning or emotional state of a sentence.
For instance, in English, when the pitch shifts upwards at the end of the sentence, the sentence is interpreted as a question: “I’m in charge” vs “I’m in charge?”.
Prosody can affect the interpretation of the meaning in a sentence (e.g. sounding sarcastic ).
English Example: “I didn’t say that”.
I didn’t say that: the emphasis on the “I” communicates a rejection of an accusation and a pivot of blame. It could be translated as “I was not the person who said that”.
I didn’t say that: the emphasis on the “didn’t” communicates a rejection of an accusation and could be translated as “You’re blaming me for saying something that I didn’t say”. I didn’t say that: the emphasis on the “that” communicates a rejection of the specific idea that was said and could be translated as “I said something but you are misinterpreting what I said”.
These aspects of prosody are generally too subtle to study deliberately and must be acquired through input.
Accent
Even within the same dialect, there are often many different accents. For instance, in the US, there are different Northeast accents in Boston and New York and different Southern accents in Louisiana and Georgia. There can even be subtle differences between different neighborhoods in the same city.
When listening to someone with a different accent than your parent’s, try to notice any subtle differences. Contrasting your desired speaking style to another can help you notice subtleties in your parent’s accent and better emulate them.
Also, be aware that different accents come with cultural connotation and baggage. If you walk around New York with a Boston accent, be prepared to argue about baseball.
3C: Speaking Practice
Improving your speaking ability is a lifelong process that you can take as far as you want. The exercises outlined below are useful for new speakers as well as experienced ones.
For both learners and natives, there are two main facets of improving speaking performance:
- Exposing yourself to new situations that stretch your speaking abilities.
- Recording yourself to deliberately review and practice your performance.
Below we’ve described four different exercises you can use to expand and refine your speaking ability. Depending on your personality, you may find one or more of them more enjoyable and beneficial than the rest. We encourage you to try all of them to identify what works best for you.
Monologuing
If you experience social anxiety when trying to speak, monologuing can be a good way to build comfort with speaking before adding in social pressure.
Monologuing means talking about an idea or issue, or telling a story while alone or in front of a camera.
The most important thing about monologues is that you DON’T pre-plan your words. If you simply memorize a monologue and repeat it, then you aren’t practicing your actual speaking ability. Your goal is to practice speaking off-the-cuff.
These monologues don’t need to be long. 1-5 minutes should be plenty. If you’re not sure what to talk about, here are some ideas:
Watch a video or read a blog article and then summarize it in your own words.
Use a random topic generator to create prompts for you to answer.
As you’re speaking, don’t worry about making mistakes.
Focus all your energy on organizing your thoughts and putting them into words.
When you rewatch (or relisten) to yourself afterward, you will have the opportunity to focus all your attention on identifying and correcting mistakes.
We explain how to evaluate these recordings at the end of this article.
Imitating Your Parent
As noted in 3A: Adopt a Parent, sounding “native” is nebulous because every native sounds different. If you want to sound native, you should aim for a specific native (your parent).
So far, you’ve been shadowing your parent, which consists of repeating exactly what they say. This allows you to focus purely on the physical component of speaking and ignore the mental process of converting thoughts into words.
Full imitation, on the other hand, means embodying your parent’s persona to express your own thoughts. It’s relatively easy to impersonate someone when you have a specific monologue to recite, but fully embodying a persona and speaking dynamically is much more difficult.
When you try to impersonate your parent you’ll naturally start paying closer attention not only to what they say but also to the subtle nuances of how they speak that you wouldn’t have noticed otherwise. Things like body language, intonation, reactions, and fillers.
To imitate your parent, watch one of their videos and attempt to summarize the same topic or story in your own words, but in their personality. If you are struggling to get the hang of imitating your parent dynamically, you can start with the easier exercise of memorizing a monologue and acting it out in your parent’s persona.
Record yourself and watch the video back to compare your mannerisms to theirs.
Real Conversation
For most learners, connecting with native speakers through conversation is the entire point of learning a language. There’s no substitute for real conversation. You’ll never get comfortable speaking without practicing with real people.
If you find yourself overthinking during output, we recommend diving into real conversation, even if you don’t feel ready for it. Conversation moves quickly enough that you don’t have time to overthink. This can help you get out of your head and use the language more naturally and instinctually. Additionally, conversation gives you the satisfaction of connecting with another real human being.
When you first start speaking with a partner, it will be tough to balance listening, thinking, and speaking simultaneously. It takes some getting used to, but you’ll adapt pretty quickly.
There are many language exchanges (HelloTalk, Tandem, Discord ) that you can use to make friends with natives to talk to online. Once COVID-19 lockdown is over, seek out in-person meetups for your language as well. Get out there and make some friends!
Be aware, most natives won’t correct all of your mistakes. As long as they can understand you, they will naturally overlook the majority of your mistakes to keep the conversation flowing and not appear rude. If you’re speaking to a native speaker over video or voice chat, ask them if you can record the conversation so you can review it later to identify mistakes on your own.
Professional Correction
Unfortunately, language exchanges are not a substitute for a professional tutor. Language exchanges can be a great place to practice real conversation and make friends before you’re at a very high level, but they won’t provide you with the precise feedback you need to improve.
It’s worthwhile to find a native that understands that you are actively trying to improve and will meticulously correct you. iTalki tutors are a great resource for professional correction and usually don’t mind being recorded.
Make sure to tell your tutor that you want them to call out every single mistake you make so that you can become aware.
Reviewing Your Recording
Once you have a recording of yourself, it’s time to review! Remember, the most important thing to keep in mind is that you are trying to notice your mistakes. The simple act of noticing is often enough to fix the issue.
Once you’ve identified a mistake, try to determine if it was a competence or performance mistake. If you’re unsure of the right way to say something, that’s a competence mistake. If you have an “oh duh” moment, that’s the sign of a performance mistake.
For competence mistakes, all of the advice in 3B: Output Troubleshooting still applies. Identify if it’s an acquisition, availability, or activation error and take the appropriate action.
For performance mistakes, try to say it again a few times to get comfortable with the correct way to say it. If it was an issue with pronunciation then record yourself and listen back to see if you sound better. You can also use tools like YouGlish to find examples of native speakers saying the same thing and compare your pronunciation against theirs.
3C: Speaking Troubleshooting
We asked our community what kinds of speaking problems they were struggling with and compiled the most common issues into this guide.
Mindset
Your goal for Stage 3C is not to achieve 100% mastery of the language. You’re aiming for B2 proficiency. That means you’re able to have casual conversations about your life and topics that you’re interested in using relatively simple, but completely correct, language.
Don’t worry about trying to sound smart or eloquent. Speak simply. Use words and phrases you are confident in. Try not to guess how to say things if you can avoid it. When you do guess, pay attention to what’s a guess and what isn’t. This will help you avoid solidifying bad habits.
Your goal is to get your thoughts across in a way that feels natural and correct. Once you’ve mastered the domain of casual conversation, you can move on to Stage 4 where you will focus on getting more precise and creative with your speech.
Motivation Issues
Slow Output Development
If you feel like your output ability is developing slower than you expected, you may need to adjust your expectations. You’re not going to be a perfect speaker by the end of Stage 3. Don’t forget to look back at your previous ability (writings or recordings) to fully appreciate how far you’ve come.
If that’s not a satisfying answer to you, then you can artificially accelerate your output ability by narrowing the focus of your first output domain. Identify a few specific topics and situations (mini-domains) you want to feel comfortable in and focus all your immersion and output practice on those mini-domains. Master this smaller subset before expanding outward.
Comprehension-Output Gap
If you are frustrated that you can understand way more than you can speak, then I have some bad news for you. This is simply a reality of language. It’s true in your NL as well: most native English speakers can read Hemingway, but few can write like him.
You can narrow this gap more quickly by focusing on mini-domains. For example, if you are a food fanatic and love talking about food, then narrow your immersion to food-related content and your output practice to food-related conversations.
Competence Issues
Fundamentally, all competence issues are solved the same way: more input. However, depending on the type of error, there are a few small tweaks and hacks that can help make the process faster and less painful.
Repeated Grammar Mistakes
If you are frequently using a grammar pattern incorrectly, then you probably have not fully acquired it yet. If so, when you think about how to use this pattern, it may feel fuzzy and unclear.
This is solved by getting more input. In particular, extensive reading (i.e. reading lots of books that are on your level) can help expose your brain to many examples of the grammar pattern and acquire it faster.
In the meantime, you can learn the grammar rule through deliberate grammar study, consciously monitor your output, and correct yourself when needed. Keep in mind that this is a temporary crutch and will not fix the underlying issue; only immersion can do that.
Finding the Wrong Words
If you can only think of the wrong way to say something, that’s usually a sign of interference from your NL.
Oftentimes, an idea you want to express will be associated with the specific way it’s phrased in your NL. This makes it so that when you try to express the idea in your TL, all that comes to mind is a direct translation from your NL.
The key to getting around this is asking yourself the right question. Instead of asking, “How do I say this?”, ask yourself “What would a native speaker say in this situation?”. This subtle reframing of the question will often produce completely different results from your subconscious.
To help make this more concrete, here’s an anecdote we once heard from someone learning Russian.
This learner was speaking with her conversation partner and said “I want to go to Florida to see the sun” in Russian. Her partner was confused; in Russian, they don’t say that.
In English, if you live somewhere with lots of bad weather, it’s common to say “I want to see the sun”. The true meaning behind this expression is “I want to experience nice weather”.
Instead of asking “How do I say ‘I want to see the sun’?”, this learner should have asked, “How would a native speaker say that they want to experience nice weather ?” This might have allowed her to express the same idea in a natural way.
Nothing Comes to Mind
If you are trying to express an idea but can’t find the words for it, try asking yourself if there are any different, but similar, ideas that you do know how to express.
Different languages express different ideas, so sometimes there simply won’t be a natural way to express the particular idea you had in mind. As explained in the previous section, internally reframing the question is often key to sidestepping the patterns of your NL.
Quickly Filling Competence Gaps
There may be situations in which you’re under pressure to fill a gap in your competence as quickly as possible. For example, maybe someone at work asks you to give a talk in your target language and you need to get up to speed before the presentation.
In cases like this, we recommend dropping all other practice and doing an input binge. Watch, read, and listen to every piece of content you can find in the particular mini-domain until you acquire it.
Uncertain Language While Speaking
When you’re writing and aren’t certain about a piece of language, you can verify through native feedback, Twitter, or or Google. When speaking, you can confirm anything you’re uncertain about by asking the native you’re conversing with.
If you have multiple possibilities in your head, you can provide all the possibilities to your partner in the moment and have them confirm which is correct.
However, this will generally interrupt the conversation. Sometimes it’s best to simply make a mental note and look out for it in your immersion later.
Performance Issues
Overthinking During Conversation
Some people get stuck in their head when trying to speak. They are so worried about saying the wrong thing that they end up saying nothing instead.
To overcome this mental barrier, practice continuous monologuing. This means speaking for a full minute without pausing and without worrying about mistakes. Choose a topic that you’re comfortable with and just start talking. Use a timer and speak continuously until the timer goes off.
Another option is to narrow the focus of your output and build full comfort within a mini-domain. Becoming comfortable in one area can catalyze comfort in other areas.
Activation During Conversation Is Too Slow
If you’ve been immersing for a long time but are new to output, you will have a huge pool of acquired language that needs to be activated. Activating this language during a conversation can be frustrating because of how slow the process is. It takes extra time for you to find the right mental query, get the available pieces, and put them together in a coherent manner.
This is why writing can be a good way to activate acquired language. The lack of time pressure frees you up to go at your own pace.
If you’re already comfortable with writing in the form of text conversations but are still struggling with activation, try long-form writing. Long-form writing on a topic will help you activate the language for that topic and make it more available for use during conversation. You can further activate that language by monologuing on the same topic.
Try to write a one-page article on the topic you want to activate, then try to summarize it verbally in your own words without looking at the article. That should activate the language for conversation.
Persistent Bad Habits
Sometimes, a piece of grammar or vocabulary will get acquired and activated incorrectly. Once the bad habit is solidified, it can be difficult to change.
If you only have a few bad habits, then we recommend using a conscious monitor to check yourself whenever you try to use that piece of language. As long as you continue getting input, eventually, the habit should fade away or your conscious monitor will become adept enough to immediately override the habit.
However, if you come from a traditional learning background where you were encouraged to output very early, then you may have solidified a large number of bad habits. In this case, we recommend going through a silent period to reset your output.
Stop outputting for 3-6 months and get as much input as possible. This should reprogram your subconscious and eliminate the bad habits that have formed.
Pronunciation Issues
Persistent Pronunciation Errors
If you can hear that you’re mispronouncing something, that’s often enough for the issue to go away naturally. Unfortunately, this isn’t always the case. The inability to mimic the pronunciation of a specific word or sound has two main causes:
-
You have the wrong mental audio
Your expectation of how something sounds affects the way you hear it. If you learned a flawed mental model of a sound early on, it may have affected the way you heard that sound for the rest of your immersion.
To fix this, use a tool like YouGlish or an audio dictionary to listen to many different examples of the sound.
Try to change your internal subvocalization of the sound to match these examples. Do a shadowing exercise with the audio that you find to repeatedly practice the sound until you can say it correctly.
You may not be able to correct it on your first try, so for persistent issues, practice this every day.
It’s important to note that the pronunciation of specific words or sounds can change depending on the context. You may have learned one of those pronunciations correctly and then tried to apply it to every situation. Pronunciation guides can actually exacerbate this issue by dumbing down their explanations to only account for the most common cases. -
You can’t make the correct mouth movement
You may not fully understand how to arrange your mouth to make a given sound. Pronunciation diagrams can help, but they suffer from the same oversimplification problem described above.
Use the diagrams as a guide, and practice using the same shadowing exercises described in case #1.
NL Accent bleeds through
If your NL accent bleeds through when speaking your TL, then the various pronunciation practice exercises listed in 3B: Pronunciation should help you.
You may want to also avoid speaking your NL for an extended period of time so that your mouth fully adjusts to your TL.
If you still aren’t happy with your accent after exhausting every exercise listed throughout Stage 3, consider hiring a professional accent coach who can give you customized advice.
3C: Activity Guide
At this point, there many different possible activities. You will need to design your own plan and schedule to focus on your personal goals.
There are two different focuses you can choose from:
- Expanding your speaking competence.
- Improving your speaking performance.
Speaking Competence Focus
If you’ve just started speaking, we recommend focusing on competence first. There will be many subtle aspects of native speech that you need to acquire. You’ll also likely still have a few competence gaps leftover from Stage 3B.
To work on your competence, there are three areas you want to focus on:
- Speaking-specific acquisition
- General acquisition
- Activating acquired language
Speaking-Specific Acquisition
As described in 3C: Speaking Competence, there are many new linguistic features that you need to start paying attention to as you refine your speaking ability. You need to train yourself to notice all of these before you can emulate them.
Continue immersing with talk shows until you have level 6 comprehension. Spend time actively listening for each of the new linguistic features.
General Acquisition
As you start speaking, you’ll run into vocabulary and grammar patterns that you’re able to understand, but still aren’t sure how to use. These are small competence gaps that you want to fill quickly. Immerse in the domain of casual conversation (reading and speaking), and any mini-domains that you frequently talk about. Use the advice in 3B: Output Troubleshooting to identify any acquisition gaps and fill them.
WARNING: if you are experiencing an excessive amount of competence errors, that means you aren’t ready for speaking. You should have level 6 comprehension with your parent and slice-of-life TV at this point. If you don’t, then keep immersing !
Activating Acquired Language
Most of your acquired language should have been activated by the writing practice in Stage 3B. If your mind goes blank when trying to speak, you probably need to activate more language.
Keep conversing with people via online text chat. You can also use long-form writing as a way to activate large chunks of newly acquired vocabulary and solidify your grammar abilities.
Most language should be activated and ready for use in speaking, but sometimes you need to say it once or twice to make the final connection. Practice monologuing or casual conversation with natives to expose yourself to situations where you can make the final speaking connection.
Speaking Performance Focus
If you are happy with your current level of competence (ie. you can write comfortably) but you’re frustrated with your speaking ability, then you just need to practice your performance.
Improving speaking performance will help you feel confident and comfortable during conversation. There are four areas you want to focus on:
- Being a good conversation partner
- Comfort in speaking
- Language accuracy
- Pronunciation
Being a Good Conversation Partner
Being a good conversation partner means you can listen to another speaker, pay attention to what they’re saying, and give them the appropriate feedback to let them know you’re listening.
The easier you can understand your partner, the better you will be able to listen to them. Immerse with talk shows and other noisy audio to improve your listening ability until it’s effortless. Pay special attention to backchanneling, speaker transitions, and social reactions so you can understand what’s appropriate for your language and culture. Try to emulate these when you’re having casual conversations with natives.
Speaking Comfort
Becoming comfortable with speaking is all about practice. You just need to expose yourself to conversations repeatedly and often. Use monologuing as a way to practice with less pressure, but make sure you are spending time having real conversations with real people as well.
If you’re having trouble getting comfortable, check out 3C: Speaking Troubleshooting for tips on how to implement
Language Accuracy
You need to make sure you’re using the language correctly. Recording your conversations and listening back can help you improve language accuracy, but it’s also important to get native feedback. A native will point out gaps in your linguistic ability that you wouldn’t notice yourself.
See 3C: Speaking Practice for an explanation of how to get feedback on your speaking ability.
Pronunciation
All of the exercises outlined in 3B: Pronunciation Training are still applicable. Make sure you are still actively immersing with your parent and paying attention to the linguistic features outlined in 3C: Speaking Competence.
Keep shadowing, but also try imitating your parent as described in 3C: Speaking Practice.
Example Schedule: Competence
Assuming you have two hours of active time to spend per day:
- 15 min Anki
- 60 min immersion with talk shows and slice-of-life
- Plus additional passive listening throughout the day.
- 45 min activation and speaking practice
- Casual conversation or writing
Example Schedule: Performance
Assuming you have two hours of active time to spend per day:
- 15 min Anki
- 60 min immersion with talk shows and parent
- Plus additional passive listening throughout the day.
- 45 min speaking or pronunciation practice
- Shadowing
- Imitation
- Corrective conversation
Level Up
By the end of Stage 3, you should be comfortable with everyday speech. Move on to Stage 4 when you want to expand into new domains.
Back to Blog